What to paint for Easter with paints. How to draw Easter: Easter cake in watercolor - step by step instructions with a photo
Today young artists(as well as their parents) the next task is to learn how to draw Easter. This is quite easy to do using geometric figures, which make up Easter itself, and festive painted eggs!
But first, a little history
Easter holiday in Orthodox tradition installed in memory of the bright Resurrection of Christ and is considered one of the most important in church calendar. It is not determined by a fixed date - it falls in April or May (calculated according to the lunar calendar).
When Jesus was crucified and buried not far from the place of execution, in a cave, on Sunday morning, Mary Magdalene and two other women came to his tomb. They wanted to wash and anoint Christ's body with incense, but they noticed that the tomb was empty! The women began to wonder, and then two men in shining clothes appeared to them and said: “Why are you looking for the living among the dead?” They meant that Christ is Risen! This event is considered by all Christians to be the greatest, giving salvation to everything. the human race, around the world. They say that if Christ is not Risen, then faith is in vain!
The ambience of the holiday was also impressive. Midnight ringing (blagovest), priests and chandeliers, crosses. Vespers, Matins, Festive Liturgy. After the service, the believers congratulated each other, kissed each other three times, and "christened each other". And then they exchanged eggs, which were painted red (a symbol of the blood of Christ). On Easter, the breaking of the fast after Great Lent also began. First, a family meal, without guests. And then on the table appeared Easter cakes and Easter (or, as we are used to saying, "Paski" - sweet pastries with cottage cheese and raisins, necessarily consecrated in the church) framed by painted chicken eggs.
Step-by-step instruction
But let's get down to creativity. How to draw Easter with eggs? Let's use simple oval, semicircle, rectangle. And also, we will need: a sheet of paper, an eraser, a simple soft pencil or coal.
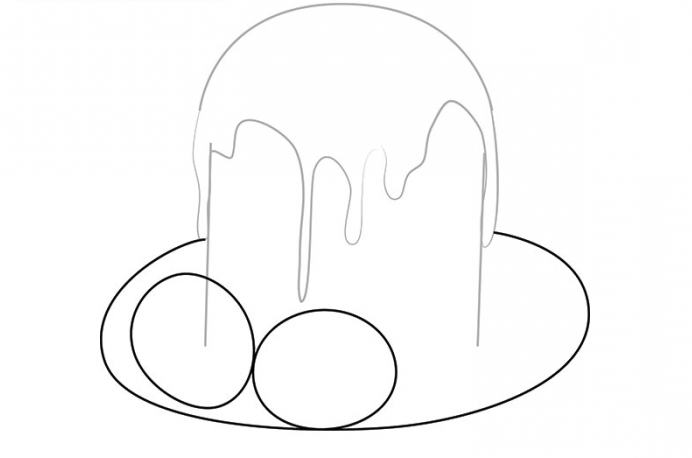
Step 1. In the middle of the sheet, draw a rectangle stretched upward. That is, its height must be greater than its width.
Step 2. On top of the rectangle we depict - so far schematically - a hat in the form of a semicircle.
Step 3. At the bottom along the perimeter of the figure we draw several ovals, these are future eggs.
Step 4. The whole resulting design is on a special plate. We depict it in the form of an oval.
Step 5. The sketch is ready. We continue the lesson on the topic “How to draw Easter?” Let's get down to detail. We remove unnecessary lines. We draw the contours.
Step 6. Our lesson on how to draw Easter with a pencil is coming to an end. Add volume to the shapes with shadows.

Coloring
Easter is light and bright. Therefore, it is necessary to color our drawing!
Soak the watercolor. Choose clean, unambiguous colors: blue, yellow, green. “Paint” the eggs on our Easter (or rather, paint)? Easter itself is light brown, the icing cap is white with multi-colored splashes. Don't be afraid to paint with watercolor over pencil or charcoal lines. They will show through the diluted paint, retaining their shape. Baking is sprinkled with multi-colored crumbs on top - do not forget to display this in the picture. The plate can be made wicker - it will be more believable and more beautiful. If you wish, write under the picture "Happy Easter" or something like that - festive. And on the side you can draw a sprig of blossoming cherries. In general, a flight of fancy is strongly welcomed! Now you know how to draw Easter step by step.
On this holiday - Great Day - it was customary to give each other beautiful postcards with best wishes and happiness. In our time, their samples can be found in Orthodox literature, but it’s better to try to come up with it yourself. How to draw on First, let's decide what we will depict. For example, you can try - and this is the very first thing that comes to mind - beautiful in a basket!
Lesson 2
For the postcard, select the appropriate sheet of paper. You can fold A4 in half so that you can write a personal congratulation inside. Outside is a picture!
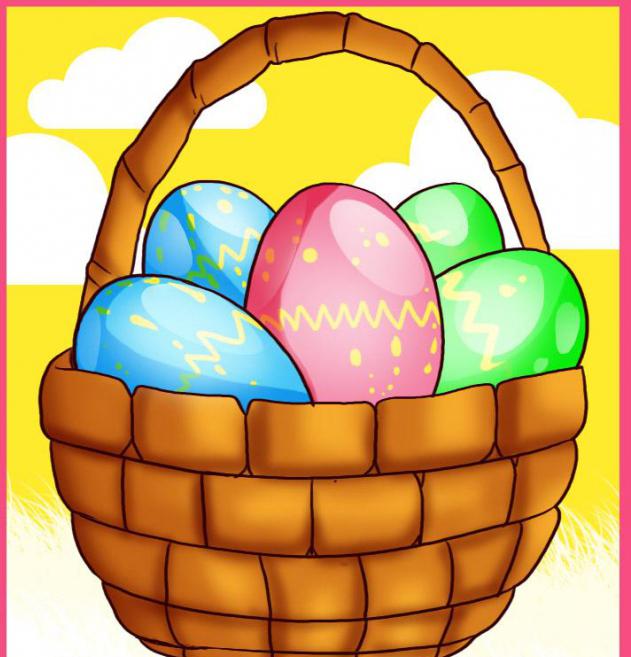
Step 1. Let's start with a sketch of the basket. We draw a circle, then draw a line - curved - on one third of the circle. We depict schematically the top handle of the basket.
Step 2. Now we draw the eggs inside the basket - almost regular ovals, slightly pointed on one side. We fill our basket with eggs. Sizes are proportional. Quantity is optional.
Step 3. We draw the details of the basket. Let's make it braided.
Step 4. We erase all extra lines with an eraser. Our neat and very clean basket is not finished yet.
Step 5. And now we paint Easter eggs in festive bright colors. Everyone draws according to their own taste, but we advise you to use pure light colors! The basket itself, as it should be, is painted light brown, dark brown and blue with shades. We finish the shadows and reflections for greater plausibility of the picture.
Step 6. We sign our resulting postcard. Outside - "Happy Easter", for example. And inside we come up with an individual congratulation for your dear person.
Results
In this lesson, we figured out how to draw Easter, how to make a postcard for congratulations on your own. We hope you find this knowledge useful. Please your loved ones with a beautiful homemade postcard! Good luck!
Friends, I'm glad to see you at my place! Today we will continue to create. In our creative workshop, we will continue the previously started theme of Easter. We already know how and what to tell our kids about the history of the holiday. And today we will elegantly decorate this event with vivid illustrations. And do-it-yourself drawings for Easter for children will help us in this. That is what we are going to talk about now.
If you are interested in a specific attribute of Easter, then use the links in the content.
In the previous thread about doing school assignment or what was given kindergarten, we have already chosen pictures that our baby can portray. But it was one, maximum two works. And now we are not limited in anything. Our baby can sit with pencils all day long. It is only worth directing him, suggesting a topic, and he can begin to create his masterpieces.
Here is this article in order to help with the choice of topics, the one that is relevant for public holidays. And to show how some illustrations are done. By the way, I remind you that you can use templates for sketching, this was my last article. This offer will appeal to those kids who are still too young to cope with the whole picture on their own, from sketching to coloring it. And, if the little one is already old enough or he just doesn’t like to draw, then take a look at the article about crafts on the Easter theme. I think you can pick interesting activity for their kids.
This spring event is filled with bright colors and symbols. It is they who will be the main theme of the work of our crumbs. Namely:
- Willow;
- Kulich;
- Eggs;
- chickens;
- Rabbit.
Let's see how to draw pencil all these items. And then the kid himself will be able to pick up desired flowers to make the picture brighter.
Willow

kulich
- We depict a rectangle on the sheet, slightly elongated upwards.

- Draw a straight line at the top and bottom.
 Only top part it is also complemented by a curved line to make a small oval.
- At the top we draw a burning candle.

- The top of the cake is decorated with spreading glaze. This can be displayed with a jagged line. Under the Easter cake in the picture we make willow branches.

- We erase the extra lines on the cake.

- Sprinkle small decorations over the glaze.

- We make fluffy willow. We thicken the branches. We draw the edge of the table, drawing on the tablecloth.

- Coloring. The easiest is pastel. We randomly apply colors: ocher, brown, orange on the cake dough. Blend with a finger. There should be darker spots under the glaze - a shadow.

- With white pastel, apply strokes to the glaze and blend.


- We color the sprinkles, candle, tablecloth to taste. We paint the willow with white.

- Final touches: we make light from a candle, we finish the willow branches.
 More options:


Eggs


chickens

- Draw the egg up with a sharp end.
- Just above the middle line we make a small triangle. This is a beak.
- Above the triangle, right at the top of the oval, we draw a crest. Several triangles connected to each other.
- On the sides, parallel to the beak, we depict wings of an oval shape elongated downward.
- Slightly above the beak, we put dots on both sides of it. Chicken eyes are ready.
- Below draws paws. Two sticks, at the end they diverge in three directions.
Second option- see step-by-step photos in the gallery. Pictures are clickable


Rabbit
I will show and tell step by step :
- We make a circle. And under it is an oval so that the top of the oval is occupied by a circle.

- Draw a horizontal ellipse at the bottom of the circle, the edges of which go beyond the circle. These are rabbit cheeks.

- We make the body a little narrower at the top and thicker at the bottom.


- A small fluffy tail peeks out from the side.

- On the head is a small forelock.

- Ears extended to the top. And inside them are parallel lines.

- In front of the tummy, the rabbit holds a small egg.

- The lower paws are circles at the bottom of the body. Upper from the sides stretch to the tummy.

- A nose is drawn on the muzzle in the middle, a mouth and teeth go down from it, which look out of the rabbit.

- Eyes and antennae are depicted from the spout on the sides.

- The picture can be colored.
Friends, look at the site more often, a subscription will help you with this. I try to find topics of interest to you that are aimed at helping you. You can tell your friends about the site so that they receive timely tips for all occasions. And that's all for today.
Options simple drawings for Easter with children.
Simple beautiful drawings with children for Easter: from simple to complex ways, drawings with a simple pencil or paints.
The end of Great Lent and the expectation of the brightest and most joyful holiday evoke an extraordinary state in the hearts of Orthodox Christians, which cannot be explained.
Enthusiastic feelings, an elevated feeling of grace on bright Easter days emphasize special holiday rituals.
Easter preparations start early. Christians pray, cleanse spiritually and physically. You can congratulate relatives on this important event and convey sincere warm congratulations using your own drawing made in the Easter theme.

Children also look forward to Easter, during which the days are filled with special fun, games, entertainment and gifts.
Children can make some of these symbolic gifts with their own hands: for example, draw beautiful drawings with Easter cakes, painted eggs and willow branches.
Let's try to draw a picture for Easter. by using step by step photos you will master the basics of drawing by Easter, and you will be able to present the result of your creativity to family and friends.
We will draw Easter cake- traditional Easter baking, which is a symbol of the presence of God in this world and his care for all people.

For drawing you will need:
- blank sheet of paper
- simple pencil
- colour pencils
- eraser
- black gel pen or marker

Let's start creating an Easter picture:
- On a piece of paper, let's mark the borders of the Easter cake with straight lines resembling a square in shape. You need to do this without pressing on the pencil, otherwise the drawing will look sloppy after all unnecessary lines are erased with an eraser.

- Let's draw the top and bottom parts of the Easter cake: draw rounded lines above and below the square.

- We draw another arc - under the upper curved line, connecting them into an oval. The top of the future Easter cake is almost ready.

- Let's draw a candle, defining the center of the oval and add the folds of the napkin on which the cake stands - draw a few curved lines right under the base of the cake.

- Let's draw willow twigs: draw a few curved lines for the stems, and then draw oval buds. Please note: closer to the top, the buds are small, and along the rest of the stem they are large.

- We “apply” icing to the cake: we draw smooth winding lines along the walls of the cake, which turn into teardrop-shaped outgrowths. We show the volume glaze under the candle with a small line.

- We draw in more detail the pits on the baking, draw a round "powder" in the form of tiny circles. We finish the hairs on the willow buds and draw one more line on the stems.

- We direct more dark color drawing outline. To do this, you can use a gel pen or felt-tip pen.

- We remove the auxiliary lines.
- We color the Easter cake using colored pencils or felt-tip pens.

What else to draw with children for Easter? For example, here are such brightly colored eggs that are the main Easter attributes:


- Before you start drawing, you can explain to your child the meaning of Easter eggs: for Christians, this ritual festive food means the beginning of a new life.
- Hopes for rebirth and restoration are associated with the egg. One of the festive rituals is to exchange krashanki with friends and acquaintances.
- drawn Easter Egg the child can paint with bright colors, decorate with ornaments and funny figures. In this he will be helped by fantasy and perseverance.
- Thanks to our step by step master classes the child can easily prepare a beautiful colorful drawing on the theme of Easter. The options proposed here will help your child take a worthy place in the competition. children's creativity at school or kindergarten.
- You just need to carefully follow the step-by-step photographs and repeat all the lines exactly. And you can decorate the finished sketch as your heart desires.
For work you will need:
- landscape sheet
- simple pencil
- colored pencils or markers
- eraser
We will try to accurately convey the shape of the egg. To do this, we set ourselves the usual egg. It will serve as a visual aid for us.
- We start with a circle that will need to be “crowned” with a top: we draw a figure above the circle that resembles a triangle, but with a strongly rounded middle corner. The sides of the triangle are the contours of the circle.

Draw a circle and the top of the egg

- Erase the line separating the circle and the triangle with an eraser. We got an egg of the correct shape.
- Easter Egg Decorating: Draw wavy lines, geometric figures. You can draw wide stripes that expand from the top to the sides, enclosing the egg and forming a funny "striped" pattern.


- With colored pencils or felt-tip pens, put on an Easter egg bright colors. The unique author's creation is ready!


- How else to paint an Easter egg? Decorate it with one color, and then draw dots, circles, stripes on its surface with contrasting colors.


Video: How to draw an EASTER EGG?
How to draw a drawing for Easter in stages and easily with a pencil for beginners and children?
Such a drawing can be drawn by an older child preschool age if the class is supervised by an adult.
For work you will need:
- blank sheet of paper
- simple pencil
- colored pencils, paints or markers

- We put the initial lines on the sheet: this will be the top of the cake covered with icing.

- Draw without pressing the pencil. Add depressions and pits of the frozen glaze.

- Now let's finish the cake itself under the "cap" of the glaze.

- In the left corner we draw Easter eggs. To give the picture a festive look, we will “tie” one egg with a ribbon.

- We draw with smooth lines a plate on which the Easter cake stands.
- We refine the contours of the picture and direct them with a darker color. Add shadows under the glaze.

- We draw the contours of Easter eggs and shade some areas on the bow.

- We circle the outline of the plate with a dark color. We decorate the picture with bright colors.
Video: How to draw Easter cake for Easter - a drawing lesson for children from 4 years old, gouache, draw at home in stages?
We continue to draw on the Easter theme. Fortunately, the scope for imagination and creativity here is truly limitless.
A child can draw a basket of Easter eggs and decorate their work with bright cheerful colors. turn out beautiful gift for Easter, thanks to which the house is filled with an atmosphere of celebration.
- Let's start drawing a basket with the image of a circle in the middle of the sheet.
- Let's circle the rim from above, adding curved lines on one side - basket weaving.
- Let's draw grass.
- Draw three Easter eggs in the basket.
- The two curved lines are the handles of the basket.
- We decorate the picture with bright colors.

After watching the video, you will learn how to draw Easter basket. The drawing is not complicated, because it can be used in the classroom in kindergarten or elementary school.
Video: Easter Basket
Do-it-yourself drawings for Easter with children to school and kindergarten
If, on the eve of the Bright Sunday of Christ, an exhibition of drawings on Easter themes is held in a kindergarten or school, then it will not be difficult to prepare a picture or postcard for the holiday with your parents.
Your child can present their vision of this happy holiday or make a drawing using step by step description below.
Drawing Easter bunnies with children:
- Let's draw four circles on a sheet of paper, arranged in pairs one on top of the other.

- The circles drawn on top are the heads of the rabbits, which should be larger than the circumference for the body. Draw two intersecting lines on the head.

- Let's draw in more detail the contours of the rabbits' heads. Let's add ears, perky bangs and details of muzzles.

- Let's finish the pupils, inner lines of the ears, antennae, eyebrows.
We draw the front paws and the contours of the tummy. - Now add hind legs. The rabbit on the right is holding a basket in its paws. Let's draw it, starting with a circle and specifying its shape.

- We add the missing details: the eggs in the basket, the heels of the rabbit, which lies on the left.

- The finished sketch is easy to “turn” into a handmade postcard if you decorate it beautifully and sign it.


How to decorate Easter Bunnies
Drawings for Easter with paints for the competition
You can convey the atmosphere of the holiday of resurrecting life with the help of an Easter still life painted with paints.
We will draw Easter cake, colorful eggs and willow branches.
For work you will need:
- sheet of watercolor paper
- simple pencil (B or B2)
- eraser
- gouache or watercolor
- brushes
- palette or any other flat white surface (saucer or plain sheet paper)
- masking tape

We fix a sheet of paper vertically with masking tape. Approximately we outline with a simple pencil (without pressure) the location of the Easter cake, a vase for willow and colored eggs.
- We divide the sheet into upper and lower parts and draw horizontal line just below the median line of the leaf. This will be the edge of the table. Let's draw a rectangle on the table, placing it not in the center, but slightly shifting it to the left side.

- We draw in the right half of the sheet and a little higher one more rectangle: narrow and small. We finish the edge of the plate with Easter cake. We remove the extra pencil lines (the line of the table and the lines inside the objects) so that they do not interfere with us when drawing.

Draw the line of the table and the edge of the plate
- We erase the upper corners of the rectangles with an eraser and refine the contours of the Easter cake and the vase.

- We take round objects of a suitable size and begin to draw eggs located around the Easter cake. The nearest Easter eggs are depicted larger in size than the distant ones.
- We draw the contours of the eggs, the edges on the vase and add the icing on the cake.

- Now you need to draw a candle. In order not to complicate our task, we simply put a simple pencil on the top of the cake and circle it, adding a small light on top.

- We draw a plate under the Easter cake. We fill the empty space of the lower right part of the sheet with a large Easter egg.

- We finish the willow twigs, correcting or shortening, if necessary, the top of the candle.

- Add buds on willow branches.
- We write on the nearest egg two letters "ХВ", meaning Christ is Risen.

- We draw a pattern on Easter eggs.

- We take paints and start decorating our Easter picture.
- We paint over the Easter cake with a light beige color with the addition of a sandy yellow tint.
- We add a little of blue color to the shade of the cake.

Coloring the icing and adding a yellow candle light
- We are preparing a suitable shade for painting over a candle and partially an egg. It could be ocher paint.

- some pink and blue color add to frosting. in yellow paint over the flame of the candle. We draw light in a circular motion.

- We paint the background with soft blue and turquoise colors.

- Let's go through the same color along the contour of the willow branches.

- Adding yellow to the flame of a candle.
- We collect alternately pink paint, diluted with water, orange and fill the background on the left.
- We paint over the surface of the table, allowing the colors to mix.
- Coloring Easter eggs. To make the picture more picturesque, we use red, red-orange and red-brown tones for some eggs.
- We draw purple shadows on the table, under the egg and under the willow.
- We begin to paint over the vase with a neutral blue color. Add some yellow.
- We decorate the willow, showing tousled small fluffy inflorescences.
Draw a pattern on Easter eggs, add shadows


Video: Video lesson Draw Gouache Easter Bunny
0 786891
Photo gallery: Create together: how to draw Easter and what else you can draw for Easter
On the eve of the bright holiday of Easter, I would like to congratulate my relatives and friends in such a way that, along with warm wishes, I also give them a piece of my soul. The best way to do this is with handmade Easter cards. Such a homemade postcard can be issued in different techniques: decoupage, patchwork, applications. But we recommend paying special attention to Easter-themed drawings, which can beautifully decorate any congratulation. For example, you can draw an Easter or a krashanka - this is always relevant and very simple. How to draw Easter and other holiday drawings will be discussed further.
How to draw Easter: Easter cake in watercolor - step by step instructions with a photo
This Easter drawing can be used both for postcard decoration and as an independent gift - a watercolor painting. If you are not good at working with watercolors, then you can color the drawing with colored pencils or acrylic paints.

Necessary materials for drawing Easter
- watercolor (colors: carmine, ultramarine, dark green, golden ocher, burnt umber, blue, orange)
- round brush with fine tip
- watercolor paper
- simple pencil
- palette (sheet of paper)
- rag
Draw Easter with your own hands: Step by step instructions

What to draw for Easter: Easter basket with eggs - step by step instructions with a photo
Egg basket - another one a win-win a picture that you can draw for Easter. Like Easter cake, drawing such a festive basket is not difficult at all. It is enough to have elementary artistic inclinations and follow our step-by-step instructions. So, find out what else you can draw for Easter...

Necessary materials for the picture for Easter
- paper
- simple pencil
- black marker
- colour pencils
- eraser
Draw for Easter: Step by step instructions

We hope that the master classes prepared by us will teach you how to draw Easter and other traditional attributes of this holiday easily and simply. In any case, you can always make your own adjustments to the work, using our instructions with photos as a basis for creativity. The main thing is that in the end you get beautiful and interesting drawings which are so nice to give for Easter to relatives and close friends.
Every year after the end of Lent, Orthodox Christians celebrate Easter, the brightest and most joyful holiday. To that important event it is customary to prepare in advance - through prayers and repentance, spiritual and physical cleansing. Children are especially looking forward to Easter, for whom these wonderful days filled with fun games, entertainment and symbolic gifts. In addition, on the eve of the great holiday, kids make handicrafts from improvised materials and draw beautiful drawings on the theme of Easter. How to draw a picture for Easter? We picked simple master classes with a photo on creating drawings with a pencil and paints for children - with the help of our lessons, children will be able to gradually master the basics of this type visual arts. Most best work can be sent to a children's drawing competition in a kindergarten, school, or simply presented to relatives and friends for Easter.
Beautiful drawing for Easter - a simple master class for children with step by step photos
Kulich is considered a traditional Easter pastry, symbolizing the presence of God in this world and His care for all people. On Easter, it is customary to send holiday cards to each other with the image of Easter cakes and painted eggs - with kind words congratulations and wishes. We bring to your attention a simple master class for children with step by step photos on the theme "Easter cake", having mastered which you can draw a beautiful picture and please your parents with a touching gift.
Necessary materials for the master class of children's Easter drawing:
- white paper A4
- black gel pen
- simple and colored pencil for coloring
- eraser
A step-by-step description of the master class on creating an Easter cake drawing, with a photo:
- On a sheet of paper, draw a medium-sized square.

- We draw a rounded line above the square and draw the same one from below.

- To the upper arc, you need to draw another one and connect them into an oval - this is the top of the future Easter cake.

- We draw a candle in the center of the top, and at the bottom we add a few thin lines, indicating a napkin for the Easter cake.

- Near the Easter cake we draw willow twigs - with stems and buds.

- Now we “apply” white icing on top of the Easter cake using smooth winding lines.

- Outline the drawing with black gel pen, not forgetting to depict “powder” on the surface of the cake - in the form of small circles.

- Use the eraser to erase the extra lines.

- It remains to color the Easter cake with colored pencils and our drawing is ready! For children, it is quite possible to draw such a symbol of Easter, showing a little perseverance and diligence.

Children's drawing for Easter to school with a pencil - a master class in stages for beginners, with a photo
Colored eggs are one of the main Easter attributes and ritual festive food. For Christians, an egg means rebirth, restoration, the beginning of a new life. According to tradition, on Easter it is customary to exchange bright krashanks with family and friends, as well as to conduct many important rituals. Many children's drawings depict multi-colored Easter eggs, decorated with ornaments and funny figures - here you can fantasize from the heart! With the help of our master class, drawing an Easter egg with a pencil will not be difficult even for novice artists. following closely step by step instructions with a photo, children will be able to make a beautiful drawing for Easter with their own hands, which will take its rightful place in the children's art competition at school.
The list of materials for the drawing master class for Easter:
- sheet of white paper
- simple pencil - brand HB
- eraser
- colored pencils or markers
Description of the master class on drawing an Easter egg, step by step with a photo:
- For creating beautiful drawing eggs, the main thing is to convey its shape on paper as accurately as possible. As " visual aid"You can take an ordinary chicken testicle. First, we draw a circle and “crown” it with the top in the form of a triangle with a rounded middle corner. Two sides triangles tightly "cover" the egg, forming a single whole. In this case, the diameter of the circle should be equal to the height of the triangle.

- The line separating the circle and the triangle is no longer needed for us - it needs to be erased with an eraser. It turns out an egg of the correct shape.

- Let's start decorating the Easter egg - lines, geometric figures, drawings. For example, we draw smooth lines, which expand from the top to the sides of the egg. Such transverse lines "cover" the egg, forming a funny "striped" pattern.


- We take colored pencils or felt-tip pens and color our Easter egg, creating a unique author's creation.

- The egg can be made solid, and then circles or other shapes can be drawn on the surface by painting them in contrasting colors. That's it, it turned out to be a cute Easter egg - a great hand-drawn gift for the Easter holiday.

Drawing for Easter in kindergarten with paints - a master class with step-by-step photos
Children's drawings reveal inner world little artist, his thoughts, experiences, emotions. On the eve of Easter in kindergarten, drawing classes are held, in which kids are happy to draw on paper with pencils or paints various Easter attributes - Easter cakes, colorful eggs, rabbits, chickens. Of course, the plots of such drawings are childishly cute and unpretentious, but they always fascinate with their touching purity and freshness of colors. Our master class step by step photos dedicated to the theme of Easter and is intended for children of preschool age.
For a drawing on the theme of Easter, you will need the following materials:
- A4 paper
- simple pencil - HB
- colored paints - for coloring
Step-by-step instructions for a master class on drawing a children's Easter drawing, photo:
- On a sheet of paper with a simple pencil, draw the outlines of the glaze, trying to draw light thin lines.

- Under the “cap” of icing, we depict the Easter cake itself.

- Near the Easter cake we outline the contours of the eggs, one of which we “tie” with a bow.