How to draw a beautiful Easter drawing. Video: Drawing Easter: Easter cake, eggs
Today young artists(as well as their parents) have another task ahead: to learn how to draw Easter. This is quite simple to do, using geometric shapes that make up both Easter itself and festive painted eggs!
But first, a little history
Easter holiday in Orthodox tradition installed in memory of the bright Resurrection of Christ and is considered one of the most fundamental in church calendar. It is not determined by a constant date - it falls in April or May (calculated according to the lunar calendar).
When Jesus was crucified and buried not far from the place of execution, in a cave, on Sunday morning, Mary Magdalene and two other women came to his tomb. They wanted to wash and anoint Christ’s body with perfume, but they noticed that the tomb was empty! The women began to be perplexed, and then two men appeared to them in sparkling clothes and said: “Why are you looking for the living among the dead?” They meant that Christ is Risen! This event is considered by all Christians to be the greatest, granting salvation to everything. to the human race, to the whole world. They say that if Christ is not Risen, then faith is in vain!
The surroundings of the holiday were also impressive. Midnight ringing (blagovest), priests and chandeliers, crosses. All-night vigil, matins, festive liturgy. After the service, the believers congratulated each other, kissed three times, and “shared Christ.” And then they exchanged eggs, which were painted red (symbol of the blood of Christ). The breaking of the fast after Lent also began on Easter. First - a family meal, without guests. And then Kulich and Easter appeared on the table (or, as we are used to saying, “paska” - sweet pastries with cottage cheese and raisins, always consecrated in the church) framed by painted chicken eggs.

Step-by-step instruction
But let’s finally get down to creativity. How to draw Easter with eggs? Let's use simple oval, semicircle, rectangle. We also need: a sheet of paper, an eraser, a simple soft pencil or coal.
Step 1. In the middle of the sheet we draw a rectangle, elongated upward. That is, its height should be greater than its width.
Step 2. On top of the rectangle we depict - for now schematically - a cap in the form of a semicircle.
Step 3. At the bottom along the perimeter of the figure we draw several ovals; these are future eggs.
Step 4. The entire resulting structure stands on a special plate. We depict it in the form of an oval.
Step 5. The sketch is ready. We continue the lesson on the topic “How to draw Easter?” Let's get down to detail. Remove unnecessary lines. Draw the contours.
Step 6. Our lesson on how to draw Easter with a pencil is coming to an end. Give shapes volume using shadows.

Coloring
The Easter holiday is light and bright. Therefore, we need to color our drawing!
Wet the watercolor. Choose clean, unambiguous colors: blue, yellow, green. “Paint” the eggs for our Easter (more precisely, paint them)? Easter itself is light brown, the top of the glaze is white with multi-colored splashes. Don't be afraid to paint over pencil or charcoal lines in watercolor. They will appear through the diluted paint, retaining their shape. The top of the baked goods is sprinkled with multi-colored crumbs - don’t forget to show this in the picture. The plate can be made of wicker - it will be more believable and beautiful. If you wish, write under the picture “Happy Easter” or something like that - festive. And on the side you can draw a branch of a blossoming cherry. In general, flights of fancy are strongly encouraged! Now you know how to draw Easter step by step.
On this holiday - Great Day - it was customary to give each other beautiful cards with wishes of goodness and happiness. Nowadays, examples of them can be found in Orthodox literature, but it’s better to try to come up with them yourself. How to draw on First, let's decide what we will depict. For example, you can try - and this is the very first thing that comes to mind - beautiful ones in a basket!
Lesson 2
For the postcard, select the appropriate sheet of paper. You can fold A4 paper in half so that you can write a personal greeting inside. And there’s a picture outside!
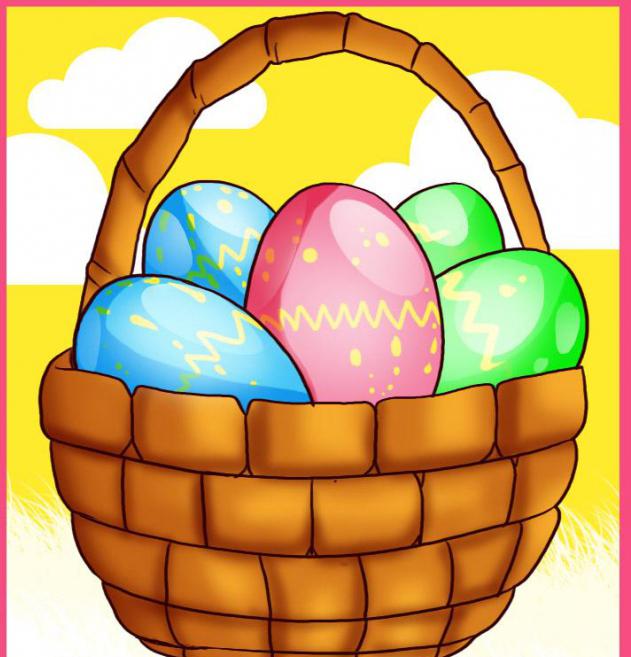
Step 1. Let's start by sketching the basket. Draw a circle, then draw a line - curved - one third of the circle. We schematically depict the top handle of the basket.
Step 2. Now we draw the eggs inside the basket - almost regular ovals, slightly pointed on one side. We fill our basket with eggs. Dimensions are proportional. Quantity is your choice.
Step 3. Draw the details of the basket. Let's make it wicker.
Step 4. We erase all unnecessary lines with an eraser. Our neat and very clean basket is not finished yet.
Step 5. Now let’s paint Easter eggs in bright festive colors. Everyone draws according to their own taste, but we recommend using pure light colors! We paint the basket itself, as appropriate, with light brown, dark brown and blue shades. We add shadows and highlights to make the picture more believable.
Step 6. We sign our resulting postcard. Outside - “Happy Easter”, for example. And inside we come up with an individual congratulation for your loved one.
Results
In this lesson, we figured out how to draw Easter, how to make a greeting card yourself. We hope that this knowledge will be useful to you. Please your loved ones with a beautiful homemade card! Good luck!
Easter is one of the brightest, joy-filled holidays. Having understood how to draw Easter, you can create a picturesque postcard on your own that will become a great gift for loved ones on this occasion. For example, you can learn how to draw Easter with eggs, because eggs are one of the most striking attributes of this spring holiday. Of course, you need to draw not ordinary eggs, but painted ones, both plain and with all sorts of patterns, sometimes very intricate ones.
Before you draw Easter you need to prepare:
1). Multi-colored pencils;
2). Paper;
3). Pencil;
4). Liner;
5). Eraser.
The easiest way to learn how to draw Easter with a pencil is to do it step by step:
1. First, with light strokes made in pencil, outline the outlines of the main objects - eggs, Easter cake and vase;

2. Draw the jug. Draw the willow branches that are in it;

3. Draw the eggs, depicting various patterns on them. Draw an outline of frosting at the bottom of the cake;

4. Draw the top of the Easter cake. Draw a lit candle. Draw a checkered tablecloth;

5. Having understood how to draw Easter step by step with a pencil, you can move on to the next stage - outlining the sketch with a liner;

6. Erase the pencil image with an eraser;

7. Color the Easter cake in brown tones. Shade its glaze with lilac and blue tones. Color the sprinkles various shades. Use red, yellow and orange pencils to color the candle;

8. Color the eggs, choosing the brightest and most saturated colors;

9. Color the willow branches in brown tones, and shade its heads with pencils in gray and yellow tones;

10. Shade the main part of the jug brown. Color in the pattern on this jug with pencils in yellow and soft pink shades;

11. Paint the tablecloth in blue and light green tones.

The Easter still life drawing is ready! Now you yourself know how to draw Easter step by step, which means you can independently create a picture with a similar plot. To color such a picture, it is not at all necessary to use multi-colored pencils. Paint, such as gouache, which is distinguished by bright and rich shades, is also perfect for this purpose. And in order to make the Easter still life more delicate and airy, it is recommended, on the contrary, to use watercolor, which many artists love for its translucent shades and economical consumption.

Drawings on the theme “Easter” are a wonderful opportunity for children to master the technique of creating a classic still life. Therefore, schoolchildren can already be offered to make drawings with their own hands - for children school age still life is integral part general educational program.
We will make sure that our drawings are not boring, but beautiful. You can bring a basket, Easter eggs and eggs to school, which will help you recreate the desired image. You can do without nature.
As usual, creating a picture begins with designing the background. We take a white sheet thick paper(for watercolors or sketches) and fix it on the easel. You can do without an easel by placing the sheet on the table.

The first task that a child has to cope with is to draw with a simple pencil basket. We start drawing it with four ovals located in parallel planes. They differ in size, following the contours of the basket. Then the side walls are drawn and that part of the ovals that we cannot see due to the fact that it is hidden by the rods is erased. After this, the rods and the handle themselves are drawn.


Considering that the drawing is created by children, you can deviate a little from the requirements for a still life and enliven the picture with a cheerful character -.

Our sketch is ready!
Now all that remains is to fill it with color, taking into account the distribution of light and shadow. The basket turns brown.

Easter - pale yellow-beige.

Their tops are snow-white.

The bow becomes just as snow-white.

And three eggs that lie next to the basket.

The bars of the basket are drawn with a dark brown felt-tip pen.

The back of the chicken is lightened with white.

And then it turns yellow.

The entire chicken is covered in yellow color.

And with the same paint dots are applied to the bow and patterns on.

We draw the details with pencils.

And we highlight the bow and Easter eggs with bright colors.

Now the fun part - we take real sprinkles for Easter cakes.

Friends, I’m glad to see you as a guest! Today we will continue to create. In our creative workshop we will continue the previously started topic about Easter. We already know how and what to tell our kids about the history of the holiday. And today we will elegantly decorate this event with bright illustrations. And do-it-yourself Easter drawings for children will help us with this. This is exactly what we will talk about now.
If you are interested in a specific Easter attribute, then use the links in the content.
In the previous topic about execution school assignment or what was given in kindergarten, we have already chosen pictures that our baby can draw. But it was one, maximum two jobs. And now we are not limited in anything. Our little one can sit with pencils all day long. You just need to guide him, suggest a topic, and he can begin to create his masterpieces.
This is exactly the article to help you choose a topic that is relevant for holidays. And to show how some illustrations are done. By the way, I remind you that you can use templates for sketching, my last article was about this. This proposal will appeal to those children who are still too young to handle the whole picture themselves, from sketching to coloring it. And, if the little one is already old enough or he simply doesn’t like to draw, then take a look at the article about Easter-themed crafts. I think you can pick it up interesting activity for your kids.
This spring event is filled with bright colors and symbols. They will be the main theme of our little ones’ works. Namely:
- Willow;
- Kulich;
- Eggs;
- Chickens;
- Rabbit.
Let's see how to draw pencil all these items. And only then the baby will be able to choose necessary flowers so that the picture becomes bright.
Willow

Kulich
- We draw a rectangle on the sheet, slightly elongated upward.

- We bend a straight line at the top and bottom.
 Only top part it is also complemented by a curved line to create a small oval.
- At the top we draw a burning candle.

- The top of the cake is decorated with spreading glaze. This can be represented by a jagged line. Under the Easter cake in the picture we make willow branches.

- Erase the extra lines on the Easter cake.

- Sprinkle small decorations over the glaze.

- Making a fluffy pussy willow. Thicken the branches. We draw the edge of the table, the pattern on the tablecloth.

- Let's color it. The easiest way is pastels. We randomly apply colors: ocher, brown, orange onto the Easter cake dough. Shade with your finger. Under the glaze there should be darker spots - shadow.

- Using white pastel, apply strokes to the glaze and shade it.


- We color the sprinkles, candle, tablecloth to taste. We paint the willow white.

- Finishing touches: adding light from the candle, finishing with willow branches.
 More options:


Eggs


Chickens

- Draw the egg with the sharp end up.
- Just above the middle line we make a small triangle. This is a beak.
- Above the triangle, right at the top of the oval, we draw a ridge. Several triangles connected to each other.
- On the sides, parallel to the beak, we depict wings of an elongated oval shape.
- Just above the beak, we put dots on both sides of it. The chicken's eyes are ready.
- Below he draws paws. Two sticks, at the end they diverge in three directions.
Second option- look step by step photos in the gallery. Pictures are clickable


Rabbit
I'll show and tell step by step :
- Let's make a circle. And under it there is an oval so that the top of the oval is occupied by a circle.

- At the bottom of the circle we draw a horizontal ellipse, the edges of which extend beyond the circle. These are rabbit cheeks.

- We make the body a little narrower at the top and thicker at the bottom.


- A small fluffy tail peeks out from the side.

- There is a small forelock on the head.

- Elongated ears. And there are parallel lines inside them.

- The rabbit holds a small egg in front of its tummy.

- The lower legs are circles at the bottom of the body. The upper ones from the sides reach towards the tummy.

- A nose is drawn in the middle of the muzzle, from it goes down the mouth and teeth, which look out on the rabbit.

- Eyes and antennae are depicted on the sides of the nose.

- The picture can be colored.
Friends, check the site more often, subscribing will help you with this. I try to find topics of interest to you that are aimed at helping you. You can tell your friends about the site so that they too receive timely advice for all occasions. That's all for today.