Draw a picture on the theme of winter with a pencil. How to draw a winter forest landscape
Winter night in gouache step by step for children from 5 years old. Master class with step-by-step photos
Master class on painting with gouache from 5 years old “Winter landscape”. Color streamers
Author: Natalya Aleksandrovna Ermakova, Teacher, Municipal Budgetary educational institution additional education children "Children's art school named after A. A. Bolshakov", the city of Velikiye Luki, Pskov region.Description: The master class is intended for children from 5 years old and their parents, educators, and additional education teachers.
Purpose: interior decoration, gift, drawing for exhibitions and competitions.
Target: creation of a decorative landscape "Winter Night" using the gouache technique.
Tasks:
-continue to introduce children to the expressive features of the colorful material gouache: applying a stroke, working with several colors at the same time, creating color stretches;
- practice using the brush with the entire bristle and its tip;
-develop a sense of color and aesthetic taste.
Hello, dear friends and guests! I present to your attention a master class on drawing a decorative landscape. During school year I offer children several classes that include exercises on working with color and creating color stretches. This second lesson is held in winter, welcome to our creative workshop!
Materials and tools:
-sheet of A3 paper
-brushes
-rag
-jar
-palette (in case of limited color range - children create desired color, we get acquainted with this in previous lessons)

Progress of the master class:
We begin work on the landscape with a white round spot; later it will turn into the disk of the moon. Then around the stain we apply semicircular strokes of red, orange and yellow.

We wash the brush and begin to carefully mix these colors in a circle. We make semicircular strokes on the border of the colors - smoothly connect one color to another, wash the brush periodically. For good connection colors, it is important that the paint layer is wet, the gouache has a creamy consistency (if the paints are dry, then they need to be filled warm water, let it brew, and then carefully drain the water).

All work on the background consists of circular strokes, as if we were building a snowball. We are gradually putting it into operation various colors and carefully connect them together.

For more subtle transitions, we sometimes use white.

Next to the yellow stripe we draw in blue.

We wash the brush, move it along the border of yellow and blue, we get greenish shades. Clumps of green color form on the brush; add strokes of it to the outer edge of the blue.

Next, we work with several colors at once - apply chaotic strokes of white, burgundy and blue.

Using a clean brush, combine the colors and carefully mix them together.

It is not necessary to repeat the same colors as mine, try to create soy color combinations - so to speak, play with color. But we must not forget about blue color, as we draw a magical winter night.


Work on the background is completed, you need to let the paints dry a little, paint on the even disk of the moon with white color, and let's start drawing the tree.

We draw immediately with paints, first we outline the direction of the tree trunks, brown.

Then we give the lines shapes; at the bottom the tree trunks are thicker. It’s better to paint from top to bottom; we start working with the end of the brush, and then with the entire bristle.

Next, we work in black and draw the bark of the trees. Apply strokes of black and slightly blur the color, making smooth transitions from black to brown.

Now we draw the branches; they also thicken a little towards the trunk.

When drawing snow, you need to draw the children's attention to the fact that it lies on top of the branches.

At the bottom of the work we draw a small snowdrift, and with the tip of the brush snow flakes over the entire surface of the work.


The works of my children, here they painted snow flakes with their fingers.

Here we used a toothbrush.


Thank you for attention! All the best and brightest to you!
 Winter landscape in mixed media. Step by step drawing
 Decorative winter landscape. Step by step drawing
When we say “Winter night”, of course we immediately imagine white fluffy snow, starry sky And warm light coming from the windows. All this can be depicted in a picture. Artist Marina Tereshkova especially for young artists showed how it can be drawn.
1. First, draw the background by mixing blue and white paint. Landscape sheet Let's put it horizontally and take the largest brush for the background.
2. Using the same large brush, draw snowdrifts and reflections from the stars. The reflections should not be very white and bright. To do this, you need to mix white with blue gouache. Let them be just a little lighter than the sky. When the paint has dried, use a thin brush to paint star points with bright white paint and draw dark silhouettes of houses and fences around them.

3. Take a sheet, cut it to size, if necessary, turn it upside down with the side with convex veins.

4. Paint the sheet with white gouache. It is better to paint with an almost dry brush so that there is not too much water, because otherwise the entire leaf will be printed completely and you will not get a beautiful snow tree.

5. Carefully place the leaf on the drawing, cover it with another leaf and press down a little. You can use a small roller for this.

6. You can take different leaves for different trees. Then add snow on the roofs, trees in the distance, near the houses. Although these trees can also be printed with small leaves. Finally, spray a little white paint. So we have a nice winter landscape.
Everyone can draw a simple New Year's landscape. The main thing is to apply a little imagination and everything will work out!
You will need
- -Paper
- -Plain pencil
- -Eraser
- -Materials for coloring
Instructions
Draw the outline of the earth. Since this is a winter landscape, the ground will be covered with snow, you don't have to paint it.
Draw the outlines of the mountains. Just add a curved line at the top above the first one. Do not press too hard on the pencil so that you can easily correct it.
Draw some trees. If you notice, they look like triangles with jagged edges. It is not necessary to make them straight.
Add a Christmas star in the sky. Also place a star at the top of the trees. Don't forget to put some snow on the trees.
Now all you have to do is colorize your drawing. Use your imagination, because this is a New Year's landscape.

How to draw winter with a pencil:
Step one. Let's define two lines of the earth's surface on the sheet: we start from a hillock, go down into a small ravine where a river will flow, rise a little higher and draw the surface to the edge of our drawing.
A little higher, on the hill, there will be a house, so let’s immediately draw its outline. Let's draw a contour of the earth's surface from the house.
From above we will show the border between the sky and the trees, it is smooth, but not very smooth. The trees are approximately the same size, but still differ from each other. Along the edges of the landscape we will draw the outline of two trees, as if limiting our drawing with them.  Step two. Let's draw a snowball on the roof of the house. The winter is snowy this year and everything is dusty. On the left above the tubercle we will draw the outline of the fence. Let's mark the snow and branches on the trees.
 Step three. First, we finish drawing the trees that we placed along the edges of our drawing. Then we draw the house: the windows, the door, and the pipe. Surely someone lives in it (maybe Father Frost and the Snow Maiden?), and lights the stove on such a frosty day, which means a column of smoke comes out of the chimney. And now, between the level of the sky and the top line of the earth, we draw a Christmas tree, one, two, three... and so we fill the entire background. We have already talked about how to draw a Christmas tree.
 Step four. We finish drawing the fence, make the trunk of the trees more winding, draw snowdrifts, large and small. A small branch of a tree sticks out from one of the snowdrifts, which will turn green in the spring. On the left, right above the river there will be a small cliff. Let's imagine a little and try to carefully draw it, approximately as shown in the picture.
 Step five. Let's draw a river. First, its upper border, and then the shimmering water itself and, in some places, ice, and even large ice floes. From the house we draw footprints to the river, because we remember that someone lives there and, probably, goes out for a walk.
 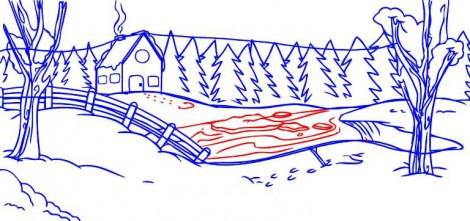 Step six. And the most colorful. Take colored pencils or markers in your hands and make your black and white drawings - fun and bright! May it lift your spirits!
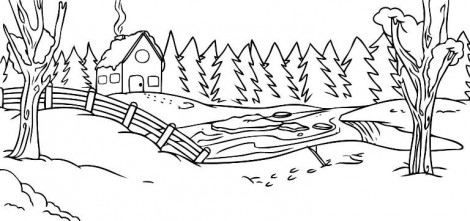
Step-by-step work on painting a winter landscape. Artist - Oleg Chuvashev. Canvas, oil.


Evening beautiful landscape
How to draw a landscape? It is important to choose the right color scheme and mood. This landscape is evening. Winter evening. Not too cold. There is frost on the trees. Birch branches fall down. Not all trees may have branches that droop, but birch and willow can.
The branches are frosty and snow-white. But the main thing in this landscape is the lake. The lake is especially mysterious in winter. And at dusk, the evening landscape with a lake creates a mystical mood.
Let's draw a landscape with a pencil. This is just a sketch that will help us a lot not to make a mistake with the location of the trees, lake, and other parts of the landscape. Drawing a landscape is not very easy. To begin with, as we have already said, let's outline it and draw it with a pencil. Then we'll choose a gamma. This is twilight, which means the gamma is cold. If you draw from your own photograph or from nature, then you can stick to the palette that is in the photograph. However, something can be changed. You can even paint a landscape in one or two colors, and it will look like full color. Especially considering that at dusk a person ceases to distinguish colors.
So, we chose the gamma. We have blue, pink, lilac, brown and white on our palette. There is also golden ocher. The main range, as you see in the picture, is like this.
Let's start drawing. Laying out the shadows. Let's draw a lake. Since this is a winter evening landscape, we paint it in subdued colors; if it were summer, then at that time there would be sunset, and there would be many more flowers in the landscape. In winter, white snow, dark or light objects.
The winter landscape is more ascetic, and perhaps therefore a little easier to draw. It makes it possible to understand the tone, rather than chasing color nuances. Moreover, if you have ever painted a sunset in the evening, or summer landscape not with a pencil, but with paints, then you probably know how quickly the picture changes. One moment the sun was yellow or orange - and now it is scarlet, and five minutes later it is crimson, and is about to disappear behind the horizon. And the water is sometimes blue, sometimes lilac, sometimes red in the rays of the setting sun. In general, the winter landscape is a little simpler in this regard. It will allow you to concentrate on drawing details - tree branches, snow-covered bushes, reflections in water. However, the winter landscape is very beautiful. Even the cold doesn’t interfere with admiring winter. So our landscape should, first of all, be beautiful.
First we draw the darker places, and then we draw white branches on top. If it is gouache, then you will paint over the paint with white. However, still leave large white areas unpainted, since it is not always possible to cover light paint darker, and you need a lot of layers of white. White snow just mark it a little with white and blue or lilac paint. Don't be afraid to mix paints; gouache will be more beautiful if the color is composite. However, a picture can be painted not only with gouache, but also with tempera or acrylic. This picture is painted with acrylic on paper. Acrylic, it seems to us, is not as opaque as tempera, so not all colors are easily repainted. Try not to draw overly bright and dark objects if you are not sure of their necessity.
We continue to draw the landscape. We draw a Christmas tree and its reflection in the water. Landscape with a lake - very interesting and beautiful picture. The most important thing here is to draw the water correctly. The water should be like real water. Therefore, we draw water and reflections in it. The trees are reflected in our forest lake, the reflection of the Christmas tree is especially clearly visible. Christmas trees also look beautiful in paintings.
Draw the details of the landscape: thin branches covered with snow. IN last moment we changed the line of the lake - it somehow stood out too much, it was unnatural. Now the landscape is more peaceful and harmonious, and looks more beautiful.
So we drew another landscape, this time we learned to draw an evening and winter landscape. As soon as spring comes, the landscapes will become more and more saturated, sparkling with colors and colors. Green grass will grow, flowers will appear. But the winter landscape has its own beauty, and it was loved and appreciated by many great artists.
1.
Light lines we plan essential elements compositions in the background, middle and foreground.2.
Attention is concentrated on objects in the middle ground - that’s where we start detailed drawing. The direction and strength of the stroke depend on the texture of the object: mountain road, snow-covered fir trees, log houses.3. How to draw a winter landscape: When working out and detailing the entire drawing at the final stage, remember that the mountains in the background should be barely visible.
Palette for this landscape:
burnt umber, burnt sienna, yellow ocher, raspberry kraplak, Prussian blue, ceruleum, ultramarine, cadmium orange, light cadmium yellow, white.
The color of the sky determines all the other colors in your painting. Before getting into details, make a general sketch.

For warm wood colors, use burnt umber and burnt sienna (muted with ceruleum). Try not to detail the texture, but only gently indicate large shapes with color.

The key colors for purple shades are crimson and two shades of blue. To get the color of an orchid, take more speck, for purple, more blue. Apply them loosely.

The shapes of the snowdrifts follow the features of the earth's surface, but the snow hides and softens its unevenness. Make sure your strokes are smooth and not angular.

The warm tone and hard texture of the old barn against the backdrop of fluffy cold snow creates the necessary contrast. In a picture that is mostly in cold colors, you should add a little warm shades on which the eye could rest. The opposite rule is true for paintings in warm colors. To depict an old barn, take only burnt umber, and then apply more paint over the wet paint. light colors to mark the boards. Leave small gaps between strokes to create shadow stripes between the boards.

Winter is a truly magical time of the year. White snow crackling underfoot, patterns on the windows, warm hats with pom-poms, snowball fights, new year holidays- this is still far from full list all the wonders of winter. And if you want to keep a little of this magic for yourself, then learning how to draw a winter landscape is what you need.
 Landscape with mountains and river |
 Twilight in the forest |
 Simple drawing |
Drawing a rural winter landscape

Although winter can fill even the atmosphere of a fairy tale big cities, special charm and they find comfort at this time of year rural views. We will demonstrate all the beauty of snow-covered village houses when we learn how to draw a winter landscape step by step.
First, with a pencil, we outline the outlines of one Christmas tree and one house. The Christmas tree will be wide and spreading.

And then - two more houses and another Christmas tree. The houses will have triangular roofs, characteristic of many villages.

Let's add more Christmas trees and a picket fence. This fence, of course, is quite conventional - in the villages people know each other and do not build high fences.

Now, based on the sketch, we will draw with paints. The Christmas trees will be a lush green hue, the houses will have the warm shade of unpainted wood, and the snow will have a slightly blue tint. To make the picture look alive, we will place three birds on the fence.
That's it, the drawing is finished.
Hills and snowfall - drawing a winter landscape

Let's continue the theme of rural beauties. This time we will depict the very outskirts of the village - the forest will be visible in the background. And the snowfall will be in full swing. Don't worry, it's not difficult at all - this example is a great way to practice and draw a winter landscape for beginners.
First, let's outline the largest forms - in our case, these are hills.

Then we will depict three spruce trees on foreground, and in the back we’ll make a house, a snowman and the sharp tops of smaller Christmas trees. Don't forget about the path leading to the house.

Let's draw all the contours well. We’ll also “give” the snowman a top hat and depict snowflakes falling from the sky.

Let's color the drawing. Our landscape will be at night, so we will make the sky dark, grayish (it will be overcast with clouds). And, of course, you can’t do without a chic full moon. The house will be made in warm colors: the walls will be yellow, the roof will be red, the doors will be brown.
Let's wrap this up - we did a great job.
Magical winter night

Despite the fact that untouched snow, smoke from the chimneys of rural houses and the pointed tops of Christmas trees look fabulous even during the day, the true magic lies in winter nights. This is exactly what we will show when we figure out how to draw a winter landscape in gouache.
We will not immediately take up gouache - first we need to complete a pencil sketch. Let's start with general outlines hilly area, a house and three trees near it.

Then we will draw another smaller house, a path leading to it and add more trees, coniferous and deciduous. In the very foreground there will be a birch tree with thin branches hanging down.

After that we will start working with paints. First of all, use dark tones to depict the sky and forest in the background. You can also grab three spruce trees near big house. Don’t forget to make a month in the sky - it will still be very thin and young.

Now the foreground. Let's make the snow a little bluish, the Christmas trees green, and the walls of the houses light brown.

Remained small parts- light in the windows, smoke billowing from chimneys, snow on the feet of fir trees, trunk and branches of a birch tree. And many stars in the night sky.
Now we can safely say that the drawing is finished.
Winter landscape with mountains and river
Winter in the mountains is amazing. The forest, which has become harsh and dark, clear rivers, thick snow - all this looks so pristine, clean, untouched that you can admire this beauty for hours. But you also need to add a touch of coziness - a small, but solid and neat village house is perfect for this purpose. So we will learn how to draw a beautiful winter landscape.
First, let's work on the first plan - there will be two trees with thin branches.


On the right side of the picture we will depict a house of a peculiar shape and the tops of Christmas trees in the background.

Now you can take up pencils or paints. On background Let's make the mountains - they will be completely covered with snow. The house will be made of wood, and the bridge will be made of brick. You also need to draw transverse stripes on the nearby trees - these are birch trees. Pay special attention to the windows - they should glow, because this is a sure sign that someone lives there.
That's it, we've finished the picture.
Twilight in the winter forest
Besides the night most interesting time days in winter forest is twilight. The stunning shade of the sky and the falling nature merge into a marvelous ensemble. Using the example of such a miracle, we will learn how to paint a winter landscape.
First, let's work on the sky and the overall tone of the snow. For this we will use watercolor or gouache to create beautiful stains. You need to wet the paper, and then apply paint with plenty of water and tilt the sheet. The paint will flow down, forming these beautiful patterns:

Then we will draw a tree in the foreground. try to make the branches thin enough. Moreover, the brush must be guided from the base of the branch to its tip.

Using the same principle, we will draw three small bushes.

Then - two Christmas trees. They should be painted with thick, rich strokes of a dark green hue.

Let's cover the trees and bushes with snow. We’ll also decorate the front bush with juicy red berries.
Now the picture is complete.
A colorful house, a bunny and snowflakes - a fun winter
Winter is a time for fairy tales, which is why it is often depicted in cartoons. In this section we will also work in a cartoon style - at the same time we will learn how to draw a winter landscape with a pencil.
First, let's outline the house and the bunny looking through the window. All outlines will be very smooth, rounded, without sharp edges.

Then we’ll draw the Christmas trees (they will be just as smooth and round) and the snow falling from the sky.

And now let's color everything in the most bright colors. But the snow, of course, needs to be made blue. And the Christmas trees are green.
That's it, the fun house is ready.
If you choose which season is more worthy of immortalization in colors, winter will give many seasons a head start. When everything is covered with snow, it’s time to expect miracles. Paintings winter landscapes outstanding Russian artists, for example, Vasily Afanasyevich Leskov or Viktor Mikhailovich Vasnetsov, show how to turn a pure fox into a picturesque fairy tale.
Those who have never picked up colored pencils to draw for pleasure should stock up on paper. It is for those who have left the times of adolescence and youth behind, and have never learned to draw landscapes, that we have developed a course: “How to draw a winter floor step by step for beginners.”
Step-by-step work plan: how to draw a winter landscape?
The first thing you need to do is put a piece of paper in front of you and imagine what you love most about winter. We have compiled a short list of what almost everyone likes: a snowy forest, a snowman, a bright blue sky and bullfinches. We will also prepare a set of colored pencils, an eraser and a simple pencil for work.
In the foreground, closer to the left side, we will depict a mighty tree: a thick trunk and powerful branches that will occupy the entire left side of the picture, as well as the upper right.
The trunk and branches have branches so that the tree does not look boring. At the bottom of the picture we will indicate snowdrifts, because winter is snowy. We will decorate the tree with a hollow, and it should not be just a hole, but an outlined circle, thanks to which we will create depth and volume.
Where we have the roots of the tree, and they also need to be drawn, because a tree cannot, in fact, hold on to the air, we will draw the lower part of the snowman’s body. As everyone remembers, a snowman consists of three balls: the bottom one - the largest, the middle one and the smallest one.
The snowman gets bast shoes, buttons, a hat - a bucket with holes in it, a nose - a carrot, eyes and a smile, which are laid out with coals. It would be nice to provide our snowy friend with a broom, which he holds in stick handles, and a scarf. Now let's take care of the birds, they flocked to peck bread crumbs from the feeder. The feeder hangs on the lower branch above the snowman's head or, to be precise, slightly to the right of his head.
If you remember from geometry how to draw a pyramid, this knowledge will be very useful to you. The feeder is a tray that hangs on four ropes on a branch.

One bullfinch sits on a tree, others graze in a feeder. At this stage, it is enough to outline their silhouettes. Now we draw a Christmas tree, we place it on the right side of the picture. She stands in a snowdrift, but is slightly taller than our snowman. We draw a three-dimensional Christmas tree, round the lines, remember that there is snow on the branches. The Christmas tree is crowned with another bird. The top of the Christmas tree is located slightly to the right of our feeder, and it barely reaches the tray where the birds eat. It remains to fill in the background, in depth by left hand there is a spruce forest, many, many fir trees, and on the right there is an ordinary one, which gets frighteningly dark in winter. When drawing a forest, you should not detail it. The furry paws should be guessable, but drawing each needle separately would be superfluous.
The final part of the work on drawing the winter landscape
Before we start coloring, we need to erase everything we have drawn step by step. Let's start with the Christmas tree. We erase everything, leaving only a pencil mark.
Now we need green and blue pencils. The Christmas tree is thoroughly covered with snow, so the green paws only stick out a little. For snow we use dark blue and light blue. Left side We paint our mighty tree brown.
We paint the forest that goes in the background in bottle color, and the spruce tree in green, but in a warmer shade. The oak bark appears in curved lines, the veins should be rich and dark. In the depths of the hollow it is dark; for coloring you can use black. Our sky is dark blue, the birds' bellies and scarf are red. The feeder should be painted either yellow or brown. On the left side of the picture, you can plant a bullfinch on the snow in front of the snowman to fill the free corner.
Draw shadows on the snowdrifts with a blue pencil, show that the entire forest is thoroughly covered with snow. Now your winter landscape is ready, now it can be used as a New Year's card.