One line drawing of a penguin. An easier way
A detailed article master class on how to draw a penguin step by step using colored pencils.
In this example we will tell you how to draw two cute little penguins. The article will be useful for children, for the purpose of studying step by step drawing, and for adults.
One penguin is good, but if there are two of them, it is much better. We'll tie them with a long scarf and start learning how to draw penguins step by step using colored pencils.
- colored pencils in black, yellow, orange, blue and light blue;
- a simple pencil of medium hardness;
- eraser;
- sharpener;
- paper.
Stages of drawing penguins:
A pair of penguins sit cutely next to each other. To draw them, at the first stage it will be enough to draw two circles in the center of the sheet.

Now we distribute the border outline onto the penguins’ body.

At the bottom of each body we will draw two tiny ovals on the sides. We get cute penguin paws.

Let's draw the eyes. The penguin on the left side will have them open. Therefore, we will depict them in the form of ovals. But the right animal’s eyes are closed. So let's draw them as two arcs.

We begin to draw the beak of each penguin.

We finish drawing one arc on each muzzle at the top and we get ready-made beaks. You also need to draw one wing on each side.

Now we draw a long and warm scarf using simple lines. A pair of penguins were cozy shopping together there and enjoying their time together.

We remove auxiliary lines to prepare the drawing for the application of colored pencils.

So, first, let's take a black pencil. We will use it to paint the main part of the penguins' body. We will also completely paint over the oval eyes and give an outline to the small elements in the drawing.

Use a yellow pencil to completely color two beaks and two pairs of legs. On base color Apply an orange tone to give volume to the resulting elements.

Let's create a scarf of blue color and for this purpose we use pencils of several tones at once.

At the last stage, you can adjust some elements in the drawing to make it look even better. On this step by step drawing penguins completed.

Now you know how to draw a penguin easily and simply.
Step 1. Here's what I used to draw the penguins with a pencil: two large graphite pencil, A, 5 mm mechanical pencil, kneaded eraser, shading paper and white acrylic marker. The drawing paper itself should be very textured, not smooth. The texture of the paper will give a much more realistic look to this design.

Step 2: Okay, I forgot to mention the graphite stick in the materials section, but this is really the only step you use it for. Lightly rub the graphite lengthwise across the page. The result should look very grainy due to the texture of the paper.

Step 3. Using either your shading brush or a paper towel/cloth, go over the entire piece of paper, smoothly blurring the background. The texture should still be visible.

Step 4: Okay! It's time to sketch our penguin family. Use a graphite pencil at this stage and don't worry about accuracy. At this stage, draw a sketch and proceed to the next step.

Step 5. Okay, now it's time to erase some of the colored sketch! Using your kneaded eraser, erase the lightest parts of the penguins' bodies, lightening their bellies, the parents' necks, and the faces of their chicks.

Step 6. Now, using your mechanical pencil, start drawing in the details and outlines of the drawing.

Step 7. In this step we begin to darken the picture by combining mechanical and wooden pencils. Notice how I darkened the faces of the adult penguins. I also erased a little space around the penguins to add more contrast between them and the background.


Step 9. In this step you can see the result of adding darkness and details. Notice that I also erased the larger outline around the penguins.

Step 10 It's time to add details to these adorable little penguins! Is it just me or do they really look something like owls?)

Step 11. Here is the result of the previous step...

Step 12. Now, using an acrylic marker, begin to draw light areas and outlines. Also, brighten up the background. You can also add texture to the ground to make it look more like snow.
This lesson will show you how to draw a penguin step by step. You only need to walk a few simple steps, completing all tasks step by step. Let's learn how to draw a penguin with a pencil step by step.
Some interesting facts
- Today there are a total of 18 species of penguins in the world, five of which are critically endangered.
- Despite their slowness on land, these cute birds are the fastest in the water.
- main feature penguins are that they can dive very deep, while birds spend 70% of their lives in water.
- The average lifespan in the wild is 15 to 20 years.
- Penguins are born very tiny, their weight barely reaches 1 kg. But when these birds grow up, they can weigh up to 40 kg. It all also depends on the type of penguin. There is the emperor penguin - the heaviest, most powerful and largest (reaches 45 kg), and there is the fairy penguin (little penguin), whose weight does not exceed 900 g (in an adult).
- Birds nest in colonies that sometimes number millions of individuals.
- Penguins are not covered with fur, but with feathers. Only they are very small and dense, which gives the impression that these seabirds do not have the usual plumage.

Now that you have met interesting facts, we will tell you how to draw a penguin.
When taking your first steps, do not press too hard on the pencil. Draw light and smooth lines, barely noticeable, so that you can remove flaws with an eraser at any time.
Step 1. Draw the body
So, how to draw a penguin? Draw a small oval on clean slate paper - this will be the body of the bird. It doesn't have to be perfectly smooth. These are just outlines so that later you can depict the black and white belly of the penguin.
Step 2. Head
Draw another oval above and to the right of the first outline - this will be the head. This figure should be smaller and have a horizontal orientation, while the body is extended longitudinally down the piece of paper.
Step 3. Addition to the head
Make two intersecting lines inside the oval of the head. This is necessary so that in the next stages you can depict facial features.
Step 4. Beak
On right side head you need to draw a small triangle. He will be the beak. Remember that putting pressure on the pencil is not recommended.
Step 5. Shape the body and legs
Using two curved lines, you need to connect two ovals (body and head) to make a neck for our penguin. Then inside the body you need to draw a curved line, similar to the letter U - this will be the wing.
Draw two lines resembling the letters L at the bottom of the body. This is how we get paws.

Step 6. Addition
Now you know how to draw a penguin in the initial stages. If you follow the instructions, you should end up with an image of a funny and cute bird that stands sideways and looks into the distance. But now we need to add a few details to make the image more realistic:
- Let's go back to the head and cross lines. Make a tiny eye just above the horizontal stripe and then draw a small dot inside and shape the pupils. This involves drawing a few lines around the eye for extra detail.
- Penguins' beaks are slightly curved and point slightly downward. Use the triangle shown earlier. Start drawing the beak from horizontal line heads.
Step 7. Tail
Take a thick grease pencil and draw the outline of the penguin. Take away smooth line on the lower left side of the oval, make a main point, and then extend it to the base of the paws. The tail should resemble a triangle, but with softer outlines.
Don't forget to draw an extra oval on the belly so that when coloring you can separate the dark feathers from the light ones.
An easier way
Let's learn how to draw a penguin for kids or beginner artists. Take a sheet of paper, as well as a pencil and eraser. Draw an oval in the center that is shaped like an egg. Duplicate this shape around the already drawn one. At the top of the egg, draw two eyes and a beak. You can simply draw a small triangle.
Then we move on to the legs, which look like a little wavy pancake. Don't forget about the wings - they can be drawn straight, curved, large and small. Now you can start coloring: the wings and lines between the ovals should be black, and the “egg” area, where the eyes and beak are drawn, remains white. The paws and the beak itself are yellow, the eyes are black.

Now you know how to draw a penguin. Enough before you start step by step instructions, carefully study all the images so that in the future you can visualize and imagine the bird. To make the drawing more interesting, you can add some funny details to the penguin - a hat, a New Year's cap, a ball, tails, anime eyes, a smile or some inscriptions in the “cloud” coming from its beak. It all depends only on your imagination and desire to learn how to portray these cute, but extremely strong, fast and friendly birds.
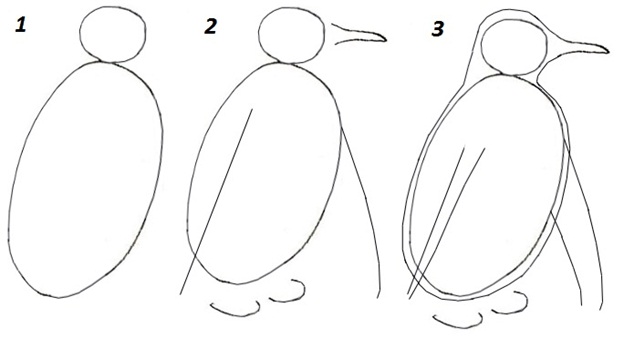
In this lesson you will learn how to draw an emperor penguin with a pencil step by step, standing on the snow, a huge ice floe. Penguins are birds, only they cannot fly; they live in coastal waters from the Galapagos Islands to Antarctica. The Emperor Penguin is the largest of all penguin species. Males and females can be distinguished by size, as males are taller and heavier (130 cm and 40 kg), and females are 115 cm tall and weigh 30 kg. Emperor penguins, like all penguins, eat fish and crustaceans. They hunt in packs, moving at an average speed of 4 km/h in water. Penguins live in large groups on ice floes near the water, if they are very cold, then they are pressed against each other and it becomes very warm inside, even if environment minus temperature, for example -20. Their vision is very well adapted to see in water.
We will draw from this photo.
Draw a circle - this will be the size of the head, then determine the length of the body, you can measure it with a pencil and project this size onto the paper, marking a horizontal stripe. Then I sketched out a curve that would show me side penguin, for example, like .


In the beak, draw the area that is orange on the penguin and the wing. I approximately divided the body in half in height, with the elbow located a little higher.

Draw the paws and tail, erase all unnecessary lines.

Paint the dark areas very dark and the abdomen with a light tone.

The side of the penguin on the left is shaded more; the body there is not illuminated. We draw sparse feathers in the front.

To make the color uniform, you can shade it with the edge of paper or cotton wool. We show a dark area near the head on the neck. You can also draw wild expanses of ice and snow, then on the left you will need to complete the shadow of the penguin. The penguin drawing is ready.
Hello again everyone!
Call your children to the monitors, because today we will learn how to easily draw a minion step by step. For those who don’t know, minions are such cute and funny characters from the animated trilogy “Despicable Me”. All of them yellow color, look like a chocolate egg toy package, speak their own language and always find themselves in interesting situations under the leadership of their owner, a gangly man with a big nose named Gru. Although I think that every adult, and even more so a child, can imagine what these restless pets look like.
I will draw with a felt-tip pen, you can follow my example or use with a simple pencil, so that if something happens, you can correct the drawing. Take a sheet of paper, preferably a landscape one.
If you want to draw a large minion, then it is better to place the sheet vertically; if you plan to draw several pieces next to each other, then you can horizontally. All minions are very similar to each other, but there is one significant difference - some are luckier and have two eyes, while others are content with only one. I will draw a more developed yellow belly, which sees twice as well.
I'll start drawing from the eyes. First, we draw two identical circles, around which we make an edging. The edging will serve as glasses in the future. The result is an eight.
To make the eyes real, add pupils to them. I draw two pieces, whoever decides to draw a one-eyed Cyclops can do it twice as fast! 
At the next stage, we will draw a body for our minion. Here you can dream up. Depending on the size of the torso, it will be tall, short or normal, like mine. 
Are there bald minions? Certainly! But I decided to make mine handsome and gave him these rare curls. You can depict the hair on your head in a different way, for example, draw a thick bunch from one point, similar to how a palm tree grows. And at this stage, don’t forget to draw the glasses strap. It turned out like this. 
The yellow men are mostly dressed in the same denim overalls, in other words just pants with straps. My friend is no exception. Now I’ll draw the very straps that hold the pants on. The dots on the straps are buttons or buttons. 
Almost left our yellow hero without the opportunity to discuss last news with brothers. Let's go back and draw his mouth. I love to smile, so of course I decorated my face with a smiling grin. 
What's next, you ask? Next we will draw the hands, one raised up, the other down. Yours may be different, both up, both down, you can even depict one-armed bandit. In fact, these are just blanks; a little later we will turn them into real hands. 
Let's return to the torso and clothes, let's complete the overalls with the obligatory pocket in the middle. 
In the next step, let's finish the arms and draw the hands, in my drawing it turned out like this. 
There is a head, there are hands. What's missing? Correctly draw the minion's legs. This is also easy and simple to do. That's it, the drawing is ready! 
Of course, children love colorful and bright drawings. Therefore, to ensure that the impressions from today’s lesson remain in your memory for a long time, take pencils or markers and color the picture, as I did. Our minion itself is yellow, the clothes are blue, the eyes are brown, and the glasses can be shaded with a silver felt-tip pen or a simple pencil. I think it turned out great, write your opinion in the comments. 