Pencil drawings of unicorns and pegasuses for beginners. Unicorn: beautiful pictures for sketching
IN this lesson presented step-by-step scheme drawing, consisting of 9 steps, devoted to how to draw a Unicorn with a pencil.
Step 1. Light outline draw a rectangular area in which the drawing will be located. Using a series of strokes we outline the appearance of the unicorn. We depict the outlines of the head, neck and torso, draw the contours of the limbs. We draw a horizontal axis through the center of the body to build perspective. We outline the location knee joints. We determine the size of the chest and the back of the body - the croup.
Step 2. Let's specify the outlines of the animal's figure. We monitor the relationship of body proportions. The creature is slightly turned towards us with its muzzle. His croup is in the background and will appear smaller due to the forward reduction. On the forehead of the unicorn we will draw the outline of a horn.
Step 3. Erase the extra lines. Add two more perspective axes. The first is along the lower border of the abdomen, the second is from the upper part of the neck to the croup. Then we check the proportions again. We draw the head using a cone, the neck using a pair of arcs. The lines of the back and abdomen will be located along the perspective axes. We draw the outlines of the croup and legs. It is very important to depict the legs correctly so that the unicorn looks confidently standing on the surface of the earth.
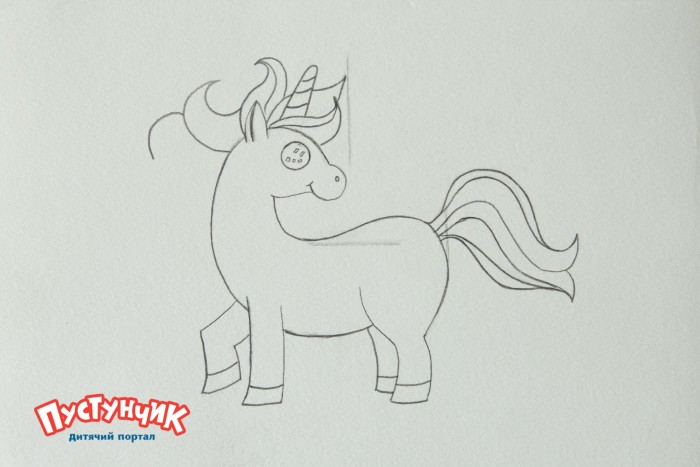
Step 4. We draw the contours of the drawing. We draw brushes on the shins, and a twisted and sharp horn on the forehead. We depict a long mane and a fluffy tail. On the face we outline the eyes, mouth, nostrils and ears. At this stage we get a completed sketch that can be used for further work in color or pencil. In our case, the work will be carried out with a simple pencil.
Step 5. We take very soft pencil and strengthen the outline of the unicorn. First, we determine the light sources; in our case, the light will fall from above and from behind. We shade the darkest areas: chest, lower abdomen, hind and front legs. Leave the top of the neck and back white. On the shoulder and back thigh leave room for glare. We detail the shape of the horn. We draw curls of hair on the mane and tail. We depict a cast shadow on the surface of the earth.
Step 6. Use your fingers to blend. At the same time, a background appears in the background. Very careful work is done on the muzzle, chest area and forelimbs to maintain their contour. While the hind legs and tail can barely be separated from the background.
Step 7 Once again, using a soft pencil, shade the most shaded areas on the unicorn's body. Let's specify the form. On the mane, we enhance the shadows with shading, leaving the horn on the head untouched. We detail the hairs on the leg brushes. We darken the tail at the top, leave it lighter at the bottom, and draw thin hairs. It is very important at this stage not to redraw the drawing.
Step 8 We smooth out the image more and more. Use your fingers to blend the pencil in large areas.
Step 9 Using a rubber band, blot the highlights on the neck, torso and limbs of the animal several times. Thus, this will add expressiveness and shine to the drawing. The unicorn will seem to sparkle in the sun. Bread gum is very suitable for working with this technique. And finally we darken the contours of the head, mane and front legs.
At this stage, the lesson on how to draw a Unicorn is completed. You can also try drawing a unicorn head for practice. We wish you creative success!
Interesting facts for the lesson “How to draw a Unicorn”
It is generally accepted that a unicorn is a snow-white horse with a sharp horn on its head. IN ancient greek mythology The unicorn was a symbol of the goddess Artemis, and in ancient Roman times - Minerva. The Bible described him as a fierce, dangerous and freedom-loving creature. He showed a lot of aggression in the stories of the Brothers Grimm. But many stories portray the unicorn as a noble and kind creature. Our unicorn will be menacing and dark in color.
Already drew +35 I want to draw +35 Thank you + 320
On this page we have collected many step-by-step lessons that will help you draw a unicorn with your own hands using pencils or a pen step by step. It will be simple and fun.
How to draw a beautiful unicorn step by step
Video: how to simply draw a unicorn
How to draw a heavenly Unicorn step by step

In this lesson we will draw a Heavenly Unicorn. All unicorns are basically the same. I drew this unicorn for Christmas. But it has already passed. Spring is now. Unicorns are present in the fantasies of people in many countries. Unicorns have been characters in fairy tales, poems, and every year there are more and more stories. It is still a mystery whether the unicorn was a real animal or not. The unicorn is now depicted as slender White horse with a horn on his forehead. Some believe that the unicorn's horn has magical properties and that if the unicorn's horn is stolen or broken, then the unicorn's suffering is transmitted to people, regardless of whether people did it or not. In the movie "Legend" (Tom Cruise) in leading role two unicorns are a man and a woman and they are separated from each other. The devil was looking for the unicorn's horn so that with its help he could bring evil to earth. The movie was one of the biggest movies of the 80s. I still love watching it. I've always loved fantasy creatures. In any case, you will now learn how to draw a unicorn. As long as there are little girls left who dream of princes and unicorns, these creatures will remain forever

Video: how to draw a unicorn head for children
How to draw a realistic unicorn with a pencil step by step
- Step 1
Using thin lines, we outline the boundaries of the drawing on a sheet of paper, draw the main lines, determine the length and width of the torso, neck and head, and the configuration of the legs. We draw the main axis in order to determine the perspective. We note the location of the joints on the legs, the volume of the chest and croup.

- Step 2
We outline the main construction lines. Checking the proportions of the unicorn's body. Our unicorn will have its chest facing us, its rump in the background, and then it will appear further away when we make it smaller. We designate distinctive feature- horn in the middle of the forehead.

- Step 3
We delete unnecessary lines and draw the second perspective axis along the border of the abdomen and the third - from the croup along the top line of the neck. We draw together the outline lines, checking the proportions: the head with a cone, the lines of a massive neck, the back, the stomach along the lines of perspective, the croup and legs. The main thing is to draw the legs correctly so that the unicorn stands firmly on the ground.

- Step 4
We draw the outline, carefully taking into account all the details. Add shields on the legs, a horn, a long mane, and a tail. We outline the eyes and nostrils. We draw the ears and see how beautiful our unicorn is already at this stage, correct the contour errors.

- Step 5
We strengthen the contour, working with a very soft pencil. We determine the light source (ours is from above and behind) and shade the shaded areas: chest, stomach, hind leg, front legs. Leave them white top part neck and back, shoulder and highlight on the hind leg. We draw the horn, the hairs of the mane of the tail and the brushes on the legs. We outline a shadow on the ground.

- Step 6
Use your finger or a feather brush to thoroughly blend the pencil. At the same time, adding a background, and on the unicorn itself, we carefully shade the head, chest and front legs, which are closer to us, so that the outline is visible; we barely highlight the hind legs and tail, which are located further, from the background.

- Step 7
Shade the darkest areas on the unicorn’s body with a soft pencil, deepening the shadow. Once again we clarify the outline, enhance the shadow on the mane, remembering that the horn on the forehead remains white, and draw the scutes on the legs in even more detail. We shade the tail from above, weaken the shadow downwards and outline the thin hairs. The main thing at this stage is not to overdo it with the shadow.

- Step 8
We work again with shading, smoothing out the drawing. In large areas, you can use your finger to rub the pencil, but you need to be careful.

- Step 9
We take a rubber band (it’s very convenient for this type of drawing technique) and kind of blot the highlights so that our unicorn sparkles like in a real fairy tale. And finally we strengthen the contour of the head, horn, front legs and mane.

How to draw a unicorn for children step by step
To draw a unicorn you will need pencils, a pen and imagination!

We draw a little unicorn for a child with pencils step by step

Cute little unicorn, looks cute, easy to draw. This lesson is suitable for children.
For work we need:
- simple pencil
- eraser
- markers (blue, black, yellow, pink, purple, green)
- Step 1
Draw the base of the head and mark the face.

- Step 2
Add a triangular body.

- Step 3
We outline the location of the ears, legs and horns.

- Step 4
We draw the legs and hooves in more detail.

- Step 5
Draw the ears, horn and nose. We outline the eyes and mane.

- Step 6
We draw in more detail the eyes and mane.

- Step 7
We draw the resulting image with a black felt-tip pen.

- Step 8
Color the image.

- Step 9
Making the background. That's it, the unicorn for children is ready.

How to simply draw a unicorn
In this lesson we will draw a unicorn. Don't judge me harshly, this is my first lesson. We will need:
- simple pencil,
- leaf,
- color pencils,
- a little patience.
- Step 1
We draw a foundation on which we will rely

- Step 2
Draw the base of the horn, neck, ears and head

- Step 3
We draw the tummy, legs, hooves should be forked like a goat’s

- Step 4
We draw the base of the tail, the back, and make the ears more realistic

- Step 5
We make the outline of the head clearer by erasing the excess and painting on it

- Step 6
We draw the base of the tail and make some areas better

- Step 7
Draw the tail, eye, nostril and hair on the legs

- Step 8
Adding curls to the tail

- Step 9
Draw the eye, nostril and auxiliary features for the mane

- Step 10
Draw a horn and a mane with curls and erase all unnecessary

- Step 11
Draw the hooves and outline them with a pen

- Step 12
Color it as you please

How to draw a portrait of a cute unicorn with a pencil step by step

In this tutorial we will draw a portrait of a cute unicorn! For this we need:
- HB pencil,
- black gel pen,
- black felt-tip pen,
- colored pens,
- eraser and colored pencils!
- Step 1
We draw a muzzle and mouth.

- Step 2
We draw the upper part of the mane, ears and inside the ear.

- Step 3
Draw the horn and stripes on the horn.

- Step 4
We draw the second part of the mane, nose, eye, inside the eyes and eyelashes.

- Step 5
Draw the third part of the mane, as in the picture!

- Step 6
Draw the fourth part of the mane, as shown in the picture!

- Step 7
Draw the lower part of the mane.

- Step 8
Let's start tracing. We take the black one and blue pen and circle their eyes!

- Step 9
Take a blue pen and use it to decorate part of the upper mane and part of the lower mane.

- Step 10
Take a purple pen and use it to decorate three parts of the mane, as in the picture.

- Step 11
We take a pink pen and decorate the ear with it, and take a turquoise pen, orange and green and outline the last parts of the mane with them.

- Step 12
Take a pink pen and trace the horn with it.

- Step 13
Let's start coloring! Take a pink pencil and use it to decorate part of the mane, horn, inside the ear and blush!

- Step 14
Take a black felt-tip pen and a blue pencil and color your eye with it! And we take gray pencil and decorate their face, ears and neck!

- Step 15
Take blue, blue and green pencil and decorate their mane!

- Step 16
Take a dark blue pencil and paint another part of the mane with it!

- Step 17
And as a final step we take orange and yellow pencil and decorate the last parts of the mane with it, as in the picture! And that's it)))) our portrait of a cute unicorn is ready)))) good luck to everyone)))

How to draw a unicorn head
Hello. In this lesson we will draw a unicorn. We will need:
- simple pencil;
- eraser;
- black pen;
- colour pencils.

How to draw a small unicorn on its hind legs
In this lesson we will draw a unicorn in full height on its hind legs. The lesson consists of 9 steps. We will need:
- simple pencil and eraser
- liner or black pen
- colour pencils

Drawing a unicorn in color
With this tutorial you will learn how to draw a unicorn jumping along a sandy road. To do this, you can use any materials, from paper and paints to a graphics tablet and drawing program. Whatever your heart desires! Attention!!! Before you start drawing, I kindly ask you to first read all the comments on the stages in order to immediately understand how to act in a given situation! Let's get started!
- Step 1
First, let's mark the head and two larger circles on the sheet, which represent the chest and croup of the horse. Draw without pressing hard on the pencil so that you can erase the auxiliary lines later.

- Step 2
We complete the missing parts: legs, ears, torso. Do not immediately draw the contours of the body, first sketch out the body approximately, marking everything schematically. The small circles on the legs are joints and should be noted as well.

- Step 3
Based on the constructed diagram, the anatomy of the horse and, possibly, references (photos used to fully understand what you are drawing), we draw the body. And we outline the background, of course.

- Step 4
We finish drawing the horn, mane and tail.

- Step 5
Now that everything is ready, take either a black pen or a soft pencil, or select a line brush in computer program and start drawing the outline. It's best to start with the horse's body first, and then move on to the details.

- Step 6
Now that the body is ready, let's move on to the little things: mane, tail, horn.

- Step 7
When everything is ready, we start painting our unicorn. You can choose any color, but I decided to make it piebald. We paint the body with a general color to match the chosen suit.

- Step 8
We paint over the mane, tail, horn, hooves and eyes. Also a common color.

- Step 9
Now I will add volume to the horse by applying shadows. Notice where I put them.

- Step 10
Now we add even more contrast by applying shadows that are slightly darker than the previous ones. Do this carefully so that there are no glares in the shadows or shadows in the light. Everything should be logical!

- Step 11
If the color you choose has spots, like the horse in the example, then apply shadows to other colors in exactly the same way as you did with the previous color.

- Step 12
Finally we reached the light. We need even stronger contrast, so we apply light to those areas that were not previously darkened. If you don’t paint digitally, like me, then you should initially not get too carried away with coloring and leave the light areas from the very beginning of working with color.

- Step 13
Draw the mane, tail, hooves. Apply shadows.

- Step 14
And now we draw highlights on the mane, tail, hooves and horn. Again, if you draw on paper, then leave the light spots initially.

- Step 15
Now let's get started background. For you it can be anything, because we have already drawn the main character - the unicorn. But you can repeat after me. We draw a forest and sky from behind, make a road and a clearing. You can use any technology convenient for you.

- Step 16
We add the following details: grass, hoof marks, tree trunks, etc. Whatever you want. At least some birds.

- Step 17
Apply finishing touches: dust from hooves, sun light and glare. You don't have to do this. To your taste.

How beautiful Child's world, while a fairy tale lives in it. It's being filled unusual plants and fantasy animals. There is no place for injustice, and goodness always triumphs. Every person, even mature age, dreams of getting to such a place. Today we will try to get in touch with magical world. The first one to meet us at the entrance will be an unusual animal. It is very similar to a horse, but its mane and tail are painted in all the colors of the rainbow. He has one large horn on his forehead and a heart on his hip. As you guessed, we will learn how to draw a unicorn.
Tools and materials that are needed for drawing to figure out how to draw a unicorn:
- Paper;
- Simple pencil;
- Eraser;
- Colour pencils;
- Black pen.
Armed with the necessary things, let's begin to solve the question: how to draw a unicorn step by step with a pencil:
Stage 1. We start drawing a unicorn by creating its body. Using a simple pencil we outline his torso, without limbs for now. The body is close to oval shape, just like the head. The unicorn's head is turned to the right (towards the body). We can say that we see the animal in profile;

Stage 2. From the general oval we will draw the face of the animal. For now, let's add his two legs - front and back. From them we will continue the rest of the construction;

Stage 3. The animal has four legs, two of which we have already drawn. The front leg will be raised and the back leg will be slightly visible. We will separate the lower part of the legs with additional lines that will highlight the unicorn’s hooves. Draw a small heart on the thigh;

Stage 4. Let's return to the animal's face and draw its features. Since we are learning how to draw a unicorn step by step in a profile position, we will draw one eye. The nostril will be in the form of a small circle, and in place of the mouth there will be a smile. Don't forget to add eyelashes and highlights to your eye;

Stage 5. The main decoration of the unicorn is its mane and tail. It's time to draw them apart wavy lines into fragments. Among the mane one can see an ear and a large horn;

Stage 6. Select the animal’s kennel by tracing it with a black pen (along a pencil outline);

Stage 7. Let's add color to our drawing to liven it up. IN previous stages We figured out how to draw the outline of a unicorn with a simple pencil, and now we move on to colored ones. Draw the hooves, outline and heart in pink and red;

A unicorn is a fairy-tale creature, a magical horse. There are still mentions of her in legends Ancient India. This is present in many myths fairy tale character. The unicorn is a symbol of chastity, purity, and innocence. It's always a horse, usually white with a lush mane and a single horn growing from his forehead. Usually he was a means of transportation for wizards, he protected them from harm and killed with his horn anyone who tried to harm them. Unicorns were often depicted on the coats of arms and flags of cities, countries (Scotland, Great Britain, Canada) and noble families. The horn of the unicorn was considered a healing remedy. In our lesson today we will learn to draw this fabulous wonderful creature- a unicorn.
Stage 1. First draw auxiliary lines. The oval is the body, a smooth curve extends from it - this is the neck, on the neck we will draw a circle with the line of the eyes and the future horn extending from the forehead. From the oval downwards we indicate the future legs of the unicorn - straight, consisting of several segments.
 |
Stage 2. Let's start drawing the unicorn's head. From the circle forward, draw an elongated horse's muzzle, highlight the line of the mouth, and show a round nostril. On the muzzle, approximately slightly above the middle, on the auxiliary line, draw an eye.

Stage 3. Now we decorate the curly bangs of the magic horse, falling over the eye, with wavy lines. The horse has funny protruding ears, pointed upward. And we draw a pointed horn up from the forehead.

Stage 4. Draw smooth lines of the neck from behind the ears down, and in front from the chin line down, and begin to draw the body of the unicorn from the front and back using the same smooth lines.

Stage 5. Using auxiliary lines feet on foreground, we begin to draw them. The legs are shown as curved curves; curves are characteristic of the limbs of horses and other ungulates. There are tufts of hair in front of the hooves.

Stage 6. Now let's start depicting the legs in the background. They are drawn in the same way as in step 5. Our unicorn is in motion.

Stage 7. We complete the lush mane going down the animal’s neck to the back.

Stage 8. At the back of the body we draw a fluffy tail, the same as the mane, fluttering while running.

Stage 9. Color the picture. You can make the unicorn white and the mane and tail gold, yellow or orange. You can use your imagination and give the horse a pleasant pink color, and paint the mane and tail in red or burgundy tones. Our unicorn is decorated in a delicate purple colour, and the mane and tail are two shades of purple. The hooves are usually black or brown.
 |
The first drawings of unicorns are more than four thousand years old. They were found in India. Soon these fabulous creatures migrated to the myths of Western Asia. In the East, unicorns were depicted in the form of a goat, and in the West - in the form of a horse and a deer. The ancient Greeks long considered unicorns to be real animals.
According to legend, once a year unicorns visit heaven to drink water from a magical spring and get caught in the heavenly meadows. That is why in ancient times they believed that they healed any disease.
The Chinese called unicorns “virgin lands” and believed that they appeared at the moment when a child was born on Earth. or future emperor. So if you are going to visit your new parents, be sure to give them a drawing of a unicorn - let it protect the baby from illnesses and promise him a happy destiny.
And I’m also sure that the unicorn will take its rightful place in your personal diary. Get to the point!
How to draw a unicorn?
An ancient legend says that the unicorn is a messenger of happiness. Anyone who manages to see a unicorn will be able to speak all the languages of the world. It’s not for nothing that unicorns symbolize wisdom and knowledge. Light and gentle, like morning fog, they just beg to appear on the pages of Your album!
Well, let's try to draw a unicorn?
1. In order to correctly place the unicorn on the sheet, divide it into two equal parts. On the left side of the sheet, closer to the center, draw a small circle. And next to the bottom - another one, much smaller (this will be the face of a unicorn), and also draw an oblique line, which will be the center of the neck.
2. Connect the circles with smooth lines to form a muzzle, and continue to draw them down, drawing the neck.

3. To understand which direction to draw the unicorn’s body, draw an oval from the middle of the neck and draw an oblique line.

4. Use an oval to mark the horse’s thigh. Use lines to show the directions of the limbs.

5. Smoothly connect the neck to the circle to get the outline of the body. By using smooth lines draw the thigh.

6. Great! Now draw the belly of the unicorn.

7. Guided by auxiliary lines, outline the limbs.


8. It's time to draw the muzzle, eye and tail.

9. Don't forget about the mane and horn.

11. Well done! Erase the guide lines and start coloring the unicorn.

Great job!

How to draw a pony?
Who doesn’t know the friendly ponies from the cartoon “Friendship is a Miracle”? Cute unicorns, symbolizing loyalty, generosity, honesty and kindness, have settled forever in children's hearts. Are you also delighted with magical ponies? Draw their close relative, a dreamy pony, and your room will immediately sparkle with bright colors.
1. To correctly place a pony on a sheet, divide the sheet into two equal parts with vertical and horizontal lines and determine the middle of the sheet. You can use a ruler.
Having stepped back a little from the center (the place where the lines conventionally intersect), begin to draw the pony’s head. First draw a sharp ear and two arc-shaped lines.


3. Using a curved line, draw the back of the horse. The line should not be too long, since our pony is just a baby. Below, mark the end of the body with a small line. Congratulations - now you can see the general features of the pony's body.

From the neck, draw two more vertical, slightly curved lines. They will be the pony legs.

5. Use curved lines to outline the pony's legs. Increase the distance between the lines down to show the unicorn's hooves. Now draw another, slightly raised leg.

6. Connect all the lines and don’t forget to draw the fourth leg, which is almost invisible.

7. Well, the outlines of the body are ready. Now start drawing the eye with highlights. Our pony is a cute fairy-tale creature, so don't be afraid to make the eye big and clearly defined, like in the cartoons.

8. Now draw a fluffy pony tail. It is very easy. You draw loose wavy lines, connect them at the end - that's all the work.
Some myths say that the tail of a unicorn is an ideal raw material for magic wands. That is why it is used every now and then by witches and fairies, who in fairy tales, moreover, often ride unicorns.

9. It's time to draw a magic horn - the pride of all fairy-tale ponies.

10. The main decoration of a unicorn is a luxurious mane. Let's draw it.


Such a pretty pony will gladly decorate the pages of your album. Erase the auxiliary lines and start coloring the image with paints.


Give a drawing of a unicorn to your best friend and wish him/her all his wishes come true!