Instructions for drawing architectural objects or how to draw a church. How to draw a temple? Step-by-step instructions for drawing a wooden church for children
In the first centuries of Christianity, above-ground churches were not specially built, and believers prayed in special rooms in the houses of rich people and in buildings established for cultural events - basilicas. During times of persecution, Christians began to hide in vast dungeons - catacombs. When the persecution ended, over time the type of temple familiar to us was formed.
The temple is the house of God, where the Lord is invisibly especially present. A temple differs from an ordinary house in that it has an altar inside and a dome or domes topped with crosses outside. The dome symbolizes the sky above us, and the cross symbolizes the victory of the Lord Jesus Christ over death. External signs are not necessary, this is especially clear now when new temples are being built and people pray in huts at construction sites or in the basements of unfinished temple structures.
But the altar space is what makes the temple a place for the main divine service - the Liturgy. In the altar there is a throne on which lies a special plate - an antimension, where the transformation of bread and wine into the Holy Gifts takes place. Literally, the word “antimins” is translated as “in place of the throne.” This means that such a board can be used anywhere, and the Liturgy can be celebrated even on a stump in the forest, if necessary.
You can turn to God mentally anywhere: at home and on the road, at school before a test or in line for a vaccination. But Christians attach special significance to church common prayer: according to Seraphim of Sarov, just one short prayer “Lord have mercy” in church is equal to a thousand bows performed at home.
There is an angel at the altar of any temple, and even if people have forgotten about the temple, he serves the liturgy there every day. We read in the book “The Spiritual Meadow” by Blessed John Moschus:
Abba Leonty, abbot of the monastery of our holy father Theodosius, told us: “After the monks were expelled from the New Lavra, I came to this monastery and stayed in it. One day, on Sunday, I came to church to receive the Holy Mysteries. Entering the temple, I saw an angel standing on the right side of the throne. Struck by horror, I retired to my cell. And a voice came to me: “Since this throne was consecrated, I have been commanded to remain with it inseparably.”
We know that many churches in our country were destroyed in the twentieth century. This is very sad because sanctification is not retroactive. Where stadiums, tracks and ordinary houses now stand on the site of destroyed churches, angels stand invisibly, saddened by the fact that no one prays in the holy place. And it is very good if the temple is restored in its original place or at least a chapel is erected there - a small building similar to a temple, only without an altar.
Let's get creative! For drawing, we chose the simplest temple in appearance - the Intercession of the Mother of God on the Nerl River, in the Vladimir region. Church of the Intercession on the Nerl, as it is usually called.

Now let's reveal all the secrets of technology.
So, you will need the following materials:
- white thick paper,
- wax crayons for children's creativity,
- watercolor paints,
- a sippy cup and a squirrel brush.

First you need to determine the horizon line, the boundary of land and water, and the outlines of the temple. For little ones, you can make a temple template for outlining. Then more sparingly draw the reflection of the temple in the water. At this stage, the work is carried out with colored wax crayons. The temple itself is painted white, the dome is painted yellow, but the reflection does not need to be painted over. You can depict trees on the ground, the sun in the sky, and make ripples in the water in white or light blue.
This stage is of little interest because the result is practically invisible. But you have to try, the main focus is ahead! We remove the crayons, they will no longer be needed. Then you need to wet the watercolor paints and paint the sky, earth and water with large, sweeping strokes. It is important to remember that the water is always darker than the sky. An image made with crayons should not be afraid to paint over it, it will definitely appear under the magic brush!

Who knows, maybe a child drawing a temple pleases God no less than the adults who built such a temple. I wish you creative success!
When republishing materials from the Matrony.ru website, a direct active link to the source text of the material is required.
Since you are here...
...we have a small request. The Matrona portal is actively developing, our audience is growing, but we do not have enough funds for the editorial office. Many topics that we would like to raise and that are of interest to you, our readers, remain uncovered due to financial restrictions. Unlike many media outlets, we deliberately do not make a paid subscription, because we want our materials to be available to everyone.
Today, young artists and their parents have another task: to draw a temple with a pencil. It is both difficult and simple at the same time. Depending on how you approach it. It will take quite a lot of time and patience, because the task contains quite a few small details, which are the architectural elements of the temple. The structure itself is geometrically clear, consisting of simple and complex figures. Therefore, to more accurately convey the image, we will need a ruler and a good eye.
But first, a little history
At the birth of Christianity, churches were not built, and believers had to pray in special buildings - basilicas. Then came the times of persecution, and Christians hid and prayed in catacomb dungeons. And only over time, the modern, familiar type of structure was formed. It is believed that the temple is the house of God. The Lord is invisibly present in him. A temple or church differs from an ordinary house in that there is an altar inside, domes outside, and crosses on them.
Symbolism
The dome traditionally symbolizes heaven, and the cross - Jesus Christ, his victory over death. People believe that there is an angel at the throne of every temple, even if the temple is abandoned. As you know, many of the churches were destroyed during the revolutionary times. And it’s good if they are restored in the same place, since it is consecrated.
How to draw a Christian Orthodox church?
Let's get creative! We chose the simple-looking Orthodox Church of the Intercession. We will need: thick Whatman paper, a sippy cup, brushes (preferably natural), an eraser, pencils.
Step 1. How to draw a temple?
First we determine the horizon line. The structure stands near the river and we mark the boundary of land and water.
Step 2. Draw the outlines of the temple (you can create a special template for the child). We outline the buildings in the river (in softer tones). We remind you that at this stage we are working with wax crayons.
Step 3. Paint the walls of the temple white. The dome is yellow. The reflection in the river does not need to be painted over. We depict trees on the ground around. There is sun in the sky. We make ripples in the water in light blue or white. This completes the crayons work!
Step 4. Now comes the fun part! Let's put away the crayons, we won't need them anymore. Then you need to soak the watercolor and paint the earth, sky, water with sweeping and large strokes. Remember: water is always darker than the sky, earth is always darker than water. This is how it should look in the picture. Don't be afraid to paint over an image you previously drew with crayons. It should definitely appear after the watercolor dries!

Another way to draw a temple
Although Orthodox architecture has its own centuries-old traditions, it is possible to depict a structure beautifully without knowing them: the main thing is to observe the basic laws of graphics and painting.
Step 1. On a piece of A4 paper, on the right side, draw a vertical line. From the same point from which we started constructing the line, we draw two inclined ones, diverging at the same angles.
Step 2. Similar to the previously drawn diagram, we need to complete the left side of our drawing. A parallelepiped should come out. Its corner is at the bottom point, where all the lines should converge. The dotted line denotes the edges and the very base of the parallelepiped. Draw one line up in the center. This is a guideline for building a dome. On the sides we draw four vertical lines.
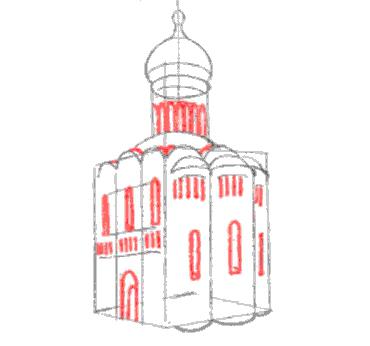
Step 3. Draw a line - arched - curved upward. This is the basis of our dome. Down we draw the boundaries of the tower with the bell. It should, as it were, come out from the base of the dome and end on the roof of the lower tier of our temple. The upper edge of the dome resembles an onion with a sharp end.
Step 4. And on the left, on the sidewall - the wall of the lower tier of the building - we outline three half-cylinders. Their height corresponds to the size of the temple. We add pointed domes to them. The roof of the building is designed in the form of curved arches.
Step 5. On the right wall of the temple we draw a door, above it there are two or three windows. We also draw several windows on the bell tower. They are oblong and narrow in shape.
Step 6. We continue the lesson on the topic “How to draw a temple step by step?” Using a simple pencil we shade the dark areas of the towers, as well as windows and doors. Using shading we add volume to the dome of the temple. We sketch the shadow that falls from the building and the bell tower. Almost everything is ready. All that remains is to remove unnecessary sketch lines. You can use an eraser to “blur” the shadows - somewhere lighter, somewhere darker. Now you know how to draw a temple with a pencil step by step.

Coloring
This image we have obtained can also be additionally colored with paints or ink, if desired.
Step 1. Dilute mascara with ordinary water one to one. Dip your finger into it and rub the right turret. We do the same with the left!
Step 2. Cover the dome and roof with yellow - in exactly the same way.
Step 3. Paint the walls with emerald green paint, you can add ocher.
Step 4. Above the dome and roof we make “washes” of a gray-blue hue.
Be sure to let the drawing dry. Now you can frame it and hang it on the wall. Can you give someone such beauty as a gift!
Additional advice on how to draw a temple: in the same way (only using a brush) our drawing is painted with gouache or watercolor. In this case, it will look different, but no less attractive.
Many, thinking about how to draw a temple with a pencil, come to the conclusion that it is very difficult. Firstly, you should observe the traditional details inherent in this structure, and secondly, do not forget about the basic laws of painting, following which you will get a stunning drawing.
Stages of drawing a temple
Before you draw a temple step by step, you should take a sheet of paper and a simple, well-sharpened pencil. At the first stage, draw a vertical line on the right side of the sheet with a pencil. From the point from which you started constructing the vertical line, you need to draw two inclined lines, which should diverge at the same angle. Similarly to the constructed diagram, you should complete the left side of the drawing. As a result, you should get an even parallelepiped, the corner of which is at its lowest point, where all the lines converge. The dotted line will need to indicate the base and edges of the parallelepiped, and one line should be drawn upward in its center. This will serve as a guide for the structure of the dome. And then you need to draw four vertical lines on the sides of the parallelepiped.
At the second stage, you will need to draw an arched line curved upward, which will be the basis of the dome. Down from it you should draw the boundaries of the bell tower. Moreover, the tower should extend precisely from the base of the dome and end on the roof of the lower tier of the temple. Next, you need to modify the top edge of the dome so that it looks like a pointed onion.
The third stage includes the construction of three semi-cylindrical figures on the left side on the side wall of the lower tier of the building. Their height should be equal to the temple itself. Next, you need to add pointed domes to them and decorate the roof of the temple on the right and left in the form of three curved arches.
At the fourth stage, you should draw a door on the right wall of the building, and above it 3 windows. Then along the perimeter of the bell tower you need to draw several narrow windows. Then, using a simple pencil, shade the darkened areas of the door, towers and windows and, using shadows, add volume to the dome. The temple is all ready. Now you know how to draw a temple and you will no longer be afraid to draw such structures.
And the second lesson descended, which will follow. And this lesson will be glorified and great, for it will be drawn with a clean and light pencil. As you may have noticed, the topic of buildings of ambiguous meaning continues, and this time we will look at how to draw a church. The Church is a stronghold of goodness and love, but not all of its deeds are as bright as they are believed to be. Look, for example, at these facts:
- Crusades. The thing is very interesting and rich. According to the official version, they were organized for the liberation of Palestine, but in principle the goal was the arrogant conversion of poor pagans to Christians and their ascension to heaven. Let's just say that during the entire period of the Crusades, tens of thousands of superstitious people rose up against their will;
- Everyone knows that the Pope is the head of the seat of the highest spiritual leadership of the Roman Catholic Church. Yes. But not everyone knows that one day a woman became Pope. No one even guessed until Papa gave birth right during the service. Well, as always, the modern Vatican considers this event a fiction, but who knows, who knows...
And now that we know all the exquisite secrets of the church, let's start drawing!
How to draw a church with a pencil step by step
Step one: add the base of the building and some flora around it.  Step two: now we finish drawing the walls and trees. Since this is a church, and there is always a cemetery near the church, you know what needs to be completed.
  Step three: we clarify the façade and architecture of the church, and also install a few more tombstones.
  Step four: we apply even more details to the building itself, giving it a more adequate shape.
  Step five: everything is almost finished, all that remains is to correct the main window and some details.
  Well, that's all, the church is ready, everyone is happy, amen! Want to draw other beautiful buildings? No problem, I made very good lessons for you, take a look.
Depicting architecture requires a lot of effort. For beginners, this is not as difficult as portraits, for example. This is because painted buildings are perceived differently from people we know, and here mistakes are less visible. I will show you how to draw the Assumption Cathedral step by step. I prohibit using a ruler or any other tools that make it easier to draw straight lines! Learn to draw by hand. When your hand gains experience and confidence, you can use any techniques. Now draw the cathedral on your own!
Step one. We will show on paper the place where the cathedral and trees will be located.  Step two. We draw the main components of the building.
  Step three. Let's detail each of these parts. Take your time, carefully work out every detail: crosses, domes, windows and even trees.
  Step four. To make the landscape realistic, we will add a background and shadows.
  Check out my other tutorials on drawing buildings, they are even better: