DIY tie products. New life for old ties: an original pillow
The husband does not wear a tie left over from gala event or is the accessory out of fashion?
Don't rush to throw it away useful thing– will turn it into a stylish brooch! Using this master class, make a decoration from a men's tie for your loved one with your own hands! An original brooch will decorate the lapel of a jacket, coat, raincoat, hat or large textile bag. A fashionable new thing will suit a lady of any age and style, it all depends on the finishing decor of the designer item.

Preparation of materials and tools
For work, take the following materials and tools:
- Men's Tie;
- brooch holder;
- beads;
- chain;
- sewing threads in the color of the tie;
- needles and pins for hand sewing;
- scissors.

Master class on making a brooch from a tie
Clean out your closet and find ties that are taking up scarce space. If you find unnecessary jeans while cleaning, then set them aside to make and sew.
Ask permission to confiscate the item you like from the owner and start making women's jewelry from a man's tie.
Untie and carefully inspect the accessory. If it seems even a little dirty to you, wash and iron it. If the iron does not have a special soleplate and a delicate ironing function, iron through a damp cotton cloth.

About 10 centimeters from the wide end, make the first fold at an angle of about 45 degrees. Some products have a label sewn on the back that needs to be peeled off.
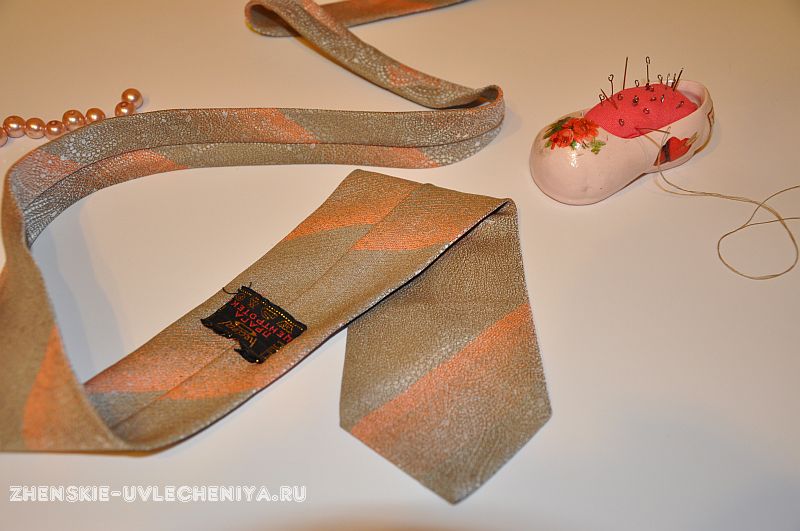
Wrap the first loop, trying to keep it symmetrical. Secure the loop with a sewing pin.

In the same way, fold the second loop in the other direction from the wide end. Thread a double thread through a hand sewing needle and use random stitches to sew both loops to the wide end. Stitches on front side make men's ties small so that they are not conspicuous and the decoration looks neat.

Fold and sew one small loop between the two loops.
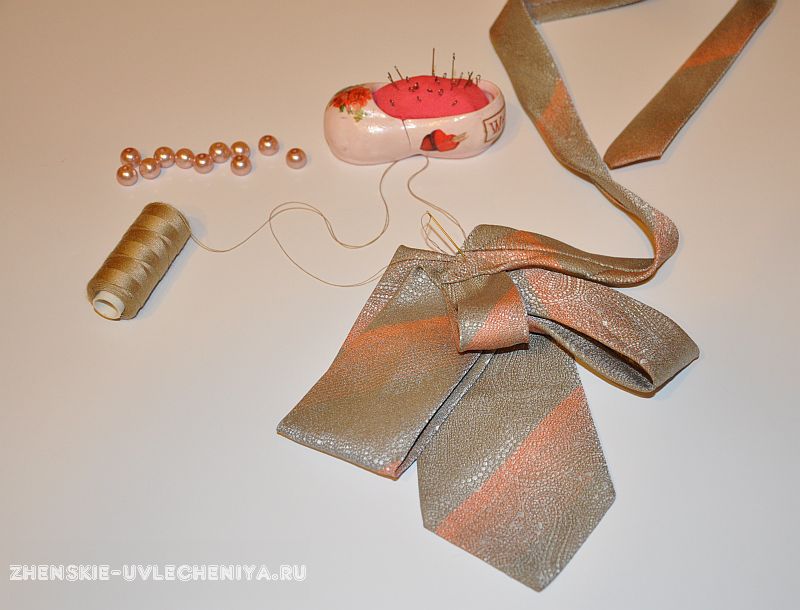
Form the next two loops into a circle.

From the remaining length of the tie, add another loop and leave the narrow end open. Secure the decoration by stitching with thread.
On the reverse side, sew all protruding lines and folds.

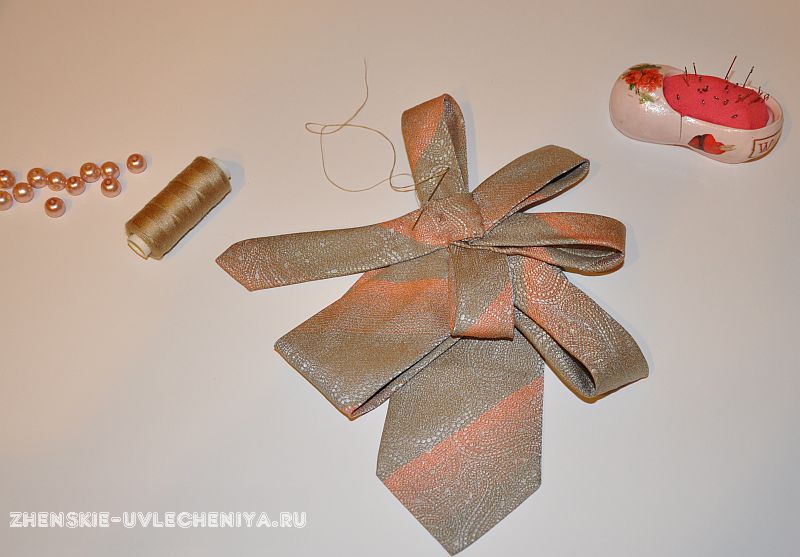
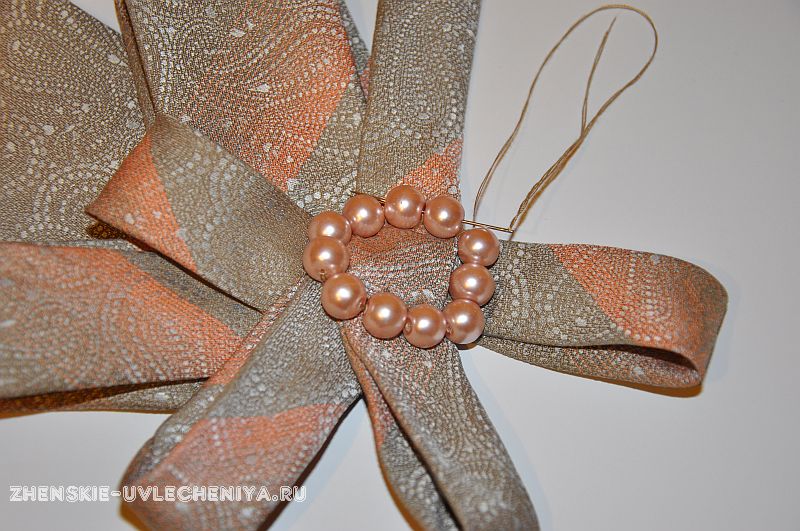
Decorate the middle of a man's tie with beads. Sew them in an oval shape, imitating a buckle.

For added strength and to even out the outline, use a needle to pass the double thread through the beads several times, pulling slightly. Fasten the end of the thread to the wrong side of the brooch.
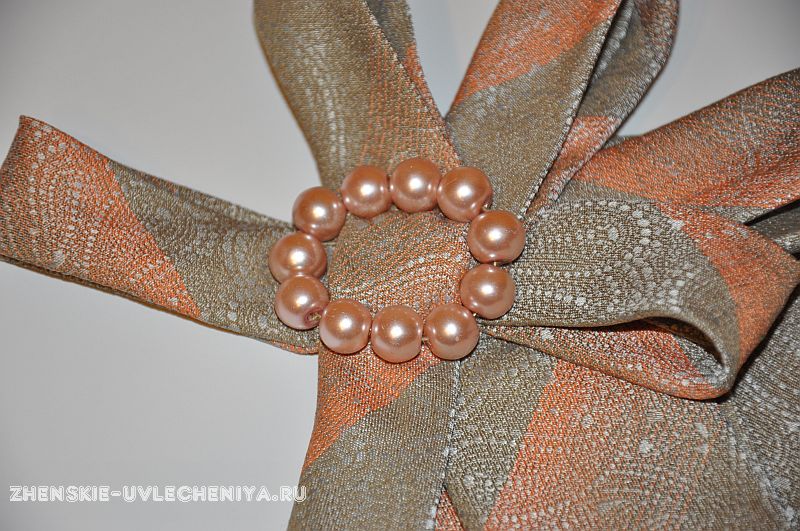
Take almost finished decoration in your hands and, after twisting it, decide how you will wear it. Additionally, decorate with a small piece of chain, sewing it near the beads so that it hangs beautifully.
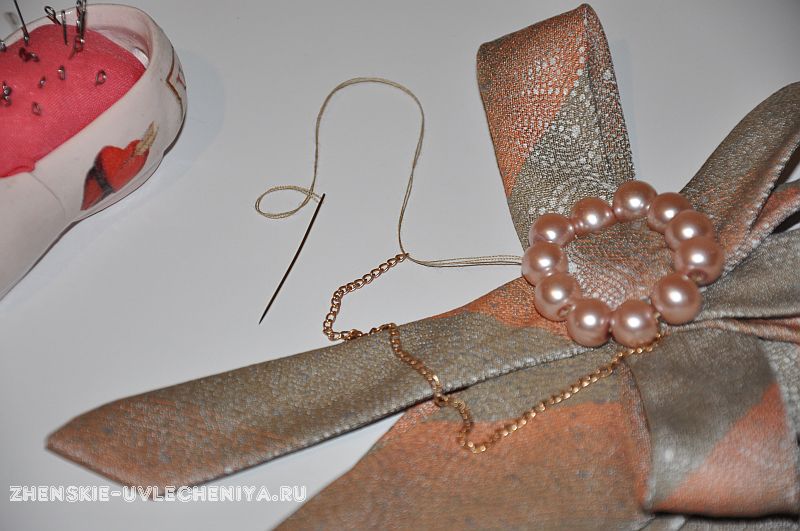
Attach a suitable clasp to the back side. You can also use a standard shaped pin.

The unusual brooch is ready! A stylish, hand-made women's decoration made from a man's tie looks very beautiful. No one will guess that an old accessory is taken as the basis; they will rather think that the needlewoman worked for a long time on the craft, wanting to get an item, a brooch, similar to a man’s wardrobe item.
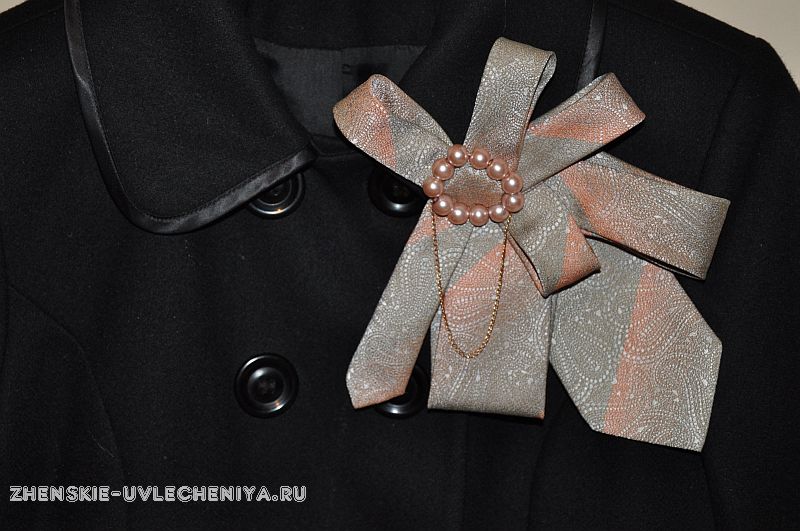
Brooches with bright and contrasting designs, polka dots, stripes, and plain ones look original. By laying out loops and folds to your liking, using various decorative accessories, you will create your own unique decoration.
If you have time, check out various materials. Stylish things can be made from ribbons, leather, plastic suede, polymer clay. They are always unique and attract attention.
Surely your dad has a whole bunch of old ties. And although their condition may still remain quite excellent, the shape and style have long been outdated. And no one wears those colors anymore. We suggest upcycling old ties into a stylish pillowcase for a sofa cushion.
As a rule, ties were always made from very high-quality silk, unusually durable fabric. These traditions in sewing real men's accessories have remained relevant to this day. And this benefits us!
The author of the master class suggested alternating ties of only two colors. It is unlikely that you will be able to find several ties of the same color and pattern. No problem - alternating completely different ties can create an even more interesting composition.
Let's stop talking - let's get to work!
Step one. Decide on the location of the ties. Take a particularly responsible approach to this issue in the case of different ties, with different patterns and motifs and different colors. The success of getting a stylish pillowcase made from handmade ties actually depends on this planning stage.

Step two. Sew the previously laid out ties together to obtain a single piece. If possible, use a machine zigzag stitch; if you don’t have a sewing machine, sew the ties by hand.


Step three. From the resulting fabric, cut out one side of the pillowcase. Reverse side in order to save ties, you can cut them from ordinary lining fabric.

Step four. Sew the pillowcase pieces on all four sides. Leave a small hole on one side for turning and filling.
0 0Galina Yatsishina,
With coming sunny days The desire to update your wardrobe becomes especially strong. And we, as usual, start with an audit of closets, sorting things, shoes, bags, accessories. Sometimes you can find real treasures on shelves and in the depths of drawers - for example, a box of men's ties that are very beautiful, but have already gone out of fashion.
Now mom, in whom the designer has awakened, has a task: to convince dad to give these ties to her (well, maybe leave a couple of his favorite ones for official events and special “outings”). And she knows exactly what to do with them next.
Let's decide what we need most: a removable decoration in the form of a necklace or bow, trimming the neck of a blouse or T-shirt, a bag, a belt or clothing. If there are a lot of ties (and grandma definitely has grandpa’s ties in her closet, even with vintage patterns!), you can sew a set of accessories.
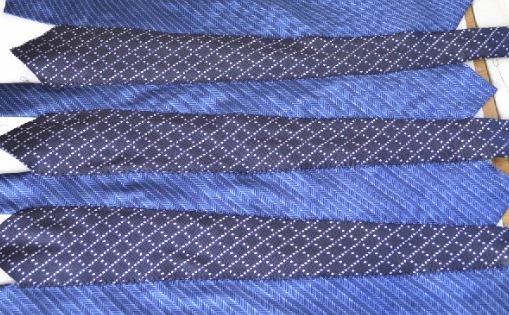
All men's ties are usually the same size and shape, differing only in the type of fabric and width. They can be used entirely by folding and rotating in the right way, or open the seams and smooth the material well before cutting.

From one tie you will get BEADS And COIN WALLET . For the beads, cut out a rectangle approximately 7-10 cm long than the required length of the beads, and sew a seam along the long side. Now we insert beads of a suitable diameter into the “pipe”, securing each one with a tied knot.
After filling the “pipe”, sew the remaining ends. For the wallet, use the front end of the tie, sew on a button and braid with a carabiner.

Complicated cutting and sewing is not at all necessary; the tie can simply be folded beautifully around the neck, fixing the soft folds on the wrong side. For more rigid folds, you need to machine stitch and attach a beautiful button. A buttonhole is made if the decoration less than circumference heads.
If you choose beads to match the fabric and fasten them along the contour of the tie, you will get AN ELEGANT ACCESSORY FOR HOLIDAY OCCASIONS .

More complex decorations will require suitable fabric of one or two colors, a variety of decor and accessories, braid, and pieces of fur. At the same time, the fabric of the tie comes in such colors that it is quite easy to make non-standard folds.

We have selected several more options for detachable ties, pendants and collars. There is enough leftover fabric for a bracelet.

Unusual variegated colors are well suited for summer; we will sew on top or glue beads, stones, and rhinestones with a glue gun. Combining fabrics of contrasting colors and suitable patterns is suitable for the office or formal event.
Sewn to the tie in gray-blue tones is a strip of plain fabric, decorated with metal buttons. She fixes the other end. The tie is gray with brown trim and fastened with press studs.

The neck of a blouse or T-shirt can be finished with a tie fabric, the trim will be sewn on, leaving only the ends free, which are tied or fastened with a button. A frill of unequal width will look original.
A bag of Soviet ties had been collecting dust in a closet at the dacha for a long time. There was also a pair of children's nylon hair ribbons. It’s a shame to throw it away, but no one will use these things for their intended purpose. This is where the idea to make such funny round pillows was born. They can be used as “thoughts”, rolled up under the head, or as seats on chairs and stools.
So, for 2 pillows with a diameter of 47 cm, you will need:
- 10 long ties;
- 2 nylon tapes different colors;
- 2 buttons;
- 1 pillowcase or piece of calico;
- filler (sintepon\holofiber\foam rubber);
- sewing supplies.

First of all, we untie the knots on the ties and rip them apart. After this, we cut the resulting blanks.
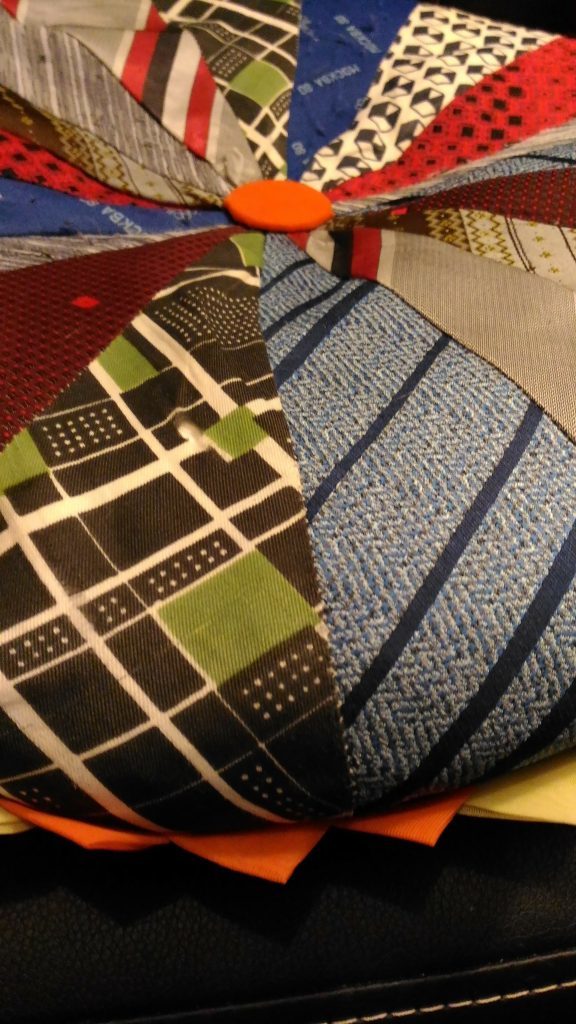
It is convenient to cut at the seams, so from one tie you get four long, trapezoid-shaped pieces of the same size. Now you just need to pin them together with pins or sweep them away to create a blank for the future pillow. Its diameter depends on the length and number of ties used.


We wrap the button with a piece of nylon tape and sew it in the middle. We cut the ribbons themselves into identical strips diagonally, fold them into triangles and sew them together slightly overlapping.

You should get a kind of curly “fringe”, which we will then sew between the front and back sides of the pillow. For the backdrop, we use a piece of calico or cut out a circle from an old pillowcase to the size of our tie blank. We sew both fabrics facing each other, with a border of ribbon triangles between them.

We leave an unstitched part on the side so that the pillow can be turned inside out. right side and fill with filler. After this, carefully sew the slit on the hands. The pillow is ready. We sew the second one in exactly the same way.
Olga Gorlanova from Kurgan shared this life hack.
Domovod, May 20, 2017.Ask your question about the article