Do-it-yourself puppet theater made of fabric for kindergarten with photos and videos. Making a do-it-yourself puppet theater for kindergarten Making decorations for a do-it-yourself puppet theater
Good afternoon guests and blog readers! Today I again want to touch on the topic of how and how to engage a child at home. This topic is very close to me, because I have two children at home. Which require attention and care.
In the previous article, I told you about educational games with your favorite characters from PAW Patrol. For those who missed this issue, read here.
Today I want to offer another option for playing at home, this is a puppet theater. Of course, you can take your child to a real puppet theater, or you can create one at home.
Therefore, I will share with you some thoughts and developments to make such a miracle.
We will need: your desire and a little free time :)
To be honest, we have different theater options at home, such as this one wood.

My kids love it very much, because it is so funny and exciting when I show them a fairy tale and they sit and listen. Now I have an older son, he can show and tell fairy tales himself. Just think, this is very cool, because while playing, a child learns to retell his favorite fairy tale, build a dialogue, etc.

I think that all preschool children, as well as most children of primary school age, will not remain indifferent to such theaters. And if you come up with your own fairy tales with a funny plot and an intriguing ending, then it can actually turn out to be a real holiday for a child.

The simplest version of a do-it-yourself puppet theater is a paper one. It's easy to make it yourself. Well, or together with the child.
DIY paper finger puppet theater, patterns
Children really like this paper finger puppet theater, it attracts them and also develops fine motor skills. Look here.

The first option is a flat round finger theater. You need to make the head and upper part of the doll, put it on your finger using a paper ring or you can make cones.

Create these dolls with your child together, starting with character templates. Download them from my website by writing me a comment below, I will be happy to send you the templates, print them and have fun playing.
After all, finger puppet theater is a whole magical art in which children learn about the world around them. Any child will enjoy being in the role of an artist, and this helps to believe in themselves and achieve success in the future. This is also good material for developing in children processes such as imagination, thinking, as well as the development of fine motor skills and much more.
The finger theater can be made from any available materials, such as paper, fabric, cardboard, corks, threads, cups, etc.
DIY tabletop paper theater, templates
I show my children this tabletop paper theater, which I made very quickly.

We will need:
- cups from Rastishka, illustrations, ice cream sticks
Stages of work:
1. Take any illustrations and cut out all the characters in the fairy tale along the outline.
3. Glue popsicle sticks onto each fairy tale character.

4. Now take the cups and make a horizontal hole at the top of each cup with a stationery knife.

5. Well, now insert the stick with the hero into the glass. Look how lovely it turned out. Very easy and simple, no worse than buying it in a store.

Ice cream sticks can be replaced with plastic forks or spoons.
If you don’t want to take illustrations from books, then you can find characters from any fairy tales on the Internet, save them, and then print them out, and then cut them out and glue them onto sticks. You can download from my website the following ready-made templates of heroes based on the following fairy tales: Kolobok, Teremok, Turnip, Hare's Hut, just write a comment or review below and I will send it to you by email.
Paper puppet theater “Walkers”
This kind of theater is very popular with young children; for such a theater you need your favorite characters and a couple of holes.

Believe me, children will happily play such games.

And if you invite friends over, it will be even more fun to play.

You will also receive samples of walkers of your favorite characters to your e-mail address.
Tabletop paper theater on plastic cups, corks, cubes
This option is also very easy to make; you can even draw the characters yourself or find and cut them out, and then glue them onto corks or cubes. Everything is brilliantly simple.

What do you think of this idea? All children love Kinder Surprise, and all of them have little donations left over from them, which you can pay for in such a theater.

DIY glove puppet
In reality, there are a lot of puppet theaters that can be built. Even at almost no cost. You just need to use your wits and do it! You can sew it, for example.

Or you can learn to knit and knit these cute little characters:

Honestly, I used to knit well, but now I don’t have enough time for it all. But I never liked sewing. But, as an option, you can also create a theater for those who love this business.

Although here is the simplest master for you - a class on sewing a puppet theater from fabric using gloves. Anyone can do it, even those who do not know the art of sewing.

We will need:
- household gloves, knitted - 2 pcs., buttons for the eyes - 2 pcs., thread, scissors, braid, stationery knife
Stages of work:
1. Take the first glove and steam the seam thread on the cuff, it is usually red or yellow. Tuck the little finger, thumb and index finger in so that they do not come out, sew them up. You should end up with a head with ears and a hare neck. Sew the bases of the ears to prevent your fingers from getting in there.

2. Now take the next glove and hide your ring finger in it, sew up the hole. Place your middle and index fingers together and now place the hare's head on them.
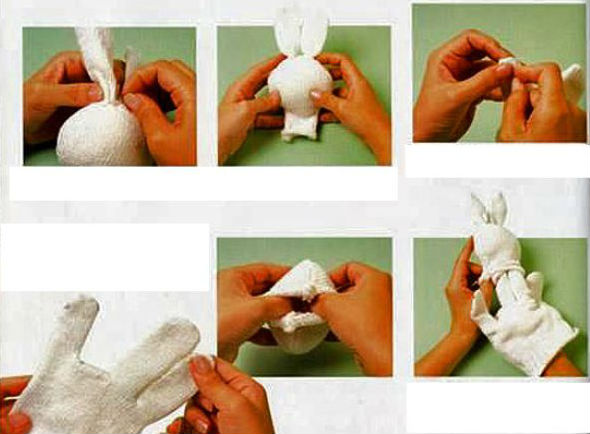
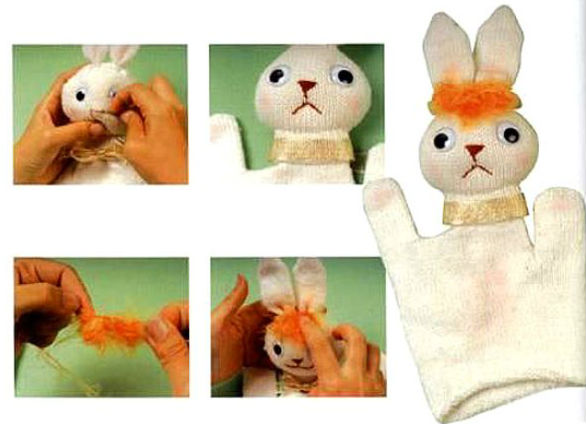
3. Sew the head to the neck. To hide the seam on your neck, tie it with a bow or tie in the shape of a butterfly. Sew button eyes and embroider a muzzle, or you can draw it with a marker. You can decorate a bunny using fluff or knitted threads by gluing a cute little chupik on his head. 😯
In this way, you can make other toys, such as a dog, parsley, etc.

My son generally loves such a simple glove, he puts it on and goes around making up all sorts of stories with the characters :)

Here is a short article for today. I think any of you have small children, you will be happy to diversify their leisure time. Choose any type of theater and do it with your child. And then enjoy a good mood and positivity. After all, all joint work strengthens your relationship! And the child will only be happy and delighted about this, and will definitely tell you: “Mommy, how I love you!” The most magical words in this world.
Well, I say goodbye to you for today. Until next time.
P.S. Do you know what is very important?! It is in the home puppet theater that you can observe your child and his behavior. Because the baby can come up with something, speak out, and we adults still need to listen to what the child is talking about, what topics he is talking about.
Elena Dyachenko
Puppet show- one of the most favorite games for many kids. Cheerful laughter is heard, joyful sparkles light up in children's eyes, a child's heart, like a sponge, absorbs every word and is filled with anticipation of a miracle when an adult communicates with a child with the help of a doll, acts out puppet shows.
From a very early age, we introduce children to the world of beauty - to theater. Theater for children is one of the most popular and effective developmental activities. This is a tool that helps teachers implement many educational and educational functions.
I would like to offer my own manufacturing option puppet theater for kids. I wanted to make it individual, easy to use, aesthetic, easy to make, and functional. The idea came up to make something like this theater, with the help of which it would be possible to stage several children's works, as well as invent your stories. In addition, I would like to create theater Our kids could take part as much as possible. Thus was born "Made puppet show» on toilet paper rolls.
Make one like this theater is not difficult at all. To make fairy-tale characters and attributes you will need toilet paper rolls, a glue stick, colored paper, cardboard and a desire for something make.

At the heart of everyone puppet character there is a cardboard roll covered with colored paper. The edges of the upper part of the roll are bent inward. Details (head, arms, legs, etc.) glued to the roll.

I made the decoration of the house from a cardboard box. On one side is the facade of the house, and on the other side is a room with furniture. Furniture is possible make from thick cardboard. Such actors and scenery stand firmly on the table and can be moved freely. Keep it like this theater convenient - fairy-tale characters fit into a house box.
By using "Prefabricated puppet theater» You can stage different fairy tales, nursery rhymes, and rhymes for kids. For example: "Ryaba Chicken",
"Turnip", "Three Bears", "Teremok", "Kolobok", and many others.
Children enjoy not only watching performances using "Prefabricated puppet theater» , but also manage the artists themselves. Older kids take an active part in creating such theater, manufacturing dolls(this is a completely accessible activity, since it is based on an application).


Working with children theater, we make the life of our students interesting and meaningful, filling it with vivid impressions and the joy of creativity. And most importantly, the skills acquired in theatrical games, children can use in everyday life
You will need
- - Knitting;
- - shreds;
- - old mittens and gloves;
- - cardboard tubes;
- - boxes from household appliances;
- - colored paper;
- - foam rubber;
- - cardboard;
- - gouache;
- - brushes;
- - PVA glue;
- - scissors;
- - 2 chairs;
- - large board;
- - bedspread;
- - rope;
- - wooden beams;
- - door hinges;
- - carpentry tools.
Instructions
Start preparing for the performance with the script. It is most convenient to write it on a computer. Find the one you need. Write down what kind of decorations you will need. Write down what is on stage when the action begins. It looks something like this. “Forest clearing. Under the trees there is a hut with chickens. There's a cat sleeping near the threshold." Write down the words according to the roles and actions of the characters.
Theater dolls are different. For home use, gloves are most suitable. Visit your nearest toy store. Perhaps there will be something suitable there, since theater dolls are sold individually and in sets. Try to choose them so that they match each other in style.
If the store doesn’t have the dolls you need, make them yourself. This will be even better, since you can make the characters according to the hand size of each actor. Perhaps you have gloves lying around, a pair of which have been lost, or old mittens. They can be very useful. Cut off the tips of the index and middle fingers of the glove. Cut them lengthwise so that the cut points touch each other. Do the same with your ring finger and little finger.
Sew the sections of the index and middle fingers together in pairs. Do the same with the ring and little fingers. Instead of five fingers, there were three on the glove. Make hands or paws from scraps or pieces of fur. Cut out 2 small circles, gather them along the edge with a needle-forward seam, insert small pieces of foam rubber and tighten. Sew the balls to the hands of the toy.
Make the head. This is also a circle made of fabric or border. In the same way as when making hands, gather the circle around the edge, stuff and tighten. Connect the head and body with a cardboard tube and sew. Decorate your head as you wish. Facial features can be embroidered or appliquéd from pieces of felt. Hair is made from fur or woolen threads. The threads are folded in half and sewn to the head in a checkerboard pattern. To make a bunny or bear have ears, insert pieces of cardboard into them. You can use heads from broken toys.
Take care of the screen. If you don't have a real one yet, string a rope across the room and hang a blanket on it. True, in this case the opportunity to put up decorations is very small. You can decorate the screen itself with flowers or trees. For a more solid screen, you need to take 2 chairs and a board. Place the chairs with their backs facing each other at some distance, and place a board on top. Drape the structure You can put a house made from a cardboard box and trees on it.
Once you feel that your passion for theater is serious and long-lasting, make a real screen. It can be large or portable, which is placed on the table. You will need 3 boards of equal length and 2 or 4 door hinges. Connect the boards with door hinges. Nail wide wooden blocks to the bottom of the screen to make it stable. You can make a stationary drapery, or you can simply cover the screen with a piece of fabric.
Decorations are attached to such a screen with buttons or nails. Try to create a design that will suit several performances. You can also make double-sided decorations. For example, on one side the house will be wooden, and on the other - brick.
Unpacked. The Christmas tree still stands decorated with balls and garlands. From under the thick crown, Father Frost and Snow Maiden are watching what is happening with the family. Soon their parents will hide them in a box and put them away in the closet until the next New Year's festivities.
There is a box of sweets on the table, waiting in the wings - to be sent to the trash can. Don't rush to throw away colorful and bright packaging. From it you can make a wonderful children's theater with your own hands, or rather a theater with cardboard dolls.
To work you will need:
- cardboard packaging for any gifts
- PVA glue
- scissors.
First, you should carefully study the drawings to decide which part of the material we will leave for decorating the theater hall, and which for the dolls (fairy-tale actors). We decided to use a large box (in the shape of a house) to create a theater room. From the small one we will cut out details for decorations and animal figures. Have you chosen the appropriate drawings? Now we can safely start cutting out the parts.

In our case, the fairy tales will be about how Santa Claus reached our region to leave delicious sweets for the children. Different types of transport eloquently indicate that the path was not easy.

Now let's get down to creating and decorating the theater hall. We'll cut a rectangular hole on the front of the larger box. Thus we open the scene.

To prevent the bottom of the box from puffing up, glue a rectangle cut off from the front side onto it. The English-Russian dictionary will help you press the cardboard and facilitate the gluing process.

This picture shows cut-out decorations: a decorated Christmas tree and Santa Claus in a sleigh.

Finally, the bottom stuck, we removed the dictionary. About 20 minutes passed. We cut holes on the roof of the house through which we will lower the characters of the play onto the stage.

We diluted the scenery with spruce trees, snowdrifts and a cozy village. The evening lights came on in the windows. We see snow flakes outside. Silence.

We glue the details onto the far wall of the theater. A solid canvas, of course, would look better, but we don’t have such material. You'll have to make do with what's available. In the end, the background looks great.

Let's continue to create. It was the turn of the high snowdrifts. We also cut them out from leftover cardboard.

Glue the snowdrifts in the foreground. Please note that the tree on the left side of the picture is located very close to the viewer.

We glue cut out thin strips to each of the characters.

This is what the work looks like from the reverse side.

We lower the main characters onto the stage through holes cut in the roof of the theater. The animals are sitting, waiting for Father Frost's sleigh to appear in the starry sky.
Home puppet theater will help parents introduce their child to art, develop his imagination, speech and creative abilities. The kid can try himself as an actor, and also take part in preparations for a theatrical performance. You will learn everything about how to make a home puppet theater with your own hands in our article.

Home dollDIY theater
Nowadays, it is not difficult to find attributes for holding a home performance. They can be purchased in specialized stores. But if you want to surprise your baby in a special way, make a puppet theater with your own hands. Let your child take part in this venture. A bright screen, colorful scenery, animated characters from your favorite fairy tales - and a sea of genuine positive emotions will be guaranteed.
DIY screen for home puppet theater
Puppet theater at home cannot do without a screen. What should it be made of? We will tell you about the most popular options.
Quick screen
Are you itching to host a theatrical performance but running out of time? Make a quick screen. To do this, just hang the fabric on a rope and fix it in the doorway. Use the waste material by cutting a window in it.
PECULIARITIES! Hold a theatrical performance outdoors. Such a pastime will not only give the baby a good mood, but will also benefit him.
If you don't want to ruin the fabric, you don't have to make a hole in it. In this case, the puppets in the performance will be located above the screen.

Sew the decorations carefully onto the material or secure with clothespins. Lightweight paper parts can be easily attached to an improvised partition using double-sided tape.
The screen is easily made from available items that can be found in every home. You will need a regular ironing board. Fix the fabric to its legs - the partition is ready. You can use the same method on a table.
Fiberboard screen
You can make both a tabletop and a floor screen from fiberboard. Naturally, in the second option you will need more materials and time. Such structures will last for more than one year.
What is needed to make a screen?
- Fiberboard sheet.
- Pencil.
- Jigsaw (saw or knife).
- Drill.
- Sandpaper.
- Ribbons or cords.
- Dye.
- Brush.
- Textile.
- Decor elements.
Sequence of work.
- Transfer the templates for the screen parts onto a sheet of fiberboard and cut them out using a jigsaw.
- Sand the ends and other irregularities with sandpaper.
- Drill holes in the structural elements.
REFERENCE! Door hinges can be used to connect the parts of the fiberboard screen.
- Paint the resulting base with water-based environmental paint.
- Let the screen dry thoroughly. If necessary, apply several coats of paint.

- Sew covers onto the design parts. Attach the elements to the fabric and trace with chalk, leaving seam allowances, then sew them together. Use thick and colorful materials. Gabardine, satin, and velvet are perfect. They will decorate the screen and give it solemnity. If desired, the covers can always be removed for washing. To add volume to the material, you can use various fillers (foam rubber, padding polyester, etc.).
- Thread the tape through the holes and connect the structure.
- Get decorating. Give free rein to your imagination. Let your baby take part in this creative process. Use ribbons, buttons, fringe, etc. to decorate.
Cardboard screen
This version of the screen is similar to the previous one, but it is less stable and durable.
What will you need to make?
- Single-layer cardboard.
- Corrugated cardboard.
- Glue.
- Pencil.
- Ruler.
- Scissors.
- Decorative elements (paper, paint, etc.).

Sequence of work.
- Trace the template for the future screen (you can download it on the Internet) with a pencil on cardboard or design the dimensions yourself.
- Cut out the blanks.
- To make the screen stable, stick several layers of corrugated cardboard on its front part; in the folded areas it is better to use one layer.
- After the glue has dried (after about a day), connect the parts using thick thread, ribbon or lace. To do this, use an awl to make holes at the joints, then thread the thread or ribbon. The stitches must be large, otherwise you risk tearing the cardboard.
- Paint the screen with paints or cover it with decorative paper (you can use unnecessary wallpaper).
Screen out of the box
A simple but worthy option. Surely you have an unnecessary box at home? Give it a second life and use it as a table screen.

- Cut a window at the bottom of the box, perhaps in the shape of a theater curtain.
- Straighten the elements of the box.
- Remove the top and bottom side parts.
- Paint the structure in several layers.
- Make decorations from the leftover material: sun, trees, grass, etc.
REFERENCE! Do you want to surprise your baby? A home shadow theater is a great option. Make a screen for the performance by stretching fabric over a base of wooden blocks, or use a box and a white sheet of paper. Prepare figurines of future characters, glue them onto black cardboard and attach them to a wooden skewer.
Dolls for home puppet theater
Dolls for a home theater performance can be bought in a store or you can use your baby’s favorite toys. But it's best to make them yourself. Your baby will be happy to participate in their making and will not only receive a lot of positive emotions, but will also show his creative abilities. Such activities perfectly develop fine motor skills, calm the nervous system and help self-expression.
What dolls can be made at home?
Fabric mitten dolls
Such dolls are made from any fabric. If you want the toy to keep its shape well, use dense materials or glue the elements with doublerin. To make a mitten doll you will need:
- pattern;
- textile;
- filler;
- chalk or a piece of soap;
- scissors;
- threads;
- decorative elements: buttons, fur, etc.

Work order.
- Do pattern according to the size of your hand. To do this, trace it on paper or take a ready-made mitten as a basis. Don't forget to leave seam allowances.
- Place the pieces together with the right sides facing in and sew.
- Press the seams.
- Turn the product right side out.
- Do head pattern future doll. Draw a circle, choose its size as desired. Cut out 2 pieces of fabric and sew them with the right sides facing in, leaving a small hole. Turn the product right side out and fill it with filler (cotton wool, padding polyester, etc.). Carefully sew up the hole. Outline the facial features and do the hair. As peephole use buttons, beads or felt cutouts, embroider the mouth using thread. For the spout cut a small piece of fabric in the shape of a circle, hand-stitch along the edge, pull the end of the thread and fill the resulting “bag” with filler. To make hair, use a bunch of threads.
Finger puppets
These theatrical accessories are made according to the same principle as in the previous version. Only they will not be worn over the entire palm, but on your fingers. Such a doll can be sewn from fabric, felted from wool, knitted from thread or cut out from paper.

These toys will become indispensable when traveling, because they do not take up much space and will captivate children of any age. Even a baby will appreciate such a theatrical mini-performance.
Paper dolls
You can buy paper dolls at any bookstore or print templates from the Internet. If you are good at drawing, show your talent and depict the characters yourself using paints.
To make toys keep their shape better, choose thick paper, or stick the pictures onto a cardboard base. Attach the manufactured characters to plastic machines, matchboxes for stability, or use a frame in the form of pieces of wire, matches or ice cream sticks, etc.
Papier-mâché dolls
Pieces of paper are soaked in glue, and then theatrical props, masks, toys, etc. are made from the resulting mass. This technique is called papier-mâché. Making a whole doll using this method is quite difficult, so mixed techniques are suitable for beginners. The torso can be made of fabric, and the arms and head can be made using papier-mâché.

Dolls made of plasticine or salt dough
Make fairy-tale characters from plasticine, secure them to pieces of wire, matches or wooden skewers. Instead of plasticine, you can use salt dough.
Spoon dolls
These toys are easy to make. Both plastic and wooden spoons will work. Draw faces or glue ready-made appliques, sew clothes or cut them out of colored paper.
PECULIARITIES! Have a small children's party. Invite your child's friends to a home performance. Together with your child, prepare a poster for the show and tickets.
A fairy tale for home puppet theater
You can also prepare a script for a home puppet theater yourself and choose the presentation of popular children's fairy tales. For your first performances, choose simple, uncomplicated stories that will teach you important things in life. Gradually increase your repertoire. So that the child is interested and does not get tired, duration of productions should not exceed 10-15 minutes.
Good for home performance Russian folk tales(“Turnip”, “Teremok”, “The Three Little Pigs”, etc.), works by Chukovsky, etc. You can compose a piece yourself. Use musical accompaniment as a backdrop for the performance.

Children's puppet theater is a home concert that will help a child cope with fears, low self-esteem, and also spend his leisure time interestingly with his parents. The baby will be able to try himself as a designer, actor, director. Interesting productions can captivate even restless children.
Help your child discover his talents and show his creativity. If you have never held theatrical performances at home, be sure to do it, your child will be delighted, and photos from family performances will remind your child of a fun childhood.