Original paintings for the interior with your own hands. DIY paintings: types, master classes and photos
Not every person decides to hang beautiful paintings in their own kitchen. And this despite the fact that designers highly recommend decorating the kitchen with your own hands. After all, they will be able to bring something new and unusual to this room. DIY kitchen paintings are considered a new trend in transforming rooms.
If you want to decorate your kitchen with paintings, then first of all you will need inspiration. But how to find it?
The search for new ideas for inspiration should be drawn from everywhere. Don’t discard even those that initially seem too simple and banal. They may end up being exactly what you need.
Also accumulate vivid impressions. Find some nice box and put in it all those interesting things that you hope to later decorate your kitchen with.
Realize your potential in new genres. To create something interesting, you need to try new ideas.
Coffee and seasonings for paintings for the kitchen
Making a canvas with your own hands is quite simple. For this you only need certain tools and materials:
- various cereals;
- cardboard;
- glue;
- beans;
- Bay leaf;
- coffee beans;
- thick fabric;
- cinnamon bark.


Making canvas for a painting
First you need to prepare the cardboard. You will need to cut a rectangle or square from it. It depends on how you want the picture to look.
After this, the resulting blank is traced over the fabric, an allowance of five centimeters is made and cut out.
Next, you need to place cardboard on the fabric, cut off the corners of the fabric and glue it to the cardboard. To prevent the fabric from unraveling, its corners will need to be glued with special care. You pull the burlap onto the cardboard very tightly with your own hands.

Drawing a picture for a painting
If you did everything written above with your own hands, then you should have a canvas. Now you need to make a drawing by laying out coffee beans and cereals on the canvas. What the picture for the kitchen will be like depends solely on personal imagination. The material can be laid out either loosely or tightly.
After you have designed the pattern, you need to glue all the elements of the picture. You can use regular glue, but it’s best to find a silicone gun with your own hands, since with its help gluing occurs much faster.
At this point, the process of making this painting can be considered complete.
Paintings from cereals and seeds (video)
Crafts from cutlery for the kitchen
In this case we will not talk about standard paintings for kitchens, but more about the panel.
Paintings from buttons and plates
The more buttons, the much better. They will be the basis for the paintings. They will need to be sewn onto thick fabric. After that, they are inserted into the frame and glued with glue. Interesting plates are hung in the center and on the sides and painted with acrylic paints. The masterpiece is ready!
Paintings from spoons and forks
You can also sew forks and metal spoons onto thick fabric. They will need to be painted with enamel, after which you will get a wonderful still life.
Their plastic materials can make more interesting pictures in the kitchen. Plastic forks and spoons are easy to paint and can be glued to any surface.


Cross-stitch
With the help of cross stitch you can create incredibly beautiful pictures for the kitchen. Such paintings are considered simply stunning decor for this room. All drawings and pictures can be made from:
- various products;
- colors;
- dishes.
You may not have paid attention to many items before. Now, thanks to the paintings, you will be able to feel all their beauty and charm. In order to make such a picture with your own hands, The following materials and tools are needed:
- fabric (canvas is best);
- two scissors (large and small);
- threads (preferably floss);
- marker for marking;
- special warmed needle;
- hoops (suitable in various shapes, sizes and from any materials).
All these materials are most often included in a general embroidery kit.
Available materials
Mosaic
Mosaic opens up great scope for the implementation of creative ideas for the kitchen. You can make paintings in the form of a mosaic from the following materials:
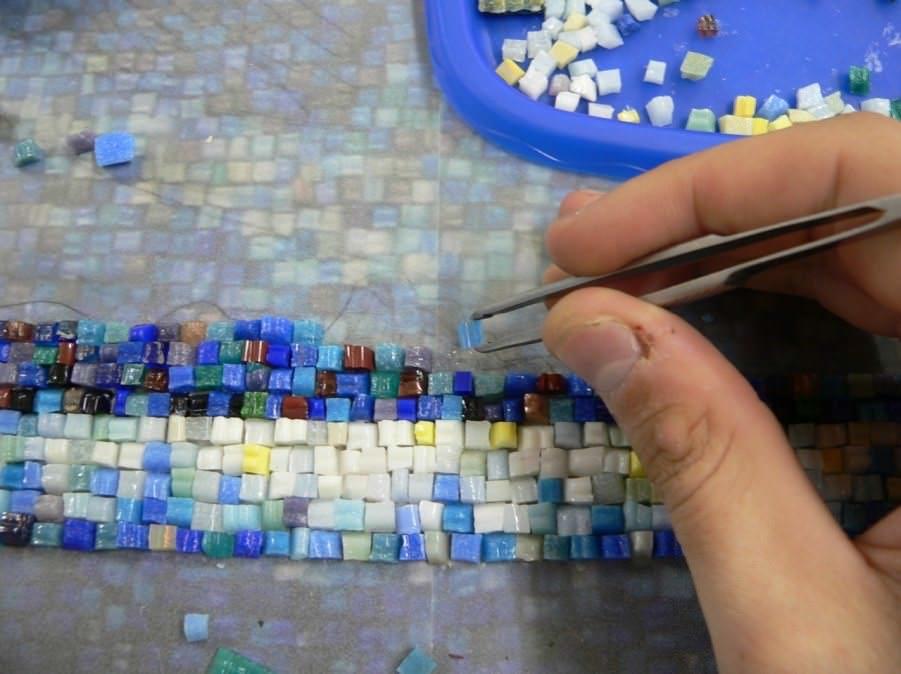
- glass;
- eggshells;
- broken tiles;
- rhinestone
Using the instructions below, you can easily do mosaic painting:
- cardboard of the required size is taken as a basis;
- glue is applied to it;
- put all the necessary elements on it;
- To fix small details, the product is coated with varnish.
Installations
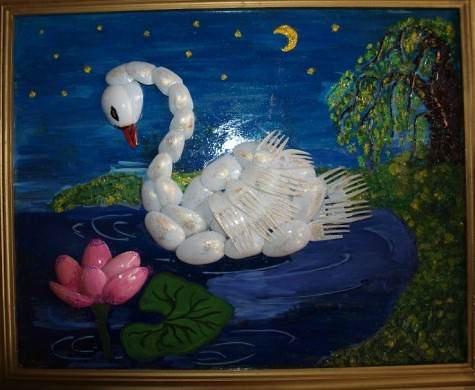
In making paintings with your own hands for the kitchen, you can use completely non-standard methods. The most incredible paintings are created using ordinary household items. For example, thanks to ordinary knives and other objects, you can create an incredible composition. Therefore for this you need materials such as:
- A4 photo frame;
- glue;
- ruler;
- pencil;
- scissors;
- cutlery in the form of a knife and other utensils;
- pieces of fabric.
DIY flower painting
The essence of this picture is to collect dried flowers. It's absolutely easy to make. Such flowers can be bought at any specialized store.
We take the base and glue the flowers with glue. Leaves and petals are drawn using pencils and felt-tip pens. If desired, you can even glue dried grass.

Leather painting for the kitchen
In this case, both suede and real leather are suitable. Its pieces are combined with paints, fabric and other materials. The most important thing is that with any such combination the picture will look amazing.
Paper painting
Unfortunately, this picture will not last long. But very beautiful. You can make both origami and quilling. Basically, such masterpieces are made by children, for whom the manufacturing process brings a lot of pleasure.
Paper painting (video)
Decorating with posters
Posters are large images that can convey someone's image or idea. Black and white posters are considered the ancestor of posters.
Exists several types of posters:
- depicted on canvas;
- printed on paper that imitates canvas;
- printed on photo paper
Making them for the kitchen is absolutely easy. All you have to do is find the image you need.

Foam painting for the kitchen
Many blocks of foam plastic remain after purchasing various household appliances. Many people throw it away, and do it completely in vain. After all, if you get creative, you can use it to make a kind of picture for the kitchen.
Initially, you will need to prepare some image. It will need to be glued to the surface of the foam. The sides of the block are also covered with paper of the desired color. To hang the resulting picture in the kitchen, all you need to do is attach a small loop to the back of it.
Master class on making a picture frame (video)
Conclusion
You read in this article about the main types of paintings that you can make with your own hands. As you may have noticed, there is nothing complicated in creating them. So feel free to start experimenting!
Paintings for the kitchen (photo)


Do DIY paintings decorating the interior is not so difficult, because in fact, many techniques already known to us allow us to create truly interesting work that is not embarrassing to frame and hang on the wall. You can place your own creations on the walls, as well as children’s works that were most successful in their creative activities. Well, in the common rooms there is a place for landscapes, still lifes, painted with paints, pasted on paper, and embroidered with threads or satin ribbons.
Make a painting with your own hands
Is artistic talent needed to make a painting with your own hands? If you answered this question positively and, doubting your abilities, did not dare to create a man-made masterpiece, then we assure you that everyone can draw a decent work. Of course, such a craft cannot be considered as a piece of art, but it is important for you that it is a thing made with your own hands, and you will definitely find a place for it in the apartment.
Today, among hobby products, there is a fairly wide range of items prepared for writing. paintings From the material with your own hands you can draw it as easily as coloring a coloring book or putting together a puzzle. The fact is that the canvas set already comes with brushes and numbered paints, which need to be applied with neat strokes to the places indicated on the canvas. By working on such a task, you will not only occupy several evenings with exciting creative work, but you will also be able to hang the finished product on the wall, which will look identical to the canvas painted by a professional artist. The advantages of this technique include the fact that you are free to select a design from thousands of options, rather than looking for a ready-made canvas that will suit your interior, and this is very important. For example, when we, we need pastel shades and floral patterns of a certain type, but it’s not a fact that the artist would want to write just such a plot.
Works done using the technique of cross stitch with colored threads do not lose popularity either. In their technique, they are very similar to the previous painting, but they only require much more skill and perseverance, because correctly positioning each of the hundreds of stitches is much more difficult than simply applying a stroke with a brush. The aerobatics of such works, a photo of one of which you see above, is the visual impression that they are painted and only by looking closer you can see many small stitches. For many years now, embroidered works that depict miraculous icons have been considered. In addition, even the embroidery process itself is considered healing and, according to legend, complex illnesses go away during it. In addition, when embroidering, you put good energy into each stitch, so that later it passes on to all members of your family.

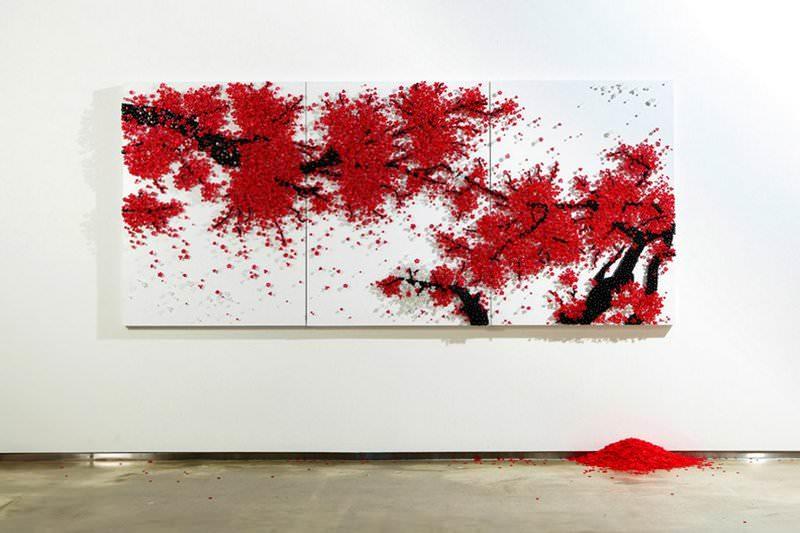
No less beautiful works are obtained when embroidering with beads; this is an ancient look, it has rich traditions. We can see an excellent example of such work in the photo above, and the beauty of this canvas is that it is three-dimensional, that is, it is made in isolation from the plane of the canvas. This effect is achieved by stringing some of the beads not on threads, but on fishing line, due to which the flowers become more rigid and hold their shape. They will look no less impressive DIY rhinestone paintings, but, as you understand, their cost will be much higher.
DIY painting master class
Simple children's techniques will also allow you to do decent work with a minimum of effort and time. For example, the following DIY painting, master class which we will describe below, is made using the cutting technique from many paper balls, painted in different colors.

First you need a clear understanding of what you want to see in the end and approximately how many paper lumps you will need. Next, a diagram is drawn on a sheet of paper or thick cardboard, which indicates the colors of each of the elements. To make your work easier, you can take as a basis one of the patterns for painting with paints, one of the easiest with a minimal set of colors, print it and fill it with paper. By the way, making lumps is very simple - cut out squares of colored napkins and carefully roll each one into a ball. You can either apply glue to each lump, or apply PVA directly to a small area of the base and, using the tip of a ballpoint pen, attach them one by one to the sheet. You cannot apply glue to the entire sheet at once, as it will dry quickly enough and the paper will no longer be able to stick, and the work will be ruined.

You can also get very beautiful pictures using felting wool, which we will form in the shape of a tree trunk with spreading branches and paint it in different colors. As you can see in the example, literally every centimeter of every part of a unique triptych is “painted” with wool, so the overall composition looks uniform and complete, and you just want to touch the surface of the image with your fingers. Such a plan DIY paintings from scrap materials can become a worthy work not only for a school exhibition, but also as a holiday gift for friends.
DIY flower paintings
Flowers have always been, and probably will always be, a favorite theme for interior decoration items that women choose. Therefore, it is not surprising that examples DIY flower paintings, for the creation of which modeling, painting, embroidery are used, a lot, a lot.

The fastest and easiest way to make a beautiful image is to transfer it from a paper napkin to a base of wood or plywood using the decoupage technique. Such a picture, which is shown in the example, can be made in literally one lesson, and you will need one paper napkin with the selected floral pattern and a base on which you will glue it. Ideally, it is better to cover the entire surface of the “canvas” with paint to match the background on a napkin. In order for the transition of shades to be smooth and imperceptible, it is better not to cut out the motif, but to tear it off, so the borders will be uneven and will spread more smoothly across the canvas. Having applied and held it in place, begin to apply special glue or PVA diluted to the desired proportion on top of the paper with a brush. After the glue has dried, you can varnish the work so that in the future it will delight you with its beauty longer. And don't forget that you're smart DIY picture frame can do a lot for visual effect.

The ancient technique of ribbon embroidery seems to be created to embody the beauty of flower petals, as bright and shining as satin fabric. Moreover, for such embroidery, what matters is not so much the accuracy of the stitches, but how carefully you straighten the piece of ribbon so that it looks like a wide petal or a tiny stamen. Using this technique, stunning soft decor is created, when an old chair or sofa is given a new, floral life, but you and I can do this work in the format of a wall panel, placing it in a frame.

For some reason, quilling in our time has gained fame only as a children's form of creativity, when in fact it was created in order to paint monastery cells with floral patterns. Therefore, making quilling flowers is a real art, and our next example proves this to us. You see how, using a limited set of colored stripes, decorating a picture with live moss or its substitute - sisal, you can create a spring, delicate canvas.
DIY modular paintings
Modular paintings are very popular today, as they fit perfectly into any interior. They represent several canvases that depict similar scenes or the same story, but divided into several parts. Using the standard, we can do it with you DIY modular paintings, hanging them in the way that seems right to us.

As a clear example, we can cite pictures that, as we have already discussed, can be drawn according to diagrams. However, if you have hidden artistic talents, then you can easily draw something that will fit into your interior as successfully as possible. But this collection of four parts, which is shown in the photo above, is made with an unusual material, because the main role in each of the four parts is played by dried tulip petals. They must be prepared in advance by placing them under a press, after wrapping them in wax paper. Such a press, for example, can be a thick book, among the pages of which the tulip will need about a month to completely dry. After this, the petals are glued on top of the finished picture, giving it the volume and unique shape of each individual flower.

Well, if you want to paint an abstraction, then it will be much easier to do. An example of such work, along with the key execution process, is shown in the photo. You need to place one canvas or place it on a stretcher, and then apply strokes to it with a brush or a stream of spray paint. After the paint has dried, divide the canvas into three parts, stretching each of them onto a separate stretcher of the appropriate size. Such paintings with a New Year's theme will be appropriate when we are, but in principle they will fit perfectly into absolutely any modern interior.
DIY paintings: photos
In conclusion, we will present to your attention a few more DIY paintings, photos which are presented below. They can be used to create home comfort and for, depending not only on the materials from which they are made, but also on the presence of a protective coating on top of them.


Here, for example, is a luxurious butterfly, which is folded using ordinary macaroni horns, painted with gouache in bright colors. But this beautiful flower basket is a great example of masterful modeling from polymer clay.

And such a chic picture, where a tree is created using buttons of different colors, will be very fun to create together with children, however, the elegance of the finished result will allow you to use such work to decorate the most sophisticated room.
Decorating your home yourself is a matter of honor for craftsmen and craftswomen who prefer an original and unique interior. Modern trends in interior decoration dictate the use of relatively modest and laconic objects.
Do-it-yourself modular paintings are just such minimalist types of decorations. Their simple geometric shape, the absence of frames, glass and other unnecessary details, allows you to create them yourself.
What are modular paintings?
As the name suggests, these decorative elements consist of several separate parts (modules), which are united by a common artistic idea and placed on the wall in a certain order. 
As a rule, do-it-yourself modular paintings made from photo wallpaper or other materials, just like factory-made products, have a certain thickness. That is, they form a three-dimensional composition. The depth of individual modules can be the same (most often) or different. In the second case, the difference in volume allows you to create the effect of a three-dimensional image.
DIY modular paintings: types
The main material for creating such decor can be used:
- wallpaper (regular or photo wallpaper);
- photos;
- colored paper;
- textile;
- canvas.
Products drawn by hand on paper or canvas become truly original. However, the ease of making modular paintings opens up wide opportunities even for those who are far from the world of creativity. When using ready-made painted materials, the main skill required is the accuracy of a home craftsman.
The arrangement of elements can be linear, diagonal or abstract. The modules are given completely different shapes: square, round, arbitrary. True, the simplest one for making a house is still rectangular.
How to place finished products
When thinking about how to make a modular picture with your own hands, you should think about its placement in advance. As a rule, empty areas of walls above sofas, along stairs or between doorways need to be decorated and filled.
The diagram below offers various options for the arrangement of elements of modular paintings, which will also be useful for those who plan to place a large number of photographs or panels. 
Paintings on canvas
Do-it-yourself modular paintings, created as an alternative to original canvases, imply the use of high-quality materials and specific technology. The basis for applying the decorative layer is canvas.
Artist stores offer a wide selection of different blanks, including a durable wooden stretcher with canvas stretched over it. The assortment of such stores often depends on the demand for such products, so finding materials in provincial cities can be problematic. The solution is to search and buy everything you need in online stores.
The selected pattern is applied to the finished base using any available technique (oil, pastel). Such modular paintings, made with your own hands, are a real work of art.
In cases where the image cannot be drawn, it can be applied to the canvas using a special printer. A ready-made base with a subframe will not be suitable for this task. You will need to purchase the canvas and mounting for it separately. Canvas printing is a fairly common service offered by many printing houses.
An important point: before you make a modular picture with your own hands, you should carefully plan the location and boundaries of each of its elements. The canvas with the printed design must be stretched on a stretcher, which means that each element of the composition must be printed separately with a sufficient supply of clean canvas around the edges.
Using scrap materials
Unlike the previous method, it is much easier to make modular paintings from wallpaper with your own hands. As a decorative material, you can use any wallpaper you like, a drawing printed in a printing house, family photographs, portraits of your favorite film artists, or decoupage cards. 
For such paintings you will also need a stretcher with chipboard or plywood. You can buy it or make it yourself. The color image is drawn, cut out and attached to the flat base of the stretcher. For fixation, use special glue, double-sided tape or a construction stapler. The disadvantage of using liquid glue is that the paper softens and deforms, so you should experiment in advance on an unnecessary fragment and select a suitable material.
Before you make a modular picture with your own hands from photo wallpaper, you need to make sure that the finished elements are correctly matched on the wall and create a single plot. Therefore, wallpaper cutting should be carried out taking into account hem allowances. An alternative would be to cover the end of the subframe with another material. In this case, the area of the picture coincides with the surface area of the subframe.
DIY modular painting: master class
Fabric is a fairly popular material for making modular paintings.  Its color can be any, at the discretion of the owner of the house. For work you will need the following tools and materials:
- stretcher;
- decorative fabric;
- scissors;
- meter or tape measure;
- glue or construction stapler;
- additional elements (fasteners for hanging, tape for finishing the end, decor).
To cut fabric, it is better to make a pattern according to the size of each fragment. Parts with hem allowances should be cut out carefully, especially if we are talking about material with a geometric pattern. If you allow a distortion, it will be very noticeable and will have to be redone.
The beauty of using fabric is that you don't have to try to match the edges of the future modular picture. This greatly simplifies the work.
The subframe can be wooden or foam. When choosing the second option, you should refuse to use glue, since it will be almost impossible to achieve uniform sizing of the fabric.
Sequence of work
The cut out fragments are placed on the surface of the subframe and fixed with temporary fasteners at several points (pins or thin nails). Then the workpiece should be turned over, allowances placed on the wrong side and sequentially attached to the stretcher. You should start with the long sides, then move to the short ones. Lastly, fold and fix the corners.
It is necessary to avoid excessive tension of the canvas, as this will lead to deformation of the pattern. If desired, the ends can be treated with tape, and decorative elements can be attached to the front surface of the painting. 
Lastly, the hinges are nailed from the inside out and then the pictures are hung on the wall.
Naturally developing as an art form, they have successfully reached the present day. At the same time, in modern designer interiors today it is almost impossible to find classical landscapes with still lifes: the place of pictorial classics has been taken by abstraction or highly artistic photography. It is with abstraction and modernism that interior painting is mainly associated, the task of which is to create a certain psychological background of the room, an appropriate mood for those present, as a rule, an atmosphere of peace and tranquility, or vice versa - office activity and energy.
The shift towards abstraction, it must be admitted, has brought painting much closer to the average person who is not involved in fine art professionally or at a technically high level. Naturally, not everyone is able to realistically reproduce reality on canvas; with abstract art, anyone has more opportunities to create their own mini-masterpieces. There are a variety of techniques, sometimes you don’t even need a brush: you can come up with an original way of applying paint to a surface yourself, you just need to practice and gain experience. 

The main condition for independently creating a picturesque interior element can be called the courage of ideas and determination in their implementation: when creating artistic abstraction, it is extremely important to free the mind from limiting cliches and, with a light heart and a steady hand, produce strokes, strokes, colored stains on paper, giving free rein to inspiration and imagination . If you succeed, the creative process will turn into a kind of meditation, giving rest to your head and nervous system, distracting you from everyday worries and disturbing thoughts. 


In principle, any flat surface, smooth or with a relief texture, can serve as a working surface for a painting. It would be quite logical to take the first steps on ordinary thick paper of the required size; cardboard and plywood are also suitable, which can be pre-painted in the required light (or vice versa, dark) shade.
Every interior should have its own flair, and often the simplest and most elegant option to bring uniqueness to a room is a painting.
But how to find something that will decorate your bedroom, living room or other room? Most likely, you will have to pay a large sum of money for an original work.

But if you don’t expect to spend extra money, but still want to have something original, then it’s quite possible to make an interesting painting with your own hands.

However, it is not at all necessary to be able to draw well. After all, paintings in the usual sense have long replaced three-dimensional images on the walls, abstract ideas embodied in a variety of techniques.

DIY fabric paintings
All high-quality canvases are made on a fabric basis. However, the modern interpretation of such paintings changes our view of art.
Modular fabric paintings have become very popular. But making them yourself is not so difficult. In stores now you can find a lot of fabrics with very beautiful, interesting and bright prints.

If you like one of them, then you can safely buy it and make an original piece of decor.

Modular picture
To create a room decoration such as a modular picture made of fabric, you will need a base in addition to the selected material. It could even be a door from an old cabinet or a piece of chipboard that could easily be lying around somewhere in the garage after renovation.

Cut out several pieces from the base to the size of your fabric and cover the tree with it. Make sure that the fabric is well stretched and does not form wrinkles. Your painting is almost ready. All that remains is to attach the hooks with which it will be attached to the wall.
Most often, such paintings consist of three or more modules, which may be the same size or different. Their shape can also be different.

The most common and easiest to manufacture are square and rectangular elements. But there are round, oval and other forms of modules for paintings. Frames for picture modules are not needed in this case.

Paintings from clothes
Even a T-shirt can decorate your interior. It often happens that stains or holes appear on clothes that you have not worn for very long, and their colors are still bright. You don’t have to throw away a seemingly damaged item, but make an original painting out of it.

Cut out a rectangle with an image from your clothing, glue it onto paper and place it in a frame. The photo shows that such paintings depicting cartoon characters will fit perfectly into the interior of a children's room.

Embroidery
In some ways, embroidery can also be classified as fabric paintings. This method of interior decoration is not new. Even our great-grandmothers had at least one hand-embroidered image in their house.

However, to embroider a picture, you still need some skills and patience. This method is not suitable for everyone, but if you do needlework, then hand-embroidered pictures can say a lot about you as a housewife.
Three-dimensional paintings
Relief images on the wall are also very popular as decorative elements in the interior. Three-dimensional paintings can be made with plaster on the wall even before it is finished.

But such decoration can only take place if there are no plans to stick wallpaper on the wall.
Note!


The method of making such paintings requires training and a considerable amount of time. Therefore, it will not suit everyone.

Paper paintings
There is an easier way to make a three-dimensional image. For this you will need colored paper or cardboard. Cut out several figures of the same or different sizes from it. These could be, for example, butterflies.

Using pins or double-sided tape, attach them to the wall in a chaotic manner or forming some kind of pattern. Your paper painting will look more impressive if you choose a color that contrasts with the tone of the wall itself.
The butterflies themselves can also be of different colors. Such a picture will sparkle with new colors when artificial lighting is turned on, so it will look most advantageous in rooms where the light is turned on most often, for example, in the corridor.

If your house has a staircase to the second floor, then kittens in different poses placed on the wall adjacent to the steps will look original.

Paintings from bushings
Rolls of toilet paper or paper towels will help you create voluminous decor with images of flowers and leaves. It is enough to flatten the cylinder a little and cut it into equal parts approximately 2-3 cm wide.
Note!


To make the flowers brighter and the leaves stand out in color even before work begins, the bushings can be painted in different colors. The individual parts of the sleeve should be placed so that a flower is formed, so it is possible to create entire compositions.

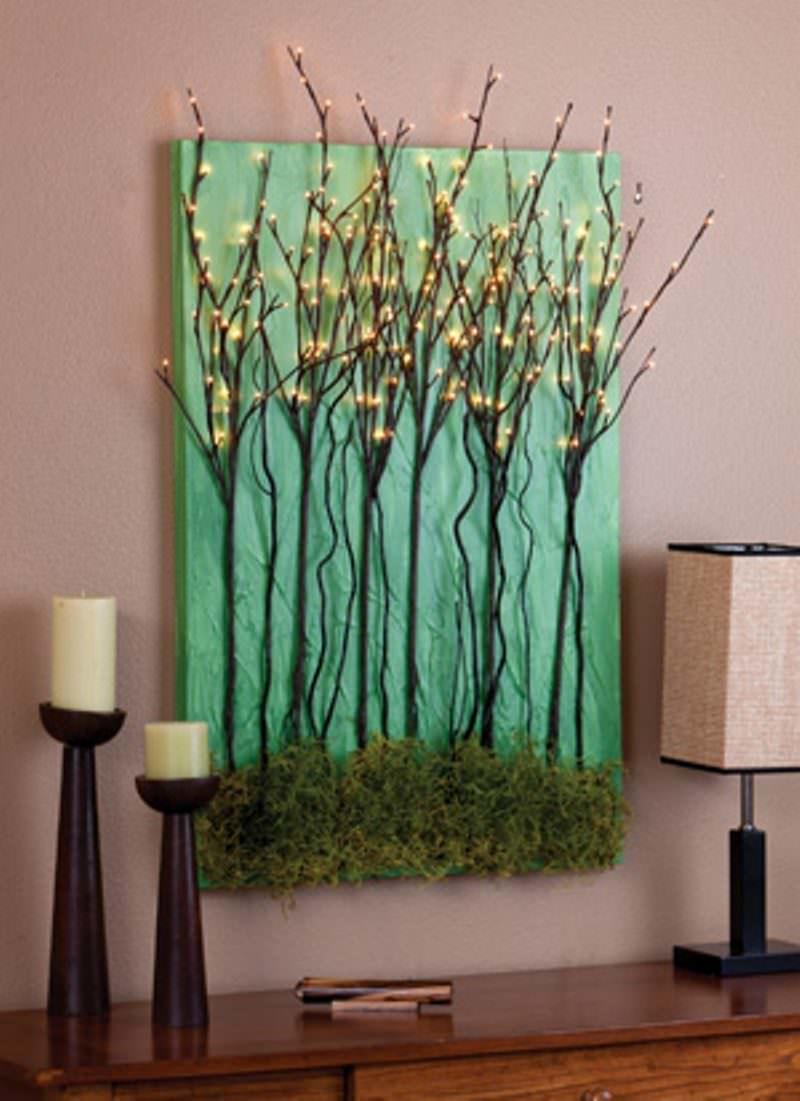
Artificial flower paintings
The easiest to make are paintings made from artificial flowers or other decorative elements. The main thing here is to beautifully glue the finished parts onto the base.

For this technique you will need a frame, a plain material and the image itself. Cover a sheet of paper with fabric, wrapping its edges and gluing it on the back side.

Then, having first removed the glass from the frame, insert the base of your picture into it and glue artificial flowers or other details (shells, dry twigs, etc.) to it. Finally, you can decorate the frame with beads.

If you already have a finished canvas, then there are many master classes on how to decorate a painting that is already boring to you and thereby update the interior.
Note!


A flat image of nature or still life can look completely different if several three-dimensional details are attached to it.

This can be either an image cut out of paper or natural materials in the form of dry leaves or even butterflies.

Photos of paintings with your own hands


