Before the Aryan peoples of Europe. Sacred Aria: the cradle of the peoples of Europe
It is quite rare that a personal computer can be called personal in literally this word, especially when it comes to a home PC. Most often, the precious electronic “machine” belongs to several family members and they use it, as they say, on a first-come, first-served basis.
That is why it is no wonder that sometimes one of the users is faced with the need to hide some file or folder from his “co-users”. In this article we will tell you what is a hidden file, how to hide a file or folder And how to show hidden folders and files using the example of a PC with the most popular platform today, Windows 7 (instructions are also suitable for Windows 8 and).
What is a hidden file/folder in Windows?
Hidden file/folder– this is the most ordinary file/folder, in the properties of which the “hidden/hidden” attribute is marked, as a result of which this file/folder is not displayed. In short, the fact that a hidden file/folder is not displayed is its only feature and difference from a regular file/folder.
How to make a file hidden? We follow these instructions:
1. Right-click on the file that you want to hide.
2. Select the “Properties” item.
3. In the window that opens, click on the “General” tab.

4. Look for the “Attributes” parameter, put a tick in the box opposite the “Hidden” inscription, click “Apply” and “OK” or just “OK”.

5. Done! The file is hidden!

The procedure for creating hidden folders in Windows 7/8/10 is no different from the procedure for creating a hidden file, so follow the instructions above to complete it.
How to show hidden folders on Windows 7/8/10?
So, we figured out what a hidden file and a hidden folder are, as well as how to make a file/folder hidden in Windows 7/8/10, now it’s time for the most interesting thing - the answer to the question of how to show hidden folders and files .
There are several ways to do this, we will tell you about four of them, and you can use what you like.
Method 1 – Control Panel
1. Click on the “Start” icon in Windows 7, select “Control Panel” (In Windows 8 and 10, press the key combination “Win + x” and select “Control Panel” from the list (Win button is the button with the Windows logo )).

2. Set the “View” option to “Small icons” and click “Folder Options” (for Windows 10 click “Explorer Options”)


5. Place a dot opposite the “Show hidden files, folders and drives” parameter, click “Apply” and “OK” or just “OK” (see screenshot in step 3).
6. That's it! Now all hidden files and folders on your PC will be displayed, only they will be a little darker than usual.

Method 2 – Arrange Menu.

2. On the panel at the top, click the “Arrange” item, then the “Folder and Search Options” item.

3. In the window that opens, select the “View” tab.
4. In the “Additional parameters” window, set the slider to the lowest position (see screenshot in step 3).
5. Set a dot opposite the “Show hidden files, folders and drives” parameter, click “OK” (see screenshot in step 3).
6. Done!
Method 3 – Tools Menu
1. Click on the “Start” icon and select “Computer”.
2. Press the “Alt” key.
3. On the panel that appears, click on the “Service” item.

4. Select the “Folder Options” item (see screenshot in point 3).
5. In the window that opens, click “View”.
6. In the “Additional parameters” window, set the slider to the lowest position (see screenshot in step 5).
7. Set a dot opposite the “Show hidden files, folders and drives” parameter, click “OK” (see screenshot in step 5).
8. Done!
Method 3 - Total Commander
This method is suitable for those users who have the Total Commander program installed. By the way, if you don’t have it installed, we advise you to get it, because this program is an excellent file manager. You can download Total Commander Here. And now let’s talk about how to show hidden folders using this program on Windows:
1. Open the program.
2. Select the “Configuration” tab on the panel, then “Settings”.

3. In the window that appears, click on the “Contents of panels” item.

4. Check the “Show hidden/system files” option and click “OK” (see screenshot in step 3).
5. Done!
As you understand, if one of the users hides a folder or file, then another user can actually easily find it by following one of the above instructions. That’s why we advise, if you want to securely hide a particular file, not just make it hidden, but also “throw it into the far corner” of your computer. Thus, even if the user sets the “Show hidden files, folders and drives” option, he will have to work hard to find your “hideaway”. The main thing, of course, is not to forget where the file was hidden.
Results
Well, now you know four ways to show hidden folders on a PC with Windows 7 and two ways on PCs with Windows 8 and 10. It is worth noting that the last method - displaying hidden folders using Total Commander is suitable for users of any system!
Today I will tell you how to hide a folder in Windows 7. There are several hiding methods to accomplish this task and all of them are simple. After reading this article, you will know at least 2 ways how to do this.
Hiding a folder using standard Windows 7 tools
If you are not familiar with any method to hide a folder, then I recommend this method to you, because it differs from others in its simplicity and speed, as well as the absence of the need to install any additional programs.
First you need to set the “Hidden” property for the folder itself that you want to make invisible to others. Right-click on the folder icon and click on “Properties”. A window will open in which, in the “General” tab, at the bottom, check the box next to “Hidden”, as in the picture below.
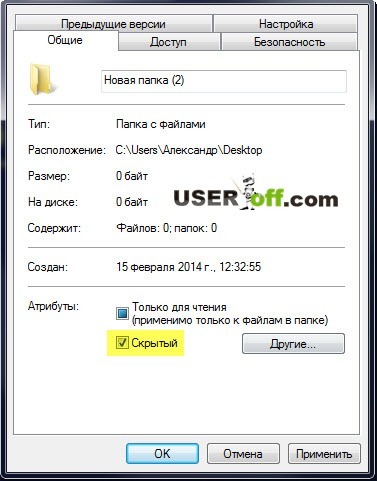
When you click OK, you will see that the folder icon has become paler than usual. But this is what you see now. But if you do not have settings specified to see hidden folders, then the folder that you made hidden will disappear completely.

How to permanently hide a folder? You need to go to the “Control Panel” menu and select “Folder Options”. If this option is not there, select “View: Small Icons” at the top right. Next, look in the “View” tab, check the “Do not show hidden files, folders and drives” checkbox and click “OK”.

When this is done, your folder with the Hidden attribute will become invisible, and now I will tell you how to find the hidden folder in this case. All you need is to go back to the “Control Panel” menu and the “Folder Options” item and in the “View” tab, select “Show hidden files, folders and drives”. In the screenshot above, this item is below. Now you will be able to see the folder again in the same place where it was before. If you want to make the folder visible again, then go to “Properties” again and uncheck “Hidden”, that’s all you need to know about how to view hidden folders.
Hiding folders using the command line
Contrary to the name, this option to hide a folder is no less simple. To learn how to do this using the Command Prompt, you must first launch a Command Prompt, which allows you to issue Windows commands using special sets of commands and parameters. Windows will decipher the commands and execute required action. Click on the “Start” menu and enter cmd in the search bar and click on the program that appears with the same name.

Now you need to enter the command in the window that opens.
attrib +h “Folder address”
The folder address must be replaced with your path to the folder; to find it out, you need to go to the folder and click once on the empty space in the top line of Explorer. The path that appears needs to be selected and copied, then you can paste the path into the command line without typing on the keyboard, right-click on the command line and select “Paste”. The Ctrl+V combination does not work here, so you can only paste the address using the mouse.
Press “Enter” and now you need to select “Do not show hidden files and folders”, as in the previous case, so that the folder is completely invisible. And you can also make it visible, as in the previous case. Now you know how you can hide folders and files, but to make it visible you can type the command:
attrib -h “Folder address” and press "Enter".
Here we have looked at another way to make hidden folders visible.
Making an invisible folder on the desktop
Now I will tell you how to hide a folder on the desktop without changing its properties. Although you can hide a folder on your desktop using the method described above. To do this, you need to place the folder on your desktop, right-click on it and select “Properties”. In the window that opens, in the “Settings” tab, select “Change icon”.

From all the icons, select transparent, click “OK” and “OK” again.

If this does not happen, copy the folder with the changed icon to another drive, delete it on the desktop, and then move it back and the icon will disappear. Now we need to remove the title. To do this, right-click on the folder icon and click “Rename”. Erase the name and type 255 while pressing ALT. This will allow you to set the folder name to a space, which means the name will no longer be visible.
Finding this folder will be easy only if you know that it exists, and everyone else will only see an empty space on the screen!
Experienced PC users often use masking techniques for their folders with important information in order to hide it from prying eyes and thereby avoid accidental deletion or unwanted viewing by others. We will tell you about these simple methods that even beginners in working on a computer can easily master.
Windows stores a large number of various files, some of which we do not see, thanks to the functionality. This moment allows you to keep important system information intact and help in a situation when you urgently need to hide a necessary element or the entire folder with data.Let's select the folder and rename it “Important”. Let's right-click on it and go down to the "Properties" command. In the window that opens, change the attribute parameter by activating hidden elements - “Important” will disappear. If the folder is not hidden, but has acquired some transparency - in the parameters Windows systems The “Show hidden files, folders...” command is activated and needs to be removed. Go to the control panel, select the small icons to view and open the “Folder Options” window. Next, go to the “View” tab and activate “Do not show hidden files...”. You will find the hidden folder later by returning to the original settings. Next, we will give a funny way to create an invisible daddy right under your nose - i.e. on the desktop. Open the Windows symbol table, it is usually hidden in utility programs. Find an empty window in the sign, select it and copy it. Drag your secret folder to the center of the table and rename it to the given blank symbol with the "Insert" command - the result is a folder with no name. Next, click on it, selecting “Properties” from the list, go to the “Settings” tab and the “Change Icon” button. Scroll the wheel and find the space between the icons. Click on it, then “Apply” and “Ok”. The folder has disappeared, but if you select an empty area in the place where our invisible is hidden, it will appear as a square. You can also use “Ctrl+A” while pressing simultaneously. Hiding information using Windows is an unreliable method that is used as an emergency short-term option. To be safe, it’s better to pack “Important” into an archive and protect it with a password. Download the WinRAR archiver program from the official website or via torrent - it is the best existing software for working with archives, run the installation file.


If an icon appears with three stacked books, the archiver is installed. Return to your top-secret folder, click the mouse and select from the list the command with the WinRAR icon “Add to archive”. If necessary, come up with a different name for the daddy, for example: patch - this name is present in almost all applications. Next, select the archive format and set a password. If you wish, you can encrypt the file names. To store your archive, find a secluded place somewhere in your file folder installed programs on the main drive, then there is a chance that it will not be detected and will not be deleted.
It should be noted that there is a lot of additional software for Windows on the Internet. This includes ransomware programs both for personal needs and for work purposes, but unless absolutely necessary, you should not expose your PC to malicious code, which tends to leak into the system from sites on this topic.
Sometimes there is a need to protect personal files or folders. This is especially true if more than one person is working with the computer. One solution is hiding. Of course, it will not help in the case of an experienced user. But it will hide information from unsuspecting eyes.
How to hide/show files and folders on a Windows 7 computer
Standard method
To hide a file or folder, you need to go through two steps:
Disable visibility of hidden folders

If the “Do not show...” option is set in the settings, then hidden files and folders will still be displayed, with the only difference being that the label for such objects is dimmer compared to a regular element.
Changing folder/file settings

After these steps, the folder or files will become hidden and will not be displayed.
Enable visibility and view
To show hidden items, you need to go to the folder settings and check the box next to “Show hidden files, folders and drives.” And for a specific object to stop being invisible, you need to uncheck the “Hidden” option.
How to make a folder invisible - video
Via Total Commander
This method is related to the previous one in that in “Folder Options” there should also be a checkmark next to the item “Do not show hidden files, folders and drives”.

How to view files and make them open
To show hidden files and folders, press Ctrl + H.
To make documents visible again, you need to use the Alt + A combination and uncheck the “Hidden” checkbox.
Via Free Hide Folder
If you want to be sure that no one can see hidden information, you can use the Free Hide Folder program, which requires setting a password.
Free Hide Folder does not hide individual files. Available for free download on the Internet.
- When you launch the program for the first time, a window will appear in which you need to enter and confirm a password. By the way, you will also need it when uninstalling the program.
- The next window will ask you to enter a registration code, but this is not a requirement. To continue working, you need to select Skip.
- Then click on the Add icon and select the folder that you want to hide.
- After the folder is selected, a message will appear indicating that it is advisable to make a Backup. It is advisable to follow the advice.
Backup saves information about the program. If the latter is deleted, then after re-installation, access to hidden folders will be restored.
In addition to Add, the general window has buttons for:

How to find hidden information and transfer it to a flash drive
Free Hide Folder hides folders so that they cannot be found using search. The only way is to open the program and select the Unhide tool. Another special feature is that it does not hide documents located on removable disks.
Because Windows search cannot detect documents hidden using Free Hide Folder, you cannot use copying. Thus, invisible folders cannot be transferred to removable drives.
Using an image and an archiver
For this method you will need a folder with files, any image and the WinRAR archiver. The program is available for free download on the official website. In this case, the processor bit capacity must be taken into account. To find out, you need:

You can take any image, there are no restrictions.
- Add the desired folder to the archive.
- Place the archive and the image in one folder, preferably located in the root of the disk.
- Using the Win + R combination, launch the Run tool, enter cmd in the line and click OK.
- In the command line, go to the folder where the archive and image are located. To do this, enter the cd command and the address. IN in this case this is cd c:\.
- Then press Enter.
- Now in the line you need to write the names of the image, archive and new file. Also, extensions must be specified in all three positions. In this case it turns out: COPY /B Image.jpg + FolderWithFiles.rar ImageWithArchive.jpg.
- Press Enter. If everything was written correctly, a message will appear on the command line indicating that the files were copied.
If you now open the created file, only the image that was taken as a basis will open.
The original files can be deleted.
How to view hidden files
To be able to view files hidden in the image, you need to open the illustration itself using WinRAR.
But the archiver must first be added to the list of programs that can open images:
- In the “Open with” menu, click on “Select program”.
- Click on “Browse” and in the window that opens, find the folder with the archiver.
- Open the folder and select the program launch shortcut.
- Next, WinRAR will appear in the list of programs that can open the image. You also need to uncheck the “Use the selected program for all files of this type” option. Otherwise, all images will be opened using the archiver.
When the user opens the image using the archiver, it will be visible that there is a folder inside.
But don't hide too much information in one file. If it takes up tens of megabytes, even an inexperienced user will become suspicious.
Possible mistakes
How to enable the “Show hidden files and folders” option
Sometimes a situation occurs that the user activates the “Show hidden files and folders” option, but the switch automatically switches to the “Do not show hidden files and folders” position. In this case you need:

Otherwise, the parameter must be created. To do this, right-click on a free area of the window, select “New”, then “DWORD Value”. Call it CheckedValue and give the value 1.
- Go to: HKEY_CURRENT_USER\Software\Microsoft\Windows\CurrentVersion\Explorer\Advanced.
- Find the Hidden parameter (with value 0), type REG_SZ, in the list and delete it.
- If the list contains a Hidden parameter, type REG_DWORD, then change its value to 1. Otherwise, the parameter must be created.
- Find the SuperHidden parameter, type REG_DWORD, in the list and change its value to 1.
- Press "F5" to refresh the editor window and close it.
What to do if Folder Options is missing
This usually means that viruses have entered the system. Perhaps the antivirus simply failed to identify and remove malware. And so that the user cannot visually detect them, the authors of such applications use the “Hidden” or “System” attributes. In addition, the “Folder Options” menu item is removed.
Even if the malware is removed, the antivirus will not be able to restore this item. This will need to be done manually:

The Registry Editor may not have been blocked after a virus attack. In this case, you can use it:
- Using Win + R, launch the Run tool, enter regedit in the line and click OK.
- Go to: HKEY_CURRENT_USER\Software\Microsoft\Windows\CurrentVersion\Policies\Explorer.
In the right part of the window, find the NoFolderOptions parameter, type REG_DWORD. Double-click LMB to open it and set the value to 0.
Hiding files and folders - simple and quick way protect personal information. Of course, the first two are less reliable, and sophisticated users may accidentally or intentionally discover the secret. But FHF and the archiver will hide personal data even from experienced eyes.
Let's look at how to hide a folder in Windows 7 and 10, as well as find hidden materials and view their contents.
Hiding files and folders in the operating system is a reliable way to hide important information or protect it from accidental damage or removal.
The function is useful in the following cases:
- Several users use the same computer at once;
- You need to temporarily hide information on your PC;
- You don't want to clutter your desktop with shortcuts.
Hiding a folder on a Windows computer
Developers from Microsoft have provided the ability to hide . This function is primarily necessary to prevent users from deleting important system files and libraries.
Can configure the display of hidden folders and files. There are also third-party applications to work with this function.
Method 1 – Standard Explorer
The essence of the first method is to use standard Windows Explorer. Its settings provide the ability to manually select what information can be displayed in the system and what information should be hidden from the eyes of other users.
Follow the instructions for Windows 7, 10:
- Go to the Computer Control Panel;
- Select the view type “Large icons”;
- In the list, find the “Explorer Options” field and open it;
- In the new window, go to the “View” tab;
- The Advanced Options area displays all the options for displaying File Explorer menus and folders and files in the operating system. Scroll down the list to the “Hidden folders and files” option;
- Check "Do not show..." and save the settings.
After setting up Explorer, you can mark the desired folders as hidden. To do this, follow these steps:
- Create a folder on your desktop or in another directory and fill it with the necessary files, which will be the hidden contents of the folder;
- Right-click on the object and select “Properties” from the action options;
- In the “General” tab, check the “Hidden” attribute and save the settings.

If the system does not prohibit showing hidden items, users will see important system files, temporary documents of open programs, and files that have been manually designated as hidden. The icons for these folders and shortcuts will be dimmer than usual, so they can be easily identified among other data.
The method described above will help hide hidden folders in Windows 10. The instructions for Windows 7 will be similar, since the Explorer settings interface is identical in both versions of the OS.
Method 2 – Free Hide Folder Utility
For more convenient interaction with hidden elements, it is better to use special programs. Free Hide Folder is one such utility. It is free and compatible with all versions of Windows.
Let's take a closer look at how to work with hidden files and folders in Windows using Hide Folder. The program interface is very simple, but is presented only in English.
Follow the instructions to hide the directory:
- Open the program window and click on the “Add” button;
- An explorer window will appear in which you need to select a folder to hide;
- After this, the path to the directory will be displayed in the main application window. In the list form you will see all the folders that are currently hidden;
- To remove a folder, find its name in the program, right-click on this field and select “Unhide Folder” in the list of actions.
Other features:
- Creating a backup of the contents of hidden folders;
- Ability to set a password for a directory;
- Using strong encryption algorithms that make it as difficult as possible for content hidden on your computer to be hacked.
Method 3 – Transparent folder
Hidden folders in Windows 7, 10 can be created not only by changing the properties of files and directories. One of the most simple methods- this is a setting appearance folder, causing it to become invisible.
Follow the instructions:
- Determine which folder you want to hide and right-click on it;
- Select "Properties";

- In a new window, open the “Settings” tab;
- Click on “Change icon”;

- Next, a list will appear with a preview of all the icons that are available in the system. Among them there are also invisible ones. Find one of them and set it as the folder image;
- Save your changes.

You must enter special invisible characters as the directory name. They appear when you simultaneously press the Alt key combination of numbers 255. The final view of the folder is shown in the figure below. As you can see, it can be selected, but during normal interaction with the desktop it is not visible.

The disadvantages of this method are that Explorer still displays the directory, even though it does not have an icon or name. Also, another user may discover the folder if they decide to select all the items on the desktop or in another directory at the same time.
Method 4 – How to hide a folder in a picture
Another method of hiding folders is radically different from all those described above. It implies the use basic techniques Steganography is the science of classifying the very fact that secret data exists.
If you have a folder with secret files and you don't want anyone else to see it, you can follow these steps:
- Archive the directory - ZIP or RAR formats are suitable;
- Next, select any image and place it along with the created archive in a new folder;
- Next, open a command prompt. This can be done by simultaneously pressing the WinR buttons and entering the CMD command;

- In the command prompt window that opens, run the folder using the command cd c:\MySecrets\;
- Next, enter the command COPY /B image.jpg + MySecrets.rar SecImage.jpg, where IMAGE is the initial image you selected, MySecrets is the archive, SecImage is the new final image in which the information will be hidden;
- To execute the command, press Enter.
After repeating the above steps, you can test the result of the work. Open the final file SecImage.jpg - you will see the first image you selected. At the same time, if you open this document using an archiver or change the resolution from JPEG to RAR, you will still have access to the archive and will be able to view the contents.

The advantage of this method is that a potential attacker is unlikely to realize that the system uses this method of hiding information. In addition, it is very difficult to identify exactly which picture the archive is hidden in, while all other methods are quite easy to deactivate.
Finding hidden elements
If you want to check if there are hidden objects on your computer that other users have created, you can use the built-in OS features to find the hidden folder or file.
Activating showing hidden folders
The easiest way to show hidden folders in Windows is to use the Explorer settings window already mentioned above. Open “File Explorer Options” and in the advanced settings, check the “Show hidden folders” box:

How to find an invisible folder
To find an invisible folder on the desktop, press the CtrlA key combination. This will allow you to select all the elements and find out if there are invisible objects in the system. You can search for folders in Explorer in the same way.
Hidden folders on a flash drive
After connecting the flash drive to the computer, it becomes part of Explorer operating system, so its contents will be affected by all the settings set in Windows. To open hidden folders in Windows on a flash drive, just change the advanced settings of Explorer to “Show hidden files”, as already described above.
You can only secure the contents of a flash drive using programs that set a password on a USB drive:
- TrueCrypt - free program to encrypt the entire contents of a flash drive, the volume of which is more than 2GB;
- Rohos Mini Drive – the ability to encrypt not the entire flash drive, but only individual directories or files;
- MyFolder – protects content on flash drives and OS root folders.
Bottom line
Now you know about everyone possible ways, how to hide a folder in Windows or how to find and open it. If you have not previously encountered setting up invisible folders, we recommend that you first use the standard Explorer settings.
For users who need to constantly hide information, we recommend working with the Free Hide Folder utility or hiding the directory in a picture. This increases the chances that the information will remain confidential, even if someone deliberately tries to find the folder.