Make a model of the solar system based on the world around you. Solar system made of plasticine
When children begin to learn the concept of the solar system and understand the fact that all the planets “orbit” the sun, they may find the process difficult and overwhelming. However, a child can better understand these principles if a visual aid is provided. Of course, it will be better and more enjoyable if parents and their son or daughter make their own models of the solar system. Although many mothers and fathers do not consider this necessary and buy ready-made layouts.
Solar system: general information
Planet Earth makes one revolution every year around the center of the solar system - the Sun. All planets revolve around a certain amount of time. For example, Mercury will “go around” the Sun in 88 Earth days, and Uranus in 84 Earth years. There are 8 planets in total in our system: Mercury, followed by Venus, then Earth, followed by Mars, followed by Jupiter, then Saturn, followed by Uranus, then Neptune. Each of them, together with meteors, satellites, comets, dust or gas formations, is an integral part of the system. The planets closest to the Sun are very hard due to their constant high temperature. As you move away from the star, the temperature gradually decreases.
Features of some planets
The smallest is Mercury. This object in the galaxy is located closest to the Sun. Because of this, the atmosphere is completely scorched. Moreover, on the light side the temperature reaches +430°, and on the dark side - -170°.
Of particular interest is Saturn with its rings. This planet has a three-layer atmosphere. Saturn's rings are made of rock and ice. On the surface of the planet the temperature reaches -150°.
To understand the principle of “work” of our “microgalaxy”, one of the ways can be to make models of the Solar System. This way you can decorate the interior and make an excellent visual aid.

Option #1. How to Reconstruct the Solar System
To create a solar system you will need:
- a circle cut out of cardboard (diameter about 30 cm);
- scissors;
- a simple pencil;
- colored paper;
- fishing line;
- scotch;
- colored pencils and markers;
- compass.
Step 1. In the center of the cardboard circle you need to draw two perpendicular lines. The intersection of these diameters will serve as the anchoring point for the Sun.
Step 2. Using a compass, the parent or child should draw 8 circles of different diameters that will serve as orbits. It should be taken into account that 4 orbits should be closer to the Sun. Then leave a gap for the asteroids. Next come the “houses” for the remaining planets. After drawing the orbits, you need to make holes in the cardboard with scissors. One of the holes should be in the center. The rest are in a chaotic order, with one hole in each orbit.
Step 3. You need to cut out the planets and the Sun from colored paper of a suitable color. On each cut out circle you can write the names of the planets.
Step 4. Use tape to attach the fishing line to the objects. The free end of the fishing line is attached with adhesive tape to the outside of a large cardboard circle. The planets are in the following sequence, starting from the closest to the Sun: the first is Mercury, the second is Venus, the third is Earth, the fourth is Mars, the fifth is Jupiter, the sixth is Saturn, the seventh is Uranus, the eighth is Neptune.
Step 5. The length of the fishing line can be adjusted to your liking. After securing the planets, you need to hang a model of the solar system, made with your own hands, using three pieces of fishing line of the same length connected with one longer piece with a ring. The model is ready.

Option #2. How to Reconstruct the Solar System
For the Solar System, you need to prepare the following materials:
- large foam ball;
- 9 bamboo skewers;
- 9 foam balls;
- adhesive tape;
- scissors or knife;
- ruler;
- marker;
- paints, pins, fishing line;
- paper.
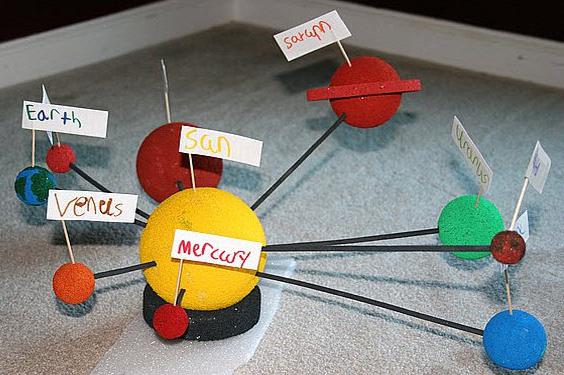
Step 1. Cut strips of adhesive tape and label them with the name of each planet and the Sun.
Step 2. Prepare 9 bamboo skewers of different lengths:
- I - 2.5 inches = 6.35 cm;
- II - 4 inches = 10.16 cm;
- III - 5 inches = 12.7 cm;
- IV - 6 inches = 15.24 cm;
- V - 7 inches = 17.78 cm;
- VI - 8 inches = 20.32 cm;
- VII - 10 inches = 25.04 cm;
- VIII - 11.5 inches = 29.21 cm;
- IX - 14 inches = 25.56 cm.
Step 3. Paint the prepared paints in accordance with the color of the planet: the Sun (the largest ball) - yellow, the Earth - green and blue, Mars - red, etc. Wait until the paint dries completely.
Step 4. Place labeled pieces of adhesive tape onto the dried balls.
Step 5. Attach a 2.5 inch skewer to the Sun, and attach Mercury to the other end. Then the remaining planets are fixed in the same way in the correct order.
Step 6. You can tie up the created system by attaching a pin and fishing line to the solar system model.

OK it's all over Now. You can create various models of the solar system from numerous materials. The main thing is to give free rein to your imagination and study literature.
Another similar model, made of papier-mâché.

Several examples of hand-made models of the Solar System are shown in the photographs below.


These images show that you don't have to be to make a visual, convenient, and simply beautiful reconstruction of the Solar System.
From the fifth grade, schoolchildren begin to study the solar system. To make it easier for children to understand how the planets are located and move around the Sun, the geography teacher suggests making a model of the Solar System at home. Let's look at the simplest ways to complete the task.
Do-it-yourself solar system model - help
Before you start modeling, tell your child about the Solar System using our notes:
- Eight planets move in outer space in the vicinity of the Sun, the largest body in the solar system.
- Four planets are closer to the Sun - Mercury, Venus, Earth and Mars, which have a strong shell and are visible to the naked eye.

- The distant group is the giant planets. They have a gaseous structure and are removed from the daylight. These include Jupiter, Saturn, Uranus, Neptune.

- In addition, there is an asteroid zone in the celestial field, all planets have satellites, and multiple meteorites, comets, and solid particles are constantly flying through the sky.


- Strengthen the theory: observe the night sky, find the North Star, Ursa Major, admire the Moon and the millions of luminous stars in the Milky Way.


DIY solar system model - an affordable option
Before starting work, look at the ratio of the planets by size so as not to make a mistake with the proportions (photo above).
You will need:
- Several newspapers
- Gray toilet paper
- Bottle of office glue
- Plywood
- Blue quick dry paint
- Multi-colored gouache
Let's get started:
- Crimp the newspaper into a ball with your hands. Moisten it with water and roll it into a ball.


- Wrap the resulting figure with wet toilet paper, twisting the bun, then coat it with glue, distributing the liquid over the surface. Dry the balls - on a radiator or simply in the air, as time allows.

- While the blanks are drying, prepare the celestial territory - cut a circle out of plywood so that it matches the made planets and the child can take it to school without your help. Paint the sky with blue paint, and outline the scattering of stars with light highlights.

- Based on natural colors, make the Sun yellow, Mercury gray, Venus yellowish, Earth bluish, Mars purple. Paint Jupiter orange, interspersed with whitish and reddish-brown stripes. Paint Saturn with light green gouache, Uranus with turquoise, Neptune with deep blue. Send the material back to dry.


- Cut out rings for Saturn from glitter paper. As you go along, explain to your child that this planet is surrounded at the equator by flat rings consisting of ice floes, dust, and fragments of stones.

Important: the planets in relation to the Sun must be correctly fixed. See their exact location - .
- Secure the finished balls to the self-tapping screws by screwing them into the plywood from below.


The model of the Solar System is ready, the top five is guaranteed.


Do-it-yourself model of the solar system - a simplified version
The principle of this method is the same as in the first case: you need to make balls and attach them to a hard surface. The only difference is that the planets are made from foam blanks.
Prepare:
- Cardboard
- Assorted sizes of foam balls (buy at a craft store)
- Paints, brushes, glue
We work:
- Color the balls and cardboard firmament (focus on point two)
- For Saturn, cut out two paper rings, wedge spacer skewers between them and glue them together. Insert the inner sides of the sticks into the ball.
- Paint the sky dark and draw the trajectories of the planets on it with yellow paint. Once dry, glue the balls to a cardboard sphere or place them on toothpicks.


The layout turned out to be excellent, made from simple materials and with your own hands. Moreover, there was a child in the wings, who not only learned to work with paper, glue, paints, but also received interesting information about our Universe.
Today you can clearly see the structure of the planets, plunge into the atmosphere of weightlessness, make childhood dreams come true and visit space without even leaving home. - an entertaining and creative process that requires a little time and the simplest materials. Using the papier-mâché technique you can create an amazing collection of planets for the interior or for use as a visual aid in school or kindergarten.
Materials for our solar system:
- eight inflatable balloons;
- a lot of old newspapers;
- paper;
- cardboard;
- starch and water;
- primer;
- acrylic paints;
- dish sponge;
- scissors.
Stages of making planets:
1) We inflate the balloons so that they are proportional to each other and correspond to the sizes of the planets, which can be viewed in a book or on the Internet.

2) Make a paste from starch and water. Mix 3 tablespoons of starch with half a glass of cold water, and then pour in two glasses of boiling water and mix thoroughly so that there are no lumps. We are waiting for it to cool down.
3) While the paste is cooling, prepare newspaper strips.
4) Dip the strips into the paste and paste them over each ball in 3 layers. Leave the holes at the tails of the balls unsealed. We give each layer the opportunity to dry.

5) When the planet blanks have dried and the paste has set, you can remove the balls. To do this, pierce them with a needle at the tail and carefully lower the ball. Seal the resulting hole with strips of paper.
6) After the planets have dried, we cover them with a primer, which will help make the surface smooth. We are waiting for the primer to dry completely.
7) Now let's start decorating. We apply the paint in different shades, it is advisable to apply several layers. Add texture with a sponge. Each planet must correspond to its own color.

9) Let's make rings for one of the planets. To do this, cut out a circle from cardboard, in which, with a pencil, draw another circle with several fixing strips, such a size that the planet Saturn fits into it. Cut out this circle too, insert Saturn into the ring and use glue and fixing strips to secure the planet. Decorate the ring.
Watch the video on the topic: DIY solar system
The solar system craft is ready. Now you can hang it in the room of a child who will dream of flying into space. You can make one and take it to school. The teacher of physics and astronomy will not leave you without praise.
Reading time: 7 minutes.
Space beckons with its mysteries and mystery. Let's try to understand the complex structure of the Universe using simple examples. Let's make a model of the solar system with the children and go on a journey to distant stars.
www.oyuncax.com
There are a lot of stars and planets in our Universe. They are far from each other, but we can see some even with the naked eye. All planets are different, and only on Earth there is life. Our Earth revolves around the Sun, and with it seven other planets. Some planets have satellites. The Earth, for example, has the Moon.
A simple rhyme will help you remember all the planets of our solar system:
All planets in order
Any of us can name:
One - Mercury,
Two - Venus,
Three - Earth,
Four - Mars.
Five - Jupiter,
Six - Saturn,
Seven - Uranus,
Behind him is Neptune.
He is the eighth in a row.
In order for this short story to resonate with a child’s soul, we suggest making a visual model of the Solar System, guided by one of the proposed ideas.
 tolko-poleznoe.ru
The universe is limitless, but for convenience, let's put part of it in a shoebox. Space in a box is not difficult to make, the materials are very simple.
Remove the lid from the shoe box. Invite your child to paint the bottom and sides with the “color of space” - dark blue, black. Make stars from plasticine or colored cardboard and glue them to the walls of the space box. The most important part of the work is to sculpt all the planets of the solar system and the Sun itself. Help your child attach space objects to strings and secure them to the top wall of an upside-down box.
While they were crafting, we remembered the names of the planets, tried to approximately maintain their sizes relative to each other and fix their location relative to the Sun and their neighbors.
 fastory.ru
If your child is one of those who likes to study the issue thoroughly, in all the small details, be puzzled by the appearance of the planets. Discuss why this or that planet is the color it is and what this is connected with.
 www.lassy.ru
Mercury grey . The surface is rocky with large craters.
 www.lassy.ru
Venus yellow-white. It has this color due to a dense layer of sulfuric acid clouds.
 www.lassy.ru
Earth light blue. The oceans and atmosphere give it this color when viewed from a distance. When you get closer, you can see the colors brown, yellow and green.
 www.lassy.ru
Mars red-orange. It is rich in iron oxides, due to which the soil has a characteristic color.
 www.lassy.ru
Jupiter orange with white splashes. Orange is due to ammonium hydrosulfide clouds, white is due to ammonia clouds. There is no solid surface on Jupiter.
 www.lassy.ru
Saturn light yellow. The red clouds are covered with a thin haze of white ammonia clouds, creating the illusion of a light yellow color. There is no hard surface.
 www.lassy.ru
Uranus pale blue due to methane clouds. There is no hard surface.
 www.lassy.ru
Neptune pale blue. Covered with methane clouds (like Uranus), but due to its distance from the Sun it appears darker. There is no hard surface.
 www.lassy.ru
Pluto light brown. The rocky surface and dirty icy methane crust give it such a hue. Sometimes it is referred to as the 9th planet of the solar system, but it is worth knowing that not so long ago it was excluded from the list of planets and classified as dwarfs. Astronomers have substantiated the reasons for this.
 fruktoviysad.ru
The planets revolve around the Sun along a certain trajectory. To explain this to your child, make a layout on a horizontal plane. Draw circles and place each planet on its own “treadmill.”
 tolko-poleznoe.ru
You can show the approximate distance from the planets to the Sun on a model with wooden skewers.
 spacegid.com
 twlwfiv.appspot.com
You can visually depict the size of the planets and the distance to the Sun in this way. The planets are wool balls. The sun is the top of the tree. Each planet is on its own “branch”.
 mamadelki.ru
 dmitrykabalevsky.ru
Here is an example of a visual aid that not only explains how everything works in the Universe, but also serves as a decoration for the room, an excellent decoration for.
 nacekomie.ru
You can also find worthwhile manuals on sale that will clearly demonstrate the “relationships” between the planets of the solar system.
 nacekomie.ru
Tell us what layouts you came up with. We are waiting for stories and photos in the comments.
An unusual and very useful educational material is a model of a reduced and original solar system, which is easy to make with your own hands. Such crafts will not only allow the child to learn the names of the planets, but will also teach them to correctly navigate in sizes and distances. Let's try to make two versions of the layout for children: from newsprint and from plasticine with beads.
How to make a realistic model of the solar system with your own hands step by step
To make a reliable model for our solar system, you need to know the approximate sizes of the planets, their distance from the Sun and colors.
- Sun – yellow, diameter 1391400 km;
- Mercury – gray, diameter 4880 km, distance from the Sun 58 million km;
- Venus – pale yellow with white streaks, diameter 12140 km, distance from the Sun 108 million km;
- Earth – blue with green splashes, diameter 12756 km, distance from the Sun 150 million km;
- Mars is red-orange, diameter 6787 km, distance from the Sun 228 million km;
- Jupiter is light orange with white splashes, diameter 142800 km, distance from the Sun 778 million km;
- Saturn – light yellow, diameter 120660 km, distance from the Sun 1.4 billion km;
- Uranus is pale blue, diameter 51118 km, distance from the Sun 2.9 billion km;
- Neptune is bright blue, diameter 49528 km, distance from the Sun 4.5 billion km;
- Pluto is light brown, diameter 2300 km, distance from the Sun 5.9 billion km.
The paper model of the solar system looks very solid and can decorate the interior of both a children's room and a classroom. This is a wonderful gift for a teacher.
- old newspapers or low quality thin paper;
- toilet paper or paper towels;
- PVA glue or any other office glue;
- the basis of the layout is a round piece of plywood or thick cardboard;
- acrylic paint on wood;
- gouache for coloring planets;
- long screws;
- brushes of different thicknesses.
Take a piece of newsprint, crumple it thoroughly and crumple it into a ball. Wetting it generously with water, give the newspaper blank the most rounded shape possible. Then we wrap it in 2-3 layers of toilet paper or napkins, wet it again and form a ball. There is no need to strive to obtain the smoothest possible surface; small cracks and dents look more natural, forming the relief of the planet’s surface.
Using a brush, apply a little glue to the resulting ball and leave it to air dry. We make preparations for other planets in a similar way, trying to at least approximately maintain their proportions.
While the balls are drying, we are preparing a model of the starry sky. To do this, lightly sand a piece of plywood and paint it with 1-2 layers of dark blue acrylic paint. After drying, we randomly apply stars, comets and constellations to the surface of the model with thick white paint, as shown in the photo below.

We paint the paper balls in accordance with the above data. For Saturn we make a ring out of cardboard.
After the paint has dried, the planets can be mounted on the base. To do this, in the places where the planets are attached, we screw long self-tapping screws into the plywood disk from the bottom up (with the sharp part facing out). Then we carefully begin to screw the balls onto the screws.
The order of the planets from the Sun is: Mercury, Venus, Earth, Mars, Jupiter, Saturn, Uranus, Neptune. On the layout it will look like this:

If desired, planets can be labeled, satellites and asteroids can be added.
We analyze the second version of the space model made of beads and plasticine
Another version of the layout is an easier-to-make compact 3D model made of beads and plasticine.

- plasticine of any color;
- beads of different colors in accordance with the colors of the planets;
- bamboo skewers;
- adhesive tape;
- White paper;
- cardboard;
- tailor's pins.
- We mold balls from plasticine, observing the approximate proportions of the planets. For the Sun it is enough to make a hemisphere.
- “Coloring” the planets with beads. To do this, scatter beads of the desired color onto a piece of paper and roll a plasticine ball over it so that the beads are pressed into it. We decorate all the balls in this way.
- We cut the bamboo skewers into pieces of the required length plus 1.0 cm on each side for fastening:
- 6.3 cm for Mercury;
- 10.2 cm for Venus;
- 12.7 cm for Earth;
- 15.2 cm for Mars;
- 17.8 cm for Jupiter;
- 20.3 cm for Saturn;
- 25.0 cm for Uranus;
- 29.2 cm for Neptune;
- 25.5 cm for Pluto.
If desired, color the skewers black or brown.
We attach the Sun to a piece of cardboard, previously painted dark blue.
We string the planet balls onto skewers and attach them to the Sun.
Using paper and adhesive tape, we make small strips and sign the names of the planets; you can print them on a printer. We fix the resulting miniature signs on pins and stick them into the corresponding planets.
The model made of beads and plasticine is ready!
Video on the topic of the article
Using the video lessons below, you will learn how to make other layout options.