How to draw a turtle with a pencil step by step for children. Great step by step instructions on how to draw a turtle How to draw a sea turtle with a pencil step by step
Hello, young animalists. Today we will find out pencil. Turtles are very ancient reptiles, living for more than 220 million years, and there are marine ones that live in salt water and do not go onto land, and terrestrial ones: land and freshwater. All of them have the main distinguishing feature in their structure - this is the shell. They come in a variety of sizes. Marine species are usually larger than their land and freshwater relatives. The largest turtle is the leatherback. Its body weight is more than 900 kg, and its shell length is 2 m. The fact that the animal is slow is an absurd myth. Yes, the land turtle has a heavy shell and its movement speed is not great. But marine and freshwater ones are quite nimble. The speed of a sea turtle can reach 35 km/h. So don't believe the rumors. So, let's start drawing.
How to draw a turtle with a pencil step by step
Step one. On the left side of the sheet we will draw a large horizontal oval - the future head. Below, closely, we will place a figure similar to a semicircle.  Step two. Now, using two curved lines emanating from one point, we will connect the shell and the head of our turtle. On top of the oval - let's draw a figure: it feels like there is a circle hidden behind the oval.
  Step three. Let's draw three legs: two larger, one smaller. We don't see the fourth one. The animal’s body peeks out from under the shell: let’s draw a line. Let's draw a sharp small tail.
  Step four. This is perhaps the most difficult step. You'll have to take a closer look to find out if it's similar to the real thing. Let's be patient and put an eraser nearby just in case. Our cute and playful turtle has two large eyes.
  We see only one, it is located at the top of the face. Above it is a fold of skin. Therefore, it is as if we are starting to draw a circle above the eye, but, resting on the oval of the face, we finish the line. Exactly the same fold above the other eye, it peeks out from behind the head. And then we’ll draw a small corner of the second cheek next to it. Two long curved lines on the oval will show us the nose. Let's add a dot a little lower. And below is a wide smile. A couple of dashes and folds on the neck will add liveliness to our image. Step five. Now we take a soft pencil in our hands and trace the outline of the drawing. Carefully erase the auxiliary lines with an eraser.
  Well, now you will know... True, there are such things in cartoons, but you can also try. Good luck in your future drawing activities. I also recommend watching the lessons.
The list of four celestial animals in Shen Shui includes the turtle. It is considered a symbol of longevity and success, which is why every home should have an amulet or drawing of a turtle. In this article we will look at how to draw a turtle step by step.
You should start working with an image of the shell. To do this, draw a semicircle. If it’s difficult to do this yourself, use a template or outline the cup. Start drawing the head and paws. Apply a characteristic relief in the form of diamonds to the shell. Don't forget the tail, eyes and mouth. Do all the work with a pencil, then color the animal. There are several ways to draw this reptile. The shell does not have to be depicted as a semicircle. Try drawing an animal from ovals. Draw the largest oval, and a smaller one on the left side. This will be the shell and the head. Draw paws under the large oval. Connect the head and shell with smooth lines. The base is ready, proceed to detailing the drawing. Draw the claws, eyes and mouth, don’t forget the tail. The shell can be drawn by applying small circles to the base.

After today's lesson you will learn how to easily draw a turtle. Here's a special video. After watching it, you will learn how to create a drawing of such a cute turtle.
In addition to the video tutorial, I have selected several step-by-step instructions that will help you understand how to draw a turtle. Shall we begin?
How to draw a funny turtle with a pencil step by step
First draw a small oval - this is the head of a turtle. Below, draw the shell in the form of a figure resembling a semicircle.
Now you need to combine the head and shell of the turtle by drawing two curved lines from one point. Draw a semicircle shape on top.

Draw three legs (we don't see the fourth). Draw a line under the shell - this is the body of the animal. And one more important detail - a small sharp tail.

And now the most difficult thing is to draw the turtle’s eyes, or rather only one eye, because the other is not visible. You need to add folds above the eyes, and at the left eye you also need to add a corner of the cheek. Using two long curved lines draw a nose. Place a dot closer to the bottom edge, and draw a wide smile even lower. And to make our turtle drawing look more realistic, we need to add a few folds to the neck.

We are approaching the finish line - erase the extra lines and draw the contours.

I am delighted! Did you like it?

This is interesting! Did you know that turtles can live over 100 years? You can find out about age by counting the rings on the scutes that make up the turtle's shell. These animals also know how to remember people’s faces. They stretch their necks if you speak kind words to them, and if you speak rudely, they hide in their shell.
How to draw a cartoon turtle
On the left side of the paper, draw something similar to an oval. Add a line at the bottom - this is the turtle's mouth.

Now draw another oval, which will be larger than the previous one. Closer to the bottom edge, draw two wavy lines - the border between the shell and the body of the turtle.

A little more - and the drawing of the turtle will be ready. Draw the turtle's legs.


Now all that remains is to draw the eye and tail of the turtle.

Color the picture.

How to draw a sea turtle
Draw these two ovals - the head and body of the turtle.

Draw the contours of the head and complete the details: eyes, mouth and put a small dot - the turtle’s nose.


Now draw the contours of the body and draw transverse stripes on it.

It's time to draw the turtle's flippers. Yes, yes, in marine species of these animals, the limbs have turned into flippers, of which the hind ones are smaller than the front ones. These are the kind of flippers you need to draw.


Erase the extra lines and color the drawing.


How to draw a turtle using lines
Finally, I have prepared for you this simple drawing of a turtle. I am sure that you will easily be able to draw such an animal even without explanations.
The turtle is an interesting and mysterious creature. And the sea turtle is doubly mysterious. She has an unusual body shape compared to other representatives of this species, making her more fun to draw, but no less difficult. It is more difficult to depict the unusual shell of this type of turtle, and the relief pattern will also not be easy.
In addition, the skin of such a reptile has many wrinkles and folds, which also need to be shown in the drawing. Such turtles are most often drawn with an ordinary pencil, since this makes it much easier to create shadows on the shell and draw wrinkles on the turtle’s body.
That is why today we will draw a sea turtle step by step with a simple pencil. And in this lesson you will learn how to draw yourself, and you can always buy a painting with a beautiful landscape on this site.
So let's get started!
Stage one - draw the outline of the shell.
We will start our drawing with an image of the outline of the shell. To do this, you need to draw a small oval, slightly extending to the lower left corner. Divide it in half with a straight line, it should be smooth and located exactly in the center. After all, the success of any drawing depends on the initial proportional sketches.
Stage two - draw the paws
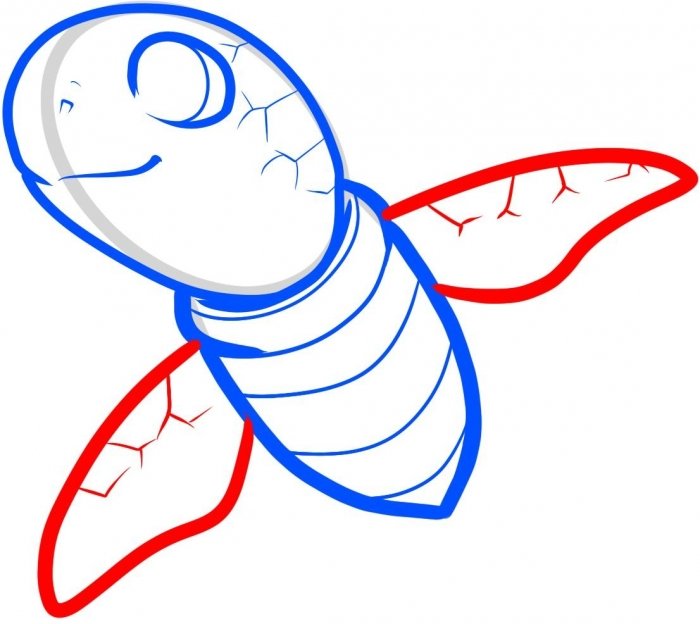
Now it's the paws' turn. They are not at all like the paws of an ordinary turtle. In appearance, they are more like fins or flippers, so we will draw the paws in the form of triangles extended forward. They should be positioned so that they “mirror” each other on both sides.
Stage three - draw the turtle's head
Now let’s draw the turtle’s heads in the form of a small oval. And you should remember about the small tail in the form of a miniature triangle right in the center of the line drawn on the shell.
Stage four - decorating the shell
Here you should pay attention to the shell. Inside the oval, which plays its role, we will draw another line, repeating the contour of the original oval. Immediately connect the head to the body using the neck, draw one eye.
Stage five - finishing the fins
Now we will draw the details of our drawing. First of all, let's change the contour of the fins, making them smoother than they looked before.
Stage six - finish the shell.
Now it's time to draw the shell. Our line placed in the center of the shell will help us here. All segments should be drawn as symmetrically as possible. Their size, shape and quantity can be depicted at your discretion.
Stage seven - finishing the details
In order to achieve maximum realism, you need to pay attention to detail. Let's say you can draw small specks on the paws and head, thus creating rough skin.
Stage eight - outline the outline

 Now trace the outlines of all the parts again. Erase unnecessary lines and blots with an eraser. Darken the segments on the shell again. At this stage, the drawing can be considered complete. Our turtle turned out just like a real one, and the simple gray color of a simple pencil only adds to the unusualness.
Turtles are unusual animals; they differ from others in their strong shell-house, which has a beautiful, relief pattern. It is not easy to portray this animal. But we have selected for you the most interesting and simple instructions that will help you understand how to draw a turtle with a pencil step by step for children.
Example of a drawing for children
Painting with a sea turtle
We have already learned how to draw turtles with pencils and markers step by step, now it’s time to move on to working with paints.
In our work we will use:
- gouache;
- brushes of different sizes;
- paper;
- water;
- palette;
- scotch.
Let's move on to the creative process:
- To prevent the paper from sliding on the working surface while drawing, secure it with tape. We dilute the blue color heavily with water. Using this color and a thin brush we will make markings. By the way, it can be done with a simple pencil.

- Approximately in the center of the sheet we outline the approximate position of the shell. Initially, its silhouette looks like an eye or a grain.
- On the right side we draw the neck and rounded head. These two parts should be approximately half the length of the shell.
- Now let's note the part in which this turtle differs from ordinary ones. This animal has fins. We draw them using curved lines, the ends of the fins should be rounded and tapered. Add the turtle's hind legs. The marking is ready.

- Now we will do the underpainting. Use a large brush and mix white and blue gouache. We will cover the water around the turtle. Use gentle strokes to completely paint over the background.
- Mix white, green and blue paint. Use the resulting shade to paint the turtle's shell. You need to make a dense layer. Add blue and black to the color used. This shade should be used to cover the remaining parts of the turtle.
- Let's move on to working with the middle brush. Let's start decorating the water around the turtle. Mix blue, green and a little white. We begin to mark the shadow areas using simple strokes. They need to be scattered throughout the sheet.
There is no need to draw any specific figures; everything should be applied randomly so that the emphasis remains on the turtle.
- Add more white to the color used. We add new light ones to the strokes made earlier. Be sure to make smooth transitions.
Add white again and continue to paint strokes on the background. Add white until the blue tint is completely gone from the paint. We are working on the background, we can depict corals. - We will continue to display corals in red. They can be drawn using small strokes throughout the background, as shown in the sample.
 Add white to the paint and draw in the light areas. Thus, you can decorate the seabed with both green and yellow paint.
 - Let's start drawing the sea turtle. Mix blue with green and draw cells of different shapes on the shell. Add white and yellow to the color. It should be a light shade.
We begin to mark the shadow areas. We make strokes inside each cell. We add even more yellow and use a bright color to make the final touches in the cells. - Add white to the yellow color and highlight the outlines of the cells on the shell. Create shadows and highlights with a thin brush and dark green color.
 Using the same color, use dot painting to decorate the fins, back of the turtle and head. Decorate the neck with dots and brown paint. Draw the eye.
 - To make the animal look natural, add a drop of green to the white color. Draw the outlines of the dots on the fins and head.
Ready. We got a real abstract painting with a sea turtle. If you decide to study the underwater inhabitants in detail, we suggest you find out how